Creators – Covering the Basics

PhysicsTest

We’ve been busy the last two weeks covering the basics of Unity. Among the topics we’ve touched on are:

  • Customising the Unity layout
  • Explaining what the main Unity windows (Scene, Game, Hierarchy, Project and Inspector) are each for
  • Talked about 3D space and vectors and talked about the difference between local and global axes (child objects)
  • Shown how to place objects in the scene and how to position, rotate and scale them
  • Shown how to “fly” around the scene view
  • Explained how the physics engine works (Physics clock monitoring and moving rigidbodies and tracking collisions and other interactions)
  • Built a simple physics-based scene which had a ball fall, hit a ramp and roll into a bunch of stacked block
  • Wrote a script to have the camera follow the ball as it moves


Additionally Mike kindly filled in and talked about the basics of object oriented programming, classes and class diagrams. There is a post from last year that covers this well for those who’d like to read it.

Additionally, the basics of the C# language that we discussed are covered in both that post which we have already linked to above and another which can be found here. The topics we touched on were:

  • Curly braces as “containers” and the requirement that they occur in pairs.
  • How semicolons (;) mark the end of statements
  • Using directives and namespaces.
  • A basic class declaration
  • Properties, both public and private
  • Methods, both public and private
  • How Unity automatically calls certain methods at certain times, and some specific examples of this:
    • Start() called when we start the game
    • Update() called every time the scene is drawn


The up-to-date project file can be found here. Please note it will require Unity 4.5.1 or later.

Hackers – tips for safely using a 3D printer

We were very pleased this week to be able to let the first members of the Hackers group take home 3D printers for the week to experiment with them. We will continue to do this in the coming weeks.

Here are some guidelines on safely using a 3D printer, prepared again by Kevin from Boston Scientific:

3d-printer-operating-guidlines (PDF)

Next time, we will take a closer look at building models in a 3D modelling package.

Bodgers – Getting Started With Robots

We are still having network difficulties with WiFi on our Raspberry Pi3s but I will work on finding a solution or a work around during the week.

We managed to connect to two of our robots and we wrote a simple hello world script and a script to control our robots. When we use Python and the Gpio Zero module all it takes to control a wheeled robot like ours is 9 different lines of code these are:

  1. from time import sleep – this will allow us to call the sleep function later in the code.
  2. from gpiozero import Robot – this will allow us to call all the robot functions from Gpio Zero.
  3. robot = Robot(left=(22,23),right=(24,25)) – this is the most complicated line in our code, all it does is assign which gpio pins will be used to control our robot. This will become much clearer when we start to build simpler circuits later in the year.
  4. robot.forward() – this function drives all our motors forward.
  5. robot.backward() – this function drives all our motors backward.
  6. robot.left() – this function drives the motors on the right forward and the motors on the left backward.
  7. robot.right() – this function drives the motors on the left forward and the motors on the right backward.
  8. sleep() – this function pauses the program.
  9.  robot.stop() – this function stops the motors.

If we want to drive our robot forward for five seconds we would use the following code

  1. from time import sleep
  2. from gpiozero import Robot
  3. robot = Robot(left=(22,23),right=(24,25))
  4. robot.forward()
  5. sleep(5)
  6. robot.stop()

We had a brainstorming session about what we might do for our projects and we came up with some great ideas which we talk more about on Saturday. My slides from Saturday are  here robot-intro.

Explorers – Building on our first game

Hi everyone,

Great to see you all there on Saturday. This weeks starting point was our game from last week. We wanted to add extra functionality. We added code to the Snowflake so that something happened when the Penguin touched it. Most people added some sound.

sensing

We also made our first variable. We did this so that we could keep track of our score. Using this score we also could add code to make something happen when you reached a certain score and win the game. Again here we added a sound and switched backgrounds.

variable

We learned and used a lot of new code this week and we will see over the coming weeks how we can incorporate it into many different types of games.

Why don’t you try using all the code you have learned so far to create your own game.

yourgame

See you all next week!

Here are the notes from todays session in PDF cda-s5-week_03-firstgame-part2.pdf

Hackers – Getting started with 3D printers

3dprinter

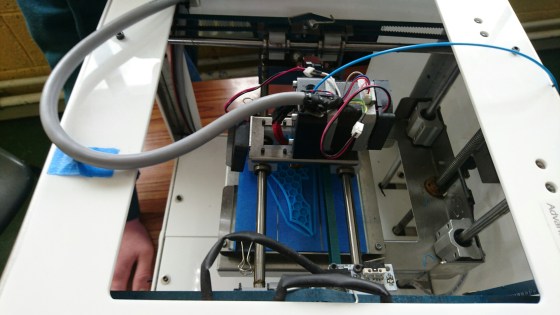
At the Hackers group, we started learning how to use 3D printers this week. 3D printers are a fantastic technology for turning 3D computer models into physical objects. They are also impressively inexpensive, with the Arduino-based Materia 101 printer that we are using costing about €600.

Thanks a million to Kevin Madden who joined the group to show us how to use 3D printers. Thanks also to his employer, Boston Scientific, who have loaned three 3D printers to us and are also covering the cost of the plastic “ink” used in them. Thanks also to Kevin’s colleague Cathal Egan of Boston Scientific, who initially offered the printers to us.

Here are Kevin’s notes on how to set up a 3D printer: 3d-printer-setup (PDF)

Here are the configuration files needed: https://www.dropbox.com/s/6otj5ok7i00ikds/Slic3r-Materia101-Settings.zip?dl=0

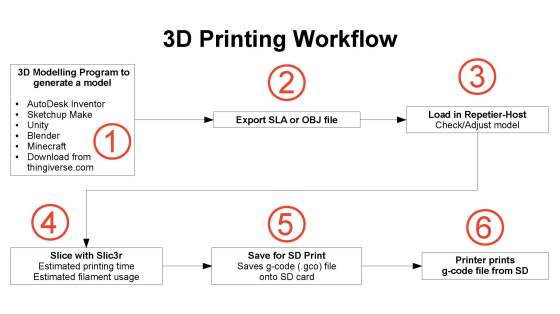
And here also is a diagram Kevin prepared, showing the 3D printing workflow:

3d-printing-workflow

At our next session, we will look at how to do some 3D modelling to create objects we can print. Should be fun!

Explorers – Writing Commands to move sprites

Hi everyone,

We had a great crowd for our first session in our Explorers group. A big welcome to all our new Ninja’s and of course a special welcome back to our younger Ninja’s from last year, who are still with us.

Thank you all for coming and for your patience while we got everyone sorted out with downloading Scratch 2.

We started today with our first game, as well as learning how to write commands to move our sprites, we took a brief look at the interface for Scratch 2.

sprites

We also took a first look at some fundamental concepts that we will be using throughout the year. Today we looked at the X and Y axis as well as the number of degrees in a circle.

axixdegrees


Here are the presentation slides from the day, in PDF format: cda-s6-week_02-firstgame.pdf

I hope you all enjoyed today and hope to see you all again over the next couple of weeks!


Martha

Welcome to the 2016-17 Season at CoderDojo Athenry!

coderdojoathenry-infosession-2016-sept

We had a great first day back at CoderDojo Athenry on 17 September 2016, with about 205 young people and their parents attending the first day.

In case you missed the session, you can review the introduction notes here:
1-coderdojoathenry-infosession-2016-sept (PDF)

This year, we have renamed our groups:
  1. Explorers, led by Martha, was formerly the Scratch Beginners group, as well as Scratch, it will include graphics packages and stop-motion animation — overview notes here: 4-explorers-wk1_information-session (PDF)
  2. Advancers, led by Mark and Oliver, was formerly the Scratch Advanced group, and will feature more advanced projects Scratch and packages such as GameMaker — overview notes here: 5-advancers-coderdojoathenry-kickoff-sept2016 (PDF)
  3. Bodgers, led by Declan, was formerly the Raspberry Pi group and will involve hardware and electronics projects — overview notes here: 6-bodgers-coderdojoathenry-info-sept2016 (PDF)
  4. Creators, led by Kieran, was formerly the Unity group and will involve 3D game development in Unity, complemented by 3D modelling and sound effects — overview notes here: 7-creators-coderdojoathenry-kickoff-sept2016 (PDF)
  5. Hackers, led by Michael, is a new group, and is a hacker space for CoderDojo Athenry, with more in-depth projects building on technologies learned in other groups, as well as new ones — overview notes here: 8-hackers-coderdojoathenry-infosessoin-2016 (PDF)

We encourage people to work through the groups in the order listed above. Creators and Hackers are aimed at young people in secondary school.

For the Bodgers group, Declan has also posted additional notes about getting started: Bodgers-Setting up our laptops.

See you all next week!

Bodgers-Setting up our laptops

We returned today after the break with a new name for our group, the Urban Dictionary defines a Bodger as:

1. Anyone who creates objects (machines, vehicles, buildings , etc.) from a mishmash of found or improvised materials.
2. An expert in bodging.
3. An unorthodox hobbyist or artist whose body of work has been cobbled together from garbage or materials used in ways that deviate from their intended purpose.

Every bodger knows that PVC pipe and duct tape are two most important resources on Earth.
You can commonly find bodgers in their natural habitat: hardware stores, dumpsters, and junkyards.

Some of us got a chance to install the software we will need over the next few week but some of us didn’t get a chance to. I have a few slides with instructions for installation here.download-installation-instructions

I’m really looking forward to doing cool stuff with cool Bodgers over the next year.

Congratulations CoderDojo Athenry Members at Coolest Projects 2016!

Congratulations to everybody from CoderDojo Athenry who participated in the CoderDojo Coolest Projects on 18 June 2016.

12 children from CoderDojo Athenry presented their group or individual projects at Coolest Projects in the RDS Dublin – this is the annual competition organised by CoderDojo, and had over 700 projects from Ireland and internationally.

We are very proud of everybody who participated, including 5 of them who won prizes: Shane won top prize in the Hardware category for his Flood Gauge project, Roy won a runner-up prize in the Games category for his Pretendo arcade game project, and Ruaidhri, Luke and Oisin won a runner-up prize in the Games category their Broken Island game written in Unity.