This week we were joined by some additional ninjas, welcome! We had to do a little revision of the first week’s content and probably didn’t manage to get quite a much done as I’d hoped.
Let’s review what we did manage to get done.
Embed a simple script in a web-page
The first thing we did was to create our folders for this week and then create a brand new HTML file called index.html. We then embedded a simple script in our html file using the tag, like this:
window.alarm("I'm alarmed");
When we opened our page in Chrome, our message popped up as an alert.
Seperate that script into its own file
We then created a new file in our folder called script.js. We cut out everything from in between our and tags and pasted it into this new file:
window.alarm("I'm alarmed");
and in our HTML file we gave the tag the name of this file instead, using the src= attribute (short for “source”) :
Our script continued to work as before, as we’d hoped.
The advantage of moving scripts into their own files is that as we get more scripts and these scripts get more complex, keeping them all within the HTML file gets messy and difficult to work with.
Developer Tools
The developer tools build into Chrome, and some other browsers, help us see what is happening with our pages and scripts and helps us to fix them when they’re not working correctly.
To open the developer tools, open the menu in Chrome (the three dots in the upper-right of the program) and select More Tools | Developer Tools.
The console, part of the developer tools, is a place for us, as programmers, to write out things that will help us check if our script is doing what we want it to do. Ordinary users never see what developers write to the console.
To write to the console, we changed our script.js to read:
console.log("I'm alarmed");
The message box stopped appearing and this message could only be seen by looking at the console.
Basic Script Concepts
The most important basic concept in programming is that of a variable. A variable is just a place to store something and a name to refer to it by. We can make a new variable, in this case called a, like this:
let a;
The first word, let, is known as a keyword and tells JavaScript “we’re going to make a new variable”. The name of the variable, in this case a, comes next and finally a semi-colon (;) to show that this line is finished. The semi-colon is how we mark the end of a command in JavaScript and it’s an easy thing to forget.
We quickly made this example more complex:
let a = 4;
let b = 5;
let c = a + b;

console.log("c");
console.log(c);
In this extended example we defined three variables called a, b, and c respectively. Not only do we define them, we also assign them a value (using the operator =) at the same time. The first two are just given a simple value, but c has a value calculated from adding a and b together.
The two console.log() line are to show the difference between actually writing the letter c to the console (as in the first line) and writing the value of the variable called c to the console (as in the second line).
Strings
Strings are how we hold a piece of text in a program. Strings are surrounded by quotations marks:
"This is a string"
I didn’t mention the last day, although I mean to, that JavaScript also allows strings with single quotes, which many other programming languages do not:
'This is also a string'
We experimented with changing our script so that instead of numbers we set our variable to strings:
let a = "4";
let b = "5";
let c = a + b;

console.log("c");
console.log(c);
and in the console saw the perhaps surprising result:
c
45
We determined that when we have two number variables the operator + does normal addition but when one or both are strings it makes a new string with the two stuck together (this is often called “concatenation”).
We introduced the following four mathematical operators:
- + : Plus does addition
- – : Minus does subtraction
- * : Asterix does multiplication
- / : Forward-slash does division (don’t confuse with back-slash \)
Conditions
We looked at a simple condition. This allows us to choose between two options based on whether a check was true or not:
if (c < 1){
  console.log("c is less than one")
}
else {
  console.log("c is greater than one")
}
The keyword if starts this check. The thing we’re testing is then inside roundy brackets (). Here we’re checking “is c less than one?”. After this we get a block of code (contained in the curly brackets {}) to do if it is true. Here we’ve also added (which is optional, you don’t have to have this if you don’t need it) the keyword else and another block of code to do if it is not true.
Basic Functions
Functions perform an action. They contain a bunch of commands to run together.
They’re great where we’re doing the same thing repeatedly but from different places and they help to logically break-up and organise our scripts.
Here’s a basic function that just writes to the console:
function SayHi(){
  console.log("Hi");
}
The keyword function indicates that we’re going to define a function. Next comes the function name, SayHi in this case, followed by roundy brackets (), followed by a block of code surrounded by curly brackets {}. Inside the curly brackets are the commands that make up this function.
To make this function actually run we need this in our script:
SayHi();
Without this the function would never run. Functions only run when we “call” them.
Function Arguments
Sometimes it’s nice to be able to give a function more information about what we want to do. A function can take several values as input, these are called arguments.
Let’s imagine we don’t want our function to log the same thing to the console every time. We want to tell it what to write. Let’s see what that looks like:
function MyFunction(what){
  console.log(what);
}

MyFunction("Testing the function");
Here our function is defined as before, but we have a name, what, inside the roundy brackets. Firstly, this means that when you call the function, you’re expected to provide a value. Secontly, inside MyFunction(), we have a new variable, here called what, containing the supplied value and usable like any normal variable.
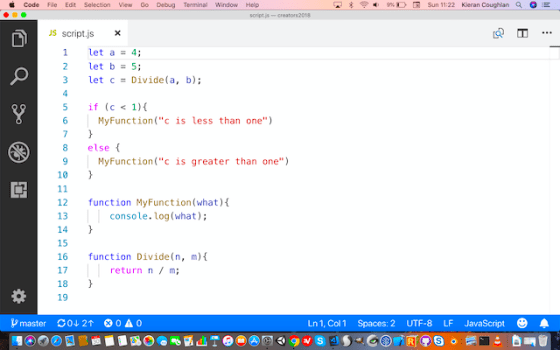
Finally here’s a more complex example with two arguments:
function Divide(m, n){
  return m / n;
}
There’s a new keyword here, return. This means “send back this value to the place that called me”. Let’s see how we might use it:
let a = 4;
let b = 5;
let c = Divide(a, b);
The third line here both calls the Divide() function and stores the value sent back.
P5.js
We had the briefest of introductions to P5.js and a flying visit to the new P5.js web editor. We’ll follow up properly on these next week.
Download
Files from this week can be found on our GitHub page.