This week we worked on random pin placement for our game. We updated the existing PinManager component to randomly (as opposed to regularly) place a number of pins into the scene.
Arrays
An array is a way for a variable to hold more than one value. It’s a a very useful concept in programming; complex programs would be practically impossible without them. In C# arrays are declared as follows:
The first line creates a one-dimensional array called nums which has four entries: nums[0], nums[1], nums[2] and nums[3].
The second line creates a two-dimensional array called grid. Note the size in this case depends on the values of the variables rows and cols. The first entry is grid[0,0] and the last is grid[rows – 1, cols – 1]. The total number of locations in this array is rows * cols.
This week we worked on getting input from the user and making the game react to it.
InputManager
Unity has a build in system for handling user input. The InputManager can be found under the Edit|Project Settings|Input menu:
The Unity input system is based on the concept of “axes”. The game request if there is input on a specific axis, giving the axis name. What that means in terms of button presses, mouse or controller input depends on the settings in the InputManager. Axes have a value that ranges from -1.0f (full negative, if negative values are allowed) through 0.0f (no input) to 1.0f (full positive).
Pre-defined Input Axes
While the game programmer can define as many input axes themselves as they like, Unity come with many common ones built-in. The first two shown above, called “Horizontal” and “Vertical” are commonly used for movement. The third “Fire1” is usually used for shooting.
We redefined “Fire1” from it’s default key (Left Ctrl) to bind it to the space key instead.
Updating the Code to Detect “Fire1”
We originally had a force applied to our ball in the “PushSphere” script as soon as the game started. We modified the code so that in the Start() method all we did was to retrieve and store the Rigidbody component. In the Update() method (called every time the game draws) we ask if there’s been any input on “Fire1” and only if there has, do we apply a force to the ball:
using UnityEngine;using System.Collections;publicclassPushSphere:MonoBehaviour{publicfloatPushStrength=1.0f;privateRigidbodyrb;//Usethisfor initializationvoidStart(){rb=GetComponent<Rigidbody>();}//Updateiscalledonceper framevoidUpdate(){floatfire=Input.GetAxis("Fire1");if(fire>0.0f){rb.AddForce(Vector3.back*PushStrength);}}}
Before proceeding, we ran our game and tested to ensure it was working correctly.
Moving Our Aimer
The aimer was rotated using input from the horizontal axis. We added a script called AimerController to our Aimer game object. A public property called RotateSpeed gives us a way to tune the speed our our aimer. We don’t need anything in the Start() method, and it’s been removed here for clarity. The Update() method looks for input on the “Horizontal” axis (which maps to the left and right keys) and applies a rotation to the Aimer’s transform using the following logic:
amount to rotate = speed of rotation * user input * time
User input here will either be -1.0f, 0.0f or 0.0f. This equates to rotate in a negative direction (anti-clockwise), don’t rotate or rotate in a positive direction (clockwise).
using UnityEngine;using System.Collections;publicclassAimerController:MonoBehaviour{publicfloatRotateSpeed=1.0f;//UpdateiscalledonceperframevoidUpdate(){floathoriz=Input.GetAxis("Horizontal");transform.RotateAround(transform.position,Vector3.up,RotateSpeed*horiz*Time.deltaTime);}}
Note that we’re rotating about the vertical axis and the rotation is centred around the aimer’s position.
Linking the Aimer and the Sphere’s Direction of Fire
To link the aimer’s with the sphere’s direction of fire, we needed to provide the sphere with a new public property which could store a reference to the Aimer’s game object:
publicGameObjectAimer;
We then simply had to update the AddForce call, in the Update() method, to take the aimer’s direction into account:
Note that we had to also multiply by -1.0f as the ball was initially going opposite to the direction we wanted.
Prefabs
Prefabs are objects, or collections of objects that we want to re-use multiple times. To create a prefab, all we need to do is to drag an object from the Hierarchy to a project folder. We made a prefab of our pin by doing this. Note that prefabs show up blue in the hierarchy to mark them out. When the prefab is changed, all copies of it in the hierarchy are updated as well.
Automatic Creation of Game Objects at Run-Time
Once we created our pin prefab, we worked on adding pins automatically into the game a run-time.
We added a new empty game object and named it PinManager, we then added a component to it of the same name. This script was given a public property, of type GameObject, to store a reference to the prefab. In the Start() method, we use two loops to place nine pins automatically into the scene, using the Instantiate() method:
using UnityEngine;using System.Collections;publicclassPinManager:MonoBehaviour{publicGameObjectPinPrefab;//Usethisfor initializationvoidStart(){for(intx=-1;x<=1;x++){for(intz=-2;z<=0;z++){Vector3pos=newVector3(x*2,0.5f,z*2);Instantiate(PinPrefab,pos,Quaternion.identity);}}}}
Note that there are several versions of the Instantiate() method. The version we’re using allows us to specify the position and rotation of the newly created object. A Quaternion is variable type that can store a rotation. Quaternion.identity simply means “no rotation”.
Testing
Project File
The latest project files can be downloaded from here.
This week we started our first game in earnest. Let’s talk about the design and the steps we took to begin implementing it.
Game Design
The game involves a simple play area with pins. The players tries to knock down the pins by controlling the direction and force at which the ball is projected. The number of pins knocked constitutes the score. The game shares element of classic games such as pinball, bowling and skittles, to name a few.
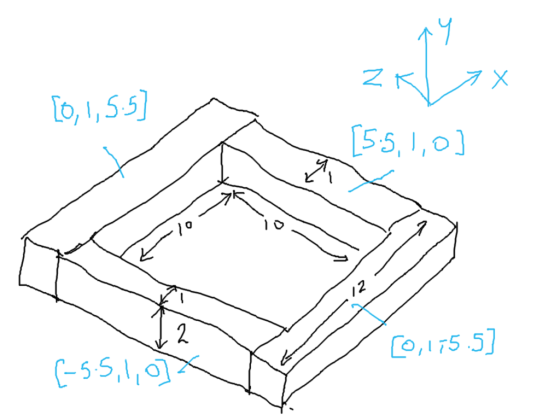
Setting up the play area
To establish the play area, we used a plane (for the ground) and four cubes stretched to size to provide the walls:
Because we don’t want gaps in our walls, we’ve been careful to be precise with the positions of everything.
Applying a Force to our Sphere
We added a sphere to our scene and made sure that it had a RigidBody body component. The RigidBody component makes it so that the physic engine takes care of the movement of the sphere.
To test adding a force to the sphere we added a temporary script to the sphere and had it add a force to the RigidBody as soon as the game starts.
Immediately it was clear that the force was too weak, so we added a property to the script which allowed us to scale the force. In testing 1000 proved to be a good value. Here is the script:
using UnityEngine;using System.Collections;publicclassPushSphere:MonoBehaviour{publicfloatPushStrength=1.0f;//Usethisfor initializationvoidStart(){Rigidbodyrb;rb=GetComponent<Rigidbody>();rb.AddForce(Vector3.back*PushStrength);}//Updateiscalledonceper framevoidUpdate(){}}
We also experimented with creating a physic material and assigning it to the sphere. Different levels of friction and bounciness give different behaviours.
Testing With a Single Pin
To test the sphere colliding with a pin we added a single cylinder to the scene. Like the sphere, we made sure it had a RigidBody component attached to it. When the game started the ball shot forward and knocked the pin, as we’d hoped.
Aimer
To aim our sphere and control the strength of our shot, we created an aimer. The aimer is composed of an empty object containing two cylinders, one pointing forwards and one pointing crossways.
We didn’t want the aimer cylinders interacting with anything so we made sure to remove the colliders from the cylinders.
We also wanted the aimer to be partially transparent so we created a new material, setting the Rendering Mode to “Transparent”, choosing a colour from the Albedo colour picker and setting the Alpha value to a value less than 255.
Project
Updated project files for this week’s project can be found here. This requires Unity Version 5.4.1f1 or later.
We’ve been busy the last two weeks covering the basics of Unity. Among the topics we’ve touched on are:
Customising the Unity layout
Explaining what the main Unity windows (Scene, Game, Hierarchy, Project and Inspector) are each for
Talked about 3D space and vectors and talked about the difference between local and global axes (child objects)
Shown how to place objects in the scene and how to position, rotate and scale them
Shown how to “fly” around the scene view
Explained how the physics engine works (Physics clock monitoring and moving rigidbodies and tracking collisions and other interactions)
Built a simple physics-based scene which had a ball fall, hit a ramp and roll into a bunch of stacked block
Wrote a script to have the camera follow the ball as it moves
Additionally Mike kindly filled in and talked about the basics of object oriented programming, classes and class diagrams. There is a post from last year that covers this well for those who’d like to read it.
Additionally, the basics of the C# language that we discussed are covered in both that post which we have already linked to above and another which can be found here. The topics we touched on were:
Curly braces as “containers” and the requirement that they occur in pairs.
How semicolons (;) mark the end of statements
Using directives and namespaces.
A basic class declaration
Properties, both public and private
Methods, both public and private
How Unity automatically calls certain methods at certain times, and some specific examples of this:
Start() called when we start the game
Update() called every time the scene is drawn
The up-to-date project file can be found here. Please note it will require Unity 4.5.1 or later.
One of our ninjas was looking for a basic inventory system that he could use, so we knocked up something very quickly.
It’s all based on the standard .NET Dictionary class, documented here.
Dictionary allows us to store keys and associated values. In our specific case, our key is a string (the name of the item) and the value is an int (the count of items of that type).
This is all implemented in a script called InventoryManger.cs which is attached to an empty game object, also called InventoryManagement, for convenience. The InventoryManager class provides the following public methods:
void AddItem(string name)
This takes an item name. It looks to see if there’s an item of this name already in the inventory. If there is, it increases the count by one. If not, it adds it with a count of one. This cannot fail, so it doesn’t return anything.
bool RemoveItem(string name)
This takes an item name. It looks to see if there’s an item of this name in the inventory and that its count is greater than zero; it’s possible that it’s listed there, but the count is zero. If there is, it decreases the count by one and returns true. If not, it returns false. The true/false return value allows us to test, when calling this method, if it succeeded, if that’s important to us.
int GetCount(string name)
This takes an item name. It looks to see if there’s an item of this name in the inventory. If so, it returns its count. If not, it returns zero.
So that allows us to add, remove and track an arbitrary number of items with very little effort.
The sample project also has a few other scripts. The intention is that the player picks up objects by moving over them. Pickup objects are tagged “PickUp”. The HandlePickup.cs script is added to the FPSController to detect moving over a pickup. Pickups have a PickupDetails.cs script attached. This automatically tags them “PickUp” and contains the items name (to use in the inventory). The project also has a FruitStealer.cs which removes one banana from your inventory every time you pass through its gate. It’s just there to show the RemoveItem method in action.
Other small things of note about this project: the “bananas” and “apples” are animated, as is the UI-text containing the text “Fruit Stealer”. The material used for the Fruit Stealer is transparent.