Bodgers – A Look Back At 2020/2021

Hello everyone,

I would like to thank all the Bodgers who joined me this year. I really enjoyed the sessions and I’m really grateful to you all for your attention, patience and your willingness to help me and each other out.

It’s a pity we couldn’t get together for even one session but hopefully when CoderDojo Athenry gets back to in person sessions I can meet you all then. I would also like to invite you all to our first post-COVID pizza party (hopefully before Christmas).

I have put together a video of the games we made this year.

Special thanks to everyone who created levels for our Red Runner game. You can find a copy of the code and images for this game on Dropbox here: https://www.dropbox.com/sh/sj6hil242d3fxmk/AAAHPnEVjw5IGWqs_G3eTXkDa?dl=0.

Thanks also to Kevin who helped us get up and running.

Enjoy the summer and hopefully I’ll see you in the autumn.

Declan

Modelers – Build and Rig a Basic Humanoid Character – Week 15

This week we continued with our super-simple rigged humanoid character. We texture painted the character, animated them, added a rigged camera and finally rendered everything to video.

Here are the video instructions:

Here’s a link to the folder where we store all our files . You’ll find a new file in there called humanoid_wip2.blend, containing everything we did this week.

Modelers – Build and Rig a Basic Humanoid Character – Week 14

This week we build a super-simple humanoid character mesh using metaballs, a new modelling technique. We then rigged the character for animation with a simple armature.

Here are the video instructions:

Here’s a link to the folder where we store all our files . You’ll find a new file in there called humanoid_wip.blend, containing everything we did this week.

As an aside, my wife and I were playing with this character. Here’s what we did:

  1. Exported the mesh as an FBX (Select the mesh, File|Export|FBX and choose “export selected”)
  2. Loaded that FBX file into Mixamo.com
  3. In Mixamo, identified the key parts of the body and allowed it to process
  4. Attached a breakdancer mo-cap to the model
  5. Exported it again from Mixamo
  6. Imported it back into Blender (File|Import|FBX)
  7. Added some props (a hat and glasses) and made sure to add them to the head vertex group
  8. Texture painted the character
  9. Added some basic props, a ground, some cardboard and graffiti walls
  10. Animated the camera a little
  11. Imagined the music in our heads… 🙂

Hopefully you might be encouraged to try something like this yourself!

Advancers – Snake and Magnify Updates

Snake Updates

The Snake project has changed a little bit from Saturday. I had to add another Sprite to get the “touching colour” code to work. So now there are 3 Sprites that move around.

  1. The one that you move around with the Arrow keys.
  2. One that follows 0.2 seconds behind, this one now draws the tail and is not touching the first one.
  3. This one follows 2 seconds behind and erases the tail.

I also changed the first Sprite to Move “2” steps not one, this speeds it up a little. I have uploaded the completed project to the AthenryAdvancers account on http://www.scratch.mit.edu so you can take a look and have a go.

My challenge to you is to beat my high score of 1200

Magnify Updates

I have uploaded a Gravity project with one single Sprite to the AthenryAdvancers account on http://www.scratch.mit.edu.

You can use this Template project to create your own Magnify project, think of an idea and draw out the Sprites you will need on a bit of paper, give the Sprites Names on this bit of paper, it doesn’t have to be a masterpiece, any rough old picture will do.

Then you need to get one Image for each of your Sprites, save them all to the same Folder on your Computer.

Once you have your diagram and all your images you can download a copy of the Magnify Project and save it to the same folder as all the images.

The steps (process) to follow to use this Project are:

  1. Rename the StartSprite to the Level 1 Sprite in your diagram
  2. Update the Variables, for this one you only need to update the MyName variable
  3. Change the Costume by uploading your image for this Sprite, delete the original costume

And then to add More Levels and Sprites use these steps:

  1. Copy the Level 1 Sprite
  2. Update the new Sprites name
  3. Update the new Sprites variables, the MyParent needs to match the MyName of the Sprite from the level above
  4. Update the MyX and MyY variables to where you want this Sprite to appear on the screen, you may have to test a few different places to get it right
  5. Change the Costume by uploading your image for this Sprite, delete the original costume

Don’t forget to Save and Test often.

http://www.scratch.mit.edu

To access the Scratch website use the following details:

Username : athenryadvancers
Password : Advancers
Modelers – Free-for-All Modelling – Week 12

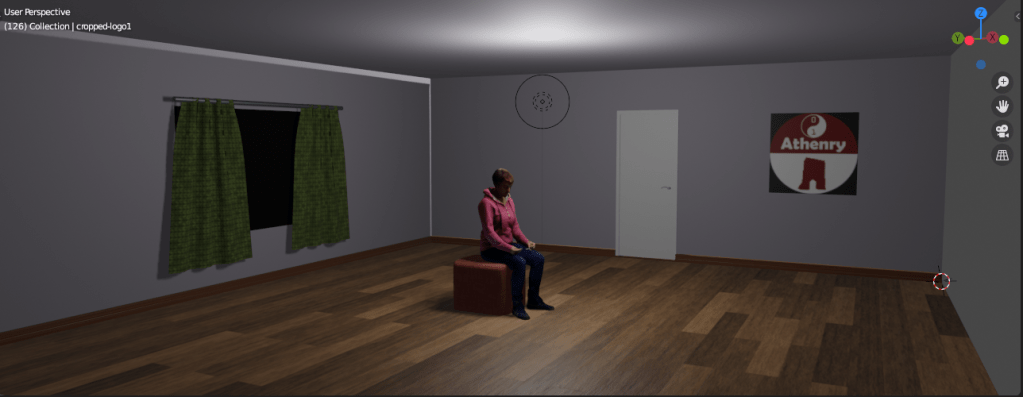
This week we did things differently and had a free-for-all session where we all built items to put into a collectively sitting room. We shared some 3D scanned humans to allow for proper scaling of items in our world. The screenshot below shows “Bettina” sitting on an ottoman in my pretty empty room waiting for everyone else’s creations to arrive. We’ll continue this next week.

Here’s a link to the folder where we store all our files . You’ll find a new file in there called Sitting Room.blend, containing everything I made this week.

Modelers – Coin Pile Part 3 – Week 8

This week we finished our animation by texturing the plane to look like a tabletop and adding a background image of a desert island.

We also saw how to add an add-on to Blender, namely Lily Surface Scraper.

Here are the video instructions:

Here’s a link to the finished animation:

Here’s a link to the folder where we store all our files . You’ll find a new file in there called dubloon_wip3.blend, containing everything we did this week.