Hackers – Programming in Python

CoderDojo-Hackers-IntroToPython

As we plan our AI robot to play Connect-4, we have decided that Python would be a good programming language for the job, as it is widely used for many of the tasks we will need to do:

  • Computer vision
  • Artificial intelligence
  • Hardware control

Therefore, we spent time this week brushing up on Python. Following the same approach that we had used previously to move from Scratch to C, we looked at how we would move from programming in Scratch to Python.

Here is the full set of notes (PDF): CoderDojo-Hackers-IntroToPython

Kevin then spent time explaining how to write a basic Python program to read an image from a webcam. Here is the code:


# We are using OpenCV
import cv2

# Capture webcam image
camera=cv2.VideoCapture(0)
val, img = camera.read()

# Display the image
cv2.imshow("Window display", img)

# Stop using the camera
camera.release

Modellers – Week 15

This week we continued with our tank model.

We created a set of wheels from a cylinder which we then scaled, duplicated and used inset and extrude to provide a little detail on each wheel.

We then created a bezier curve to define the shape of the track across then wheels. Bezier curves are an easy way to defined a smooth shape. They have a number of points through which the curve passes. Each point has a pair of handles. The rotation of these handles defines the angle at which the curve passes through the point. The distance between the handles defines how tightly the curve bends as it approaches the point.

Here are the video instructions for this week:

The updated tank model can be found here.

Explorers Week 4 – Maths Game

Hi everyone,

You all did great work on Saturday, there was some quite complex thinking to be done to figure it out but you did great!

CDA-S5-Challenge_10-Maths game-how to

  1. the player picks a level of difficulty and the computer chooses 2 random numbers to add (subtract or multiply- whichever you choose!) together and show the numbers to the player. Fr this we needed 2 SPRITES and 4 VARIABLES called SCORE, LEVEL, NUMBER1 and NUMBER2 as well as 2 BACKDROPS. CDA-S5-Challenge_10-Maths game-ask questions1CDA-S5-Challenge_10-Maths game-ask questions
  2. The player then has to enter an answer to the equation and the computer tells them whether they are wrong or right. CDA-S5-Challenge_10-Maths game-decisions alternative end
  3. We repeated the ask/answer questions 5 or 10 times. Can you figure out where the REPEAT loop fits?
  4. We also had a second sprite who reacted positively to correct answers BROADCAST and negatively to wrong answers BROADCAST. You can use whatever sprites you like and change their look whatever way you like. One coder added a puppy as their second and had him bark whenever an answer was correct. CDA-S5-Challenge_10-Maths game-sprite 2
  5. After all the questions were asked we had the 1st Sprite SAY – Game Over! and BROADCAST Game over so that the backdrop changed and music played. There are two ways to change the backdrop- see below!CDA-S5-Challenge_10-Maths game-alt backdrop CDA-S5-Challenge_10-Maths game-backdrop

Can you improve our game??! Can you figure out how to subtract or multiply instead of add? Can you get the computer to add three numbers together or give the user 3 level options like: easy, medium or hard? The notes for the Maths Game are here: CDA-S9-Week_4_20-MathsGame.pdf

and here is a link to the game

https://scratch.mit.edu/projects/367754778/embed

See you all in two weeks, enjoy the mid term break!


Martha

Julie, Ruaidhrí, Eoin and Iseult

Brainstorming a new Hackers project – an AI robot to play Connect-4

conn4

The Goal

In this session, we started planning how we will build an intelligent robot that can play the game of Connect-4. Our aim is that it will be like playing against a human, with a physical Connect-4 set, not just a computer game. This is the plan we had come up with during our brainstorming the previous week, so this week we started to figure out how we can achieve this.

This will be a challenging project that the whole group will work on together. It will require lots of teamwork, collaboration, and learning.

C4-MainPlans

The Major Components

We spent time thinking about the major components that our system will need, and planning the major tasks for these components on the whiteboard. They will include:

  1. A robot mechanism to play a move, which will involve moving to one of the positions 1-7 at the top of the board and dropping in a token, then reloading for the next time.
  2.  A camera to view the board and analyse what it sees, to figure out which spaces have a red token, which have a yellow token, which are free, and whether anyone has won (4 in a row) or has a promising state (one or more 3-in-a-row).
  3. An AI decision-making system (see below)
  4. A software version of the game that we will find online and modify so that our AI can play it, so that we can work on the AI before the physical robot is ready.

For each component, we identified some major tasks and people volunteered to work on 2 major components each.

We also agreed that Python is a good programming language for the task, so we will have to brush up on Python next.

C4-AI

The Artificial Intelligence

The group spent some time playing rounds of Connect-4 against each other, in order to get us thinking about how we would design a computer strategy to play the game. Then we returned to the whiteboard, where people gave their ideas about the main strategies to be followed – these are on the right side of the whiteboard.

Some of the strategy ideas people proposed:

  • Work towards 4 in a row (obvious but important!)
  • recognise states with the potential for 4 in a row
  • have multiple paths to win
  • try to block your opponent.

This made me think of a general AI algorithm for playing 2-person games, called the Minimax Algorithm. This is based on constructing a game tree of all possible future moves, by yourself and by your opponent, for a number of steps into the future (called the lookahead or depth limit). Then, we evaluate all possible future game states using a utility function (also called fitness function): this will return a low value (e.g. -20) if we lose, a high value (20) if we win, or some other intermediate score if the game is not over, such as a count of the number of 3-in-a-rows we have, minus the count of our opponent’s (this will definitely be between 20 and -20). We will then pick the move that should lead to us a state with as high a utility as possible. Also, if we assume our opponent is rational, they will pick the move that will give us as low a utility as possible, so we can use the game tree to predict what their best possible move is, and be prepared for them! Each time they take a move, we can re-calculate the game tree to plan a new best move.

We then looked at the strategy ideas people had proposed, and saw how they are achieved by the Minimax algorithm, even though it’s a general algorithm, not just for Connect-4!

There are some good videos and tutorials about the minimax algorithm on line. Here are two that I liked:


Modellers – Week 14

This week, we finished our apple project started in week 12. We took the images we’d made and stencil painted them onto our apple model.

Here are the video instructions for the stencil painting:

The completed apple model can be found here.

Once we finished the apple, we started to talk about animation. To illustrate this, we started building a little multi-object tank model that we can later animate. Here are the instructions on starting the tank model:

The in-progress tank model can be found here.

Modellers – Week 13

This week we had a 3D printer in the room, so our plans to stencil paint the apple took a back seat until next week. Instead we printed a dice model and then looked at how to build that model.

The printer we used is a Prusa i3 Mk 2.5. To print a model you import it into a program called a slicer which converts it from a polygon based model into instructions for the printer in how to lay down a series of layers of plastic to build the same approximate shape.

The model we printed was a dice. To do this we used ‘hard surface modelling’ techniques, specifically the use of boolean operators. Boolean operators allow you to take two shapes and make a composite shape that is:

  1. Difference: The first shape with the second cut-out
  2. Union: A shape which is the two shape fused together
  3. Intersect: A shape which is only where the two original shapes overlapped

This technique is powerful, but it results in many N-gons (polygons with more than four sides). N-gons are bad in many circumstances. For example severe distortion may result if :

  1. If we try to apply smooth shading
  2. If we try to apply a subsurface modifier
  3. We later try to distort the mesh, as with an animation
  4. If we export the model for use in other 3D packages

If none of those apply, hard surface modelling can have its uses.

Here is the instruction video for this week:

The dice model file can be found here.

Advancers – Piano

We started with a basic plan:

  • 1 Piano Sprite
  • 3 Button Sprites
    • Record
    • Stop
    • Play
  • A list to store all the possible Piano notes.
  • A list to store the tune being played.

Luckily Scratch comes with a Piano Sprite, which we used and expanded it to fill the width of the screen.

PianoSprite

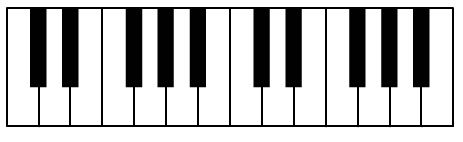
Next step was to create the list of all the notes, there are 14 keys on the Piano so we need at least 14 notes in our list.

We found out what notes are possible by using one of the Sound blocks and looking at what was possible

PossibleNotes

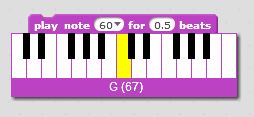
This gave us our list of possible notes:
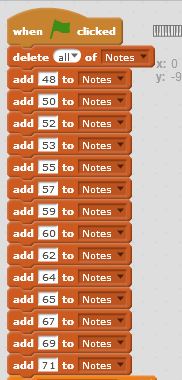
NotesList

Now on to the code…

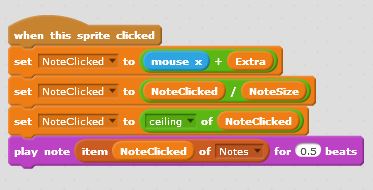
We needed to work out what key on the Piano had been clicked, and convert it to a number between 1 and 14 so we could play the correct note from the list.

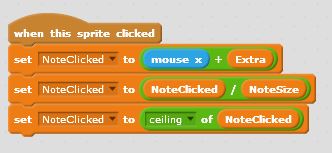
This required some tricky calculations, to convert the Mouses “X” position to a positive integer between 1 and 14.

  • First we added a number to make X always positive
  • Second we divided that by the size of a note.
  • And finally we rounded it up, using the ceiling function.

This ended up with the following code and a couple of Variables to store the “Extra” number to make X positive and the size of a note:

NoteClickedBasic

Once we had the positive integer we could use it to select the correct note to play from the list:

NoteClickedMedium

We did start some of the Buttons, and we will complete them next week. Notes for the buttons will be included then.
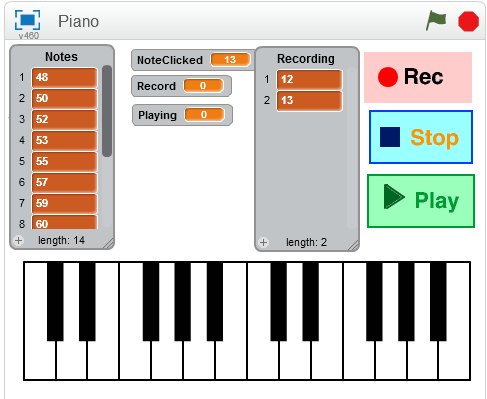
Buttons

In order to make the Piano a bit more usable we added 3 Buttons:

  1. Record
  2. Stop
  3. Play

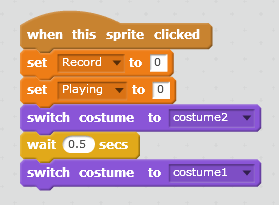
All three Buttons had two costumes, we used the second costume to change the colour of the Button, this made it easy to see if you had clicked the button or not.

The Record button, simply set a Data Flag to indicate to the Piano code that it should “record” the notes being played in a List variable.

It also flashed while recording was “on”, this is the code for the Record Button:

RecordButtonCode

We also had to add some additional code to the Piano to make sure the notes were recorded:

RecordPianoCode

The Stop button was quite simple, we just set the Data Flag back to 0, and changed the costume for a short while to make it clear that the button had been pressed.

StopButtonCode

The Play button was a little more complex as it need to read all the items in the List and play the correct notes. It also flashed while playing. This is the code from the Play button:

PlayButtonCode

The Final project looked something like this, you can get a copy from the Scratch Web Site, see the Notes below.

PianoStage

Notes:

Note: My version of the project has been uploaded to https://scratch.mit.edu you can Sign in using the following details:

  • Username : cdadvancers1819
  • Password : advancers
  • Project Name is : Class-Piano

Explorers Week 3 – Storytelling

We had a great day in Scratch Beginners on Saturday! We created a project in which the Sprites communicated with each other to tell some sort of a story or bad joke, Like I did!


Timing was very important, each sprite had to wait for the other sprite to have their say.

Here are the notes from this week CDA-S9-Week-3-StoryTelling.pdf


We are going to do a great Maths Game this Saturday so we look forward to seeing all there.

Martha

Ruaidhri, Julie, Iseult and Eoin