In the Hackers group this week, we took a large step forward in our Project SABRE (Small Autonomous Battling Robotic Entities), when we started working with remote controllers for our robots.
Components
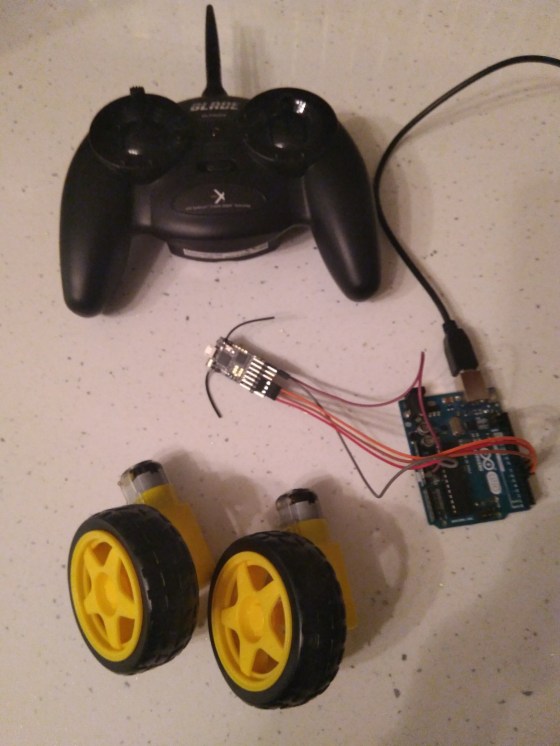
From what the group has read, it looks like the most widely-used controllers are Spektrum-compatible DSMX or DSM2 ones. Therefore, we bought 3x Lemon RX DSMX/DSM2 receivers and one MLP4DSM Blade transmitter (as shown in the photo).
There was a lot of excitement when people were able move the joystick on the transmitter and have it change the value being printed out in the Arduino console!
I was away this weekend so Dave looked after the group.
He covered some basic electronics theory such as Ohms Law, how we use resistors in our circuits to protect other components and how to wire up an LED. He also helped the group build a simple traffic light circuit controlled by an Arduino which they then programmed.
The Raspberry Pi Foundation have announced that they are not running the Pioneers Challenge this year and are instead concentrating on the Coolest Projects. This means that Coolest Projects is now open to Code Club and Raspberry Jam members. There will be a UK Coolest Projects in April in London and Coolest Projects in Dublin will now be called Coolest Projects International. See more info here.
We have two sessions before the mid-term break so we will concentrate on coming up with ideas for our next projects and how we might implement these ideas and that will leave us a couple of weeks to get components etc. organized.
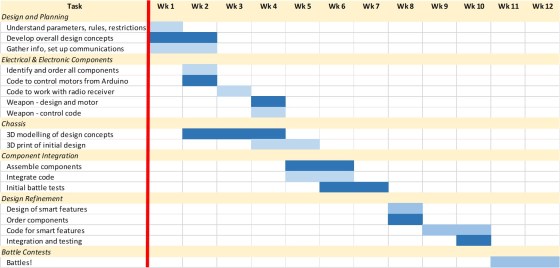
In recent weeks in the Hackers group, we have been refining our plans for Project SABRE (Small Autonomous Battling Robotic Entities).
Our mission for Project SABRE is to build “battlebots” that include some autonomous features. While there are many kits available for purchase, our two teams of hackers are designing and building their bots from scratch, identifying and sourcing all components ourselves, 3D printing bodies of their own designs, and programming everything themselves. Even the mentors are hands-off, helping mainly with project planning and purchasing, but not designing or making.
The main components required are:
2 or 4 motors with wheels or tracks
Battery packs and chargers (salvaged from old toys)
This week in the Creators group we looked at emulating the classic toy, the Spirograph.
The Spirograph consists of geared plastic discs. One disc is fixed in place over a sheet of paper and the other, with a pencil tracing the path, is allowed to spin around it. The result is a complex and beautiful design on the paper.
This diagram should help explain in conjunction with the photo. The centre of the black disc spins around the centre of the red disc, which itself doesn’t move. So the centre of the black disc rotates around in a circle. Pretty simple?
Now, the pencil itself rotates around the centre of the black disc. Shouldn’t that make a circle too? Well it would if the black disc wasn’t moving. Thankfully though, it is and that’s what makes this interesting.
Finding the Location of the “Pencil”
So how do we find the location of the pencil? Let’s look at our diagram again, but with things re-labeled a bit:
Centre: Formerly “centre of red disc”. It’s the fixed centre of our spirograph
Centre2: Formerly “centre of black disk”
Point: The point on our curve. This is where the pencil would be in a physical spirograph.
Radius0: Distance from Centre to Centre2
Radius1:Distance from Centre2 to Point
Angle0: The current angle of the line between Centre and Centre2
Speed0: The amount that angle0 increases every time we draw
Angle1: The current angle of the line between Centre2 and Point
Speed1: The amount that angle1 increases each time we draw
So at any time the location of our point is:
Point = Centre + [Centre2 relative to Centre] + [Point relative to Centre2]
So know where Centre is and if we can calculate where Centre2 is relative to Centre and similarly where Point is relative to Centre2, we can just add them all together!
Given an angle and a distance, can we get a location?
The answer to this is a resounding “yes”! Look at the diagram:
given an angle and a radius, we can calculate the X and Y position of any point around a circle. The magic is the COS and SIN (pronounced “kos” and “sign”) functions. These functions exist in almost all programming languages and JavaScript’s no exception.
Using p5.Vector
The last big concept we tackled thus week was using P5js’s built-in vector class to store (x, y) points and make our code tidier. To make a vector we just use createVector(x, y). We can then use functions to add them together, etc. We would get the same result working with the X and Y values separately but the code is a lot neater and shorter.
And in conclusion
This looks pretty cool:
Getting this week’s code
As aways, all the code from our Creator group can be found on our GitHub repository.
Another great week, a lot of work was done in the Explorers room. Hope you all had fun making our Maths game!
A player picks a level of difficulty and the computer chooses 2 random numbers to add (subtract or multiply- whichever you choose!) together and show the numbers to the player. Fr this we needed 2 SPRITES and 4 VARIABLES called SCORE, LEVEL, NUMBER1 and NUMBER2 as well as 2 BACKDROPS.
The player then has to enter an answer to the equation and the computer tells them whether they are wrong or right.
We repeated the ask/answer questions 5 or 10 times. Can you figure out where the REPEAT loop fits?
We also had a second sprite who reacted positively to correct answers BROADCAST and negatively to wrong answers BROADCAST. You can use whatever sprites you like and change their look whatever way you like. One coder added a puppy as their second and had him bark whenever an answer was correct.
After all the questions were asked we had the 1st Sprite SAY – Game Over! and BROADCAST Game over so that the backdrop changed and music played. There are two ways to change the backdrop- see below!Here are this weeks notes in PDF CDA-S7-Week_3_18-MathsGame.pdf
Also I have uploaded the finished game to the www.Scratch.mit.edu website, just use the login details in the notes.
This week we continued to play with the Sense HAT and as we’ve been mostly focusing on projects so far this year we took the opportunity to look at some of the theory behind programming.
We looked at how we use variables, loops and decisions in our programs and we also learned about algorithms. An algorithm is a set of rules we can use to solve a problem for example an algorithm to determine if a given year is a leap year. A year is a leap year if it is divisible by four, but not by one hundred, unless it is divisible by four hundred.
We then worked on a program which would allow us to “move” an LED around the LED matrix on the Sense HAT. You can run our code on the trinket.io Sense HAT emulator.
Dave will lead the group next week when he will cover some basic electronics.
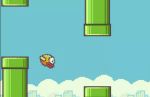
This week we finished up the Flappy Bird clone from last week. We had a LOT to do so made a plan at the outset to keep us on track! Mostly we were trying to get the pipe to work … Continue reading →
It was great to see everybody back after the break.
I had a big box of goodies from the recent Raspberry Pi Pioneers competition. We got more swag for both teams that entered including some very nice badges and three really interesting books.
Our Zombie Trolls also got their prize for failing really well 😊. This included a Raspberry Pi, a 5” HDMI Monitor, some basic electronic components, t-shirts and an Astro Pi Sense Hat (Hat stands for ‘Hardware Attached on Top’).
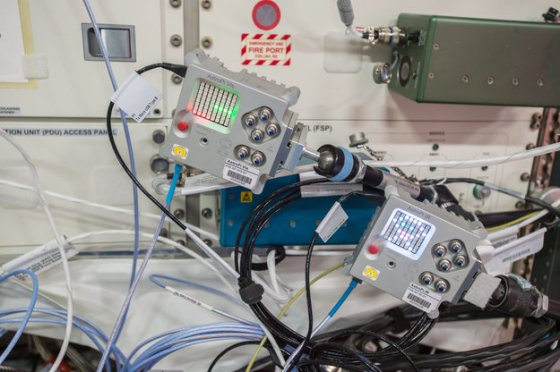
The Sense HAT add-on board was specially created for the Astro Pi competition which gives kids the chance to get their code running on one of two Raspberry Pi devices that are on the International Space Station.
The board gives Astro Pi the ability to ‘sense’ and make many kinds of measurements, from temperature to movement, and to output information using a special display – the 8×8 LED matrix. We had great fun playing around with the Sense Hat and it’s definitely something we will get great use out of and maybe we could enter the Astro Pi competition and have our code running on the ISS.
We also took a look at controlling an Arduino from Unity 3D which is something that could be used for 4D/Immersive Technology type game.
Thanks to everyone who came yesterday and special welcome to our new people. Thank you all for your patience with the projector!
This week we did a game based on an old game called Breakout.
The object of the game is to try and get rid of all the blocks by bouncing a ball into them using a bat of some type. You all had your own versions of what you wanted the game to look that and that’s brilliant, your imagination is way better than mine.
The first thing we did was design your bat and write some code to control it. We decided that the mouse should control the movement and that the movement should be only from left to right and vice versa.
I have also uploaded the finished game to the Scratch Website if anybody wants to take a look at it or for anyone that wasn’t there on Saturday. I will go through it at the beginning of next weeks session if anyone has any questions.
You will find the login details for our account on the Scratch website in the notes above.
Today we started with a little brainstorm about what we want to do this term. We took a little vote about what to tackle today and most people wanted to have a go at building a game.. so that’s what … Continue reading →