This week we looked at the mechanical design for our Connect 4 robot. We need a way to hold the tokens and drop one into a slot when the game-playing AI decides what to play.
We started with two ideas for holding the tokens:
- A vertical magazine with 21 tokens held in place by two pins.
- A disc holding the tokens at the edge.
The photo below shows an illustration of the magazine idea.
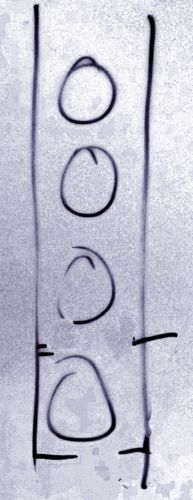
The magazine would move across the board and drop a token into a slot by pulling out the lower pin. The upper pin would hold the rest of the tokens in place so that the wouldn’t drop into the board. Once the bottom token was dropped, the lower pin would be pushed back and the upper pin pulled out to allow the tokens to drop down one step.
The disc idea involved it rotating into place over the board and dropping a token into the board as needed.
We decided that both ideas were impractical on size grounds: the magazine and disc would be very high and hard to support.
We eventually settled on a modification of the magazine idea: 3 magazines with 7 tokens each. This would be smaller and more stable. It does require us to keep track of the number of tokens in each magazine. That’s something our code should be able to manage.
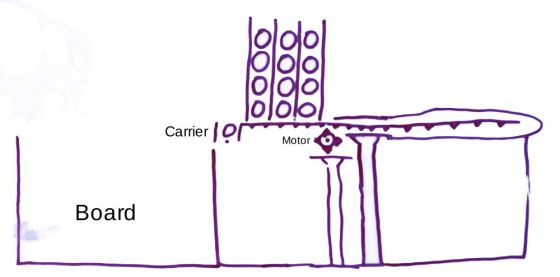
We decided to keep the position of the magazines fixed. A carrier (think cup) could move under the magazine, collect a token and drop it into the board. The magazine and carrier would both need a single pin at the bottom to hold the tokens in place. The carrier should be the height of a single token, so that only one can drop into it. The carrier would have an arm (like a handle) that sits on the magazine side and holds the other tokens in position.
We spent some time discussing how to move the pins in and out before one ninja had a great idea: the pin should be the arm of a servo motor. The servo can rotate the arm through 90° to allow a token to drop.
We then considered how to move the carrier back and forth. We settled on having a single stepper motor drive a gear on a rack that holds the carrier. Turning the gear moves the rack and the carrier into position. Keeping track of the carrier position might be difficult. The easiest way would be to measure the time it takes to reach a particular slot and then power the motor for that amount of time. The problem with that is that it depends on the motor always taking the same amount of time to reach a slot. The motor might slow down as the battery driving it runs down. Mentor Declan suggested using a beam sensor to locate the correct position. We could put a marker above each board position and stop the motor when the sensor reaches the marker. That marker could be something as simple as a small hole. If the beam shines through the hole instead of reflecting, the mark has been found.
Lastly, we considered how to hold everything in place. We think that a large piece of plywood should do the job. We can also attach a sheet of paper to the plywood behind the board to help the vision system see the empty slots. Mentor Kevin pointed out that anything in the background of the board with the same colour as the tokens could confuse the vision system.
The photo below shows a sketch of the final design.
So, where will the parts from our design come from?
We have an old flatbed scanner that we can scavenge parts from. It has a gear and rack system to move the scan head. It should be long enough to meet our needs. We haven’t looked at the motor that drives the gear yet. We will have to figure out if we can power it and control it. If not, we have motors from previous projects that we can use. The gear probably won’t fit one of the old motors, so we will have to modify it. Or, we can 3D-print a part that will allow us to fit the gear to the motor. That worked well for us last year when we made axles to allow us fit wheels to the motors we had for our hide and seek robots.
We will have to 3D-print the carrier. It will probably take a few iterations to get something that works. It will need to be the right size to hold only one token, and be shaped to stop tokens from dropping lightly and getting wedged. Some experimentation will be needed. We can 3D-print the magazines as well, or maybe make something from plywood strips and cardboard.
We will also need to make a camera mount for our vision system. The mount will need to sit in front of the board, out of the way of the human player. It will need to be in a fixed position so that it covers the whole board and allows us to reliably identify token positions. This will probably be a mix of a 3D-printed part and plywood.
We will tackle these tasks at our next session.