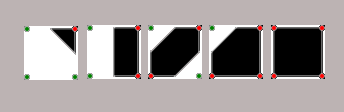
This week we took a look at a technique for generating random dungeons. Although never mentioned on the day, this technique is often called “marching squares”. It looks at the four corners of a space at a time, some of which are open and some of which are closed, and picks a shape that blocks off the closed corners.
There are sixteen possible combinations of corners on and off. All of these can be covered with these five shapes (or a rotation of them) to represent the closed off areas:
Generating the Dungeon
We generated a 2D array (a list of lists) to store our dungeon layout. At each point we used a 2D Perlin noise value (using the noise() function) to calculate a value. The point was deemed to be either open or closed based on whether this value was higher or lower than a threshold value we specified. Varying this threshold value can make the dungeon more open, or more closed in.
Drawing the Dungeon
To draw these shapes we first defined each of them as a list of x, y points defining the shape.
We then used beginShape(), vertex(), and endShape() functions to draw them at the correct size, location and orientation by scale(), transform() and rotate().
Once we were able to draw the shapes, we just needed to loop over our grid, inspecting each set of four adjacent corners in turn and drawing the appropriate shape.
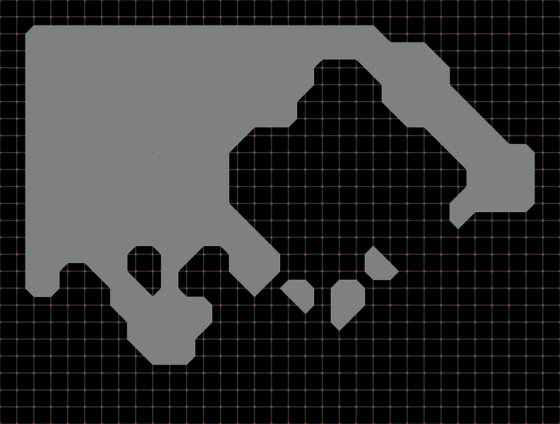
Here’s a screenshot of one random dungeon. Dots (green for open, red for closed) are drawn to show the grid and the lines between the individual shapes are also shown for clarity:
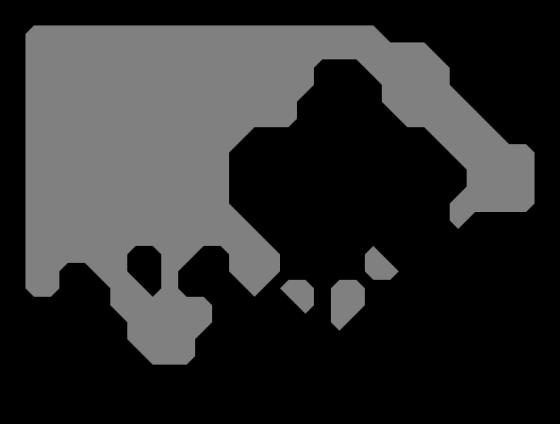
and here is is without these overlays:
Download
The files for this week can be found on our GitHub repository.
This week we had a quiz. There were three rounds on Technology, Creators 2019 and Pop Culture. There was a very high proportion of correct answers on all questions. The quizes can be found here, for anyone that wants them:
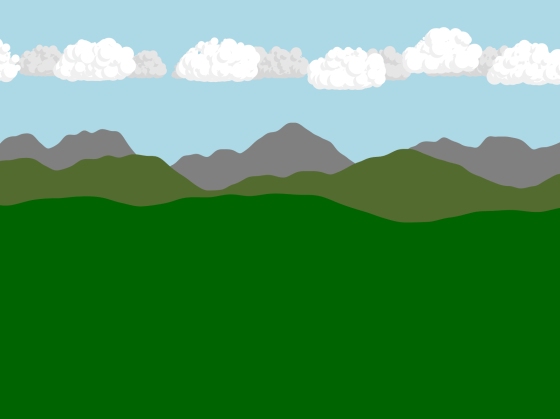
After that we set everyone a programming challenge: make an animated scene. People got busy and there was some good progress. We will continue with that next week. Mark and I (Kieran) got in on the action figuring out how to draw clouds. My attempt is shown in the image at the top of this post. The code can be found, as always, on the CoderDojo Athenry Creators 2018 GitHub.
This week we creating a game where a tiny plane flies over dynamically generated terrain picking up as many boxes as possible. The player scores a point for every box, but that also makes the plane fly faster, making the game more challenging.
Perlin Noise
Normal random-number generators produce values that jump around all over the place. Perlin noise is different. It is also random, but it varies smoothly. This makes it great for mimicking the sort of randomness we see in nature.
1D Perlin Noise Landscape
Our smooth and changing landscape is generated using a one-dimensional Perlin noise value generated by the P5.js function noise(xoff).
We start with a loop that goes across from 0 -> width across the screen. We’re looking to generate a set of [x, y] points that define our shape.
We use these values:
xstart: A starting value for xoff
xinc: An amount to increment xoff by for every new location
ymin: The smallest y value we want for our landscape – something a little below the top of the screen
ymax: The largest y value we want for our landscape – something a little above the bottom of the screen
Each call to noise() generates a single value in the range 0-1. We use the P5.js function map() to change this value in the range 0-1 into a value in the range ymin-ymax.
Changing the size of xinc controls how choppy or smooth the landscape is. We tune it to a value that gives approximately two peaks and two valleys across the screen, and looks right for our game.
Moving the Landscape
Moving the landscape is achieved by changing the starting value of xoff (aka. xstart) each time we update the screen. By making it a little larger each time, the effect is that the landscape seems to scroll from right to left.
Other Parts of the Game
The other parts of the game are very standard. We define a simple plane shape (drawn using rect() calls) that can move up or down in response to the arrow keys.
We define “cargo” containers that are randomly generated on the surface of the landscape and move right-to-left at the same speed.
The cargo containers have an active property that is false if they move beyond the left-edge of the screen or get sufficiently close to the plane to be “picked up”.
We added a function to the landscape class (Ground.js) that checks for a given [x, y] location to see if that point us under the ground by checking what the height of the landscape is at that x value. If the plane is below the ground we consider it crashed.
We added a simple scoring mechanism that tracks how many boxes were collected and makes the plane move faster (really – the ground scroll faster) every time a box is collected.
Download
The files for this week can be found on our GitHub repository.
This week we extended our colliders so that we could used them to prevent the player going off the edges of the screen. We used it to show how software design needs to evolve.
Colliders
Our colliders were designed to be connected to an object with three things:
A property x containing the x-coordinate of its location
A property y containing the y-coordinate of its location
A function hit() which was called if the attached collider touched another collider
Something to Connect To
We had colliders already attached to our:
Enemy
Bullets
but we didn’t have anything to attach to that could represent the side of the screen.
We created a new class called Static() with nothing more than the x, y and hit() that we needed so that we could connect a collider to it (stored in one more property – collider).
Screen Edges
We created a pair of these colliders positioned at the right and left-hand side of the screen. We made sure to add them to our list in check_colliders(). Nothing much happened. Why? Well, first, the Player didn’t have a collider, so we added one, liberally copying code from Enemy, which a minor change to the description argument.
Now we could see the contact occurring between the edge and the player, though nothing was stopping it moving yet.
Unintended Consequences
As often happens with code, this change had unexpected consequences; bullets were not firing properly any more. Why? Because the player now had a collider and the bullets were becoming inactive immediately because they were hitting that. The fix was to modify the Bullet’s hit() function to ignore hitting a collider with the description “player”.
Stopping the Player Moving
We now knew our player was hitting an edge, but another problem became apparent: we didn’t know which edge!
To properly stop the player and stop it moving too far, we really needed to know which side of the player the collider we’d hit was, but that information wasn’t available to us with the current design.
A couple of quick changes were necessary:
In Collider.touching(), instead of just passing the descriptors to the objects hit() functions, we changed it to pass the Collider itself.
In all the hit() functions, we had to made a small adjustment to account for the fact that we were now getting a Collider and not just a string.
With the extra information from the collider, were were able to determine how far the player should be allowed to move to and prevent it going further by setting the x value appropriately.
Download
The files for this week can be found on our GitHub repository.
This week we mainly dealt with building and using a box collider in our game. The box colliders are written in a way such that:
They are connected to something in the game and follow it around
What they are attached to must have the properties x and y for position
It is possible to test if they are touching each other
If two colliders are found to be touching, we tell the things that they’re attached to that they’ve been hit by something
What they are attached to must have a function hit() that we can call
Extents of the Collider
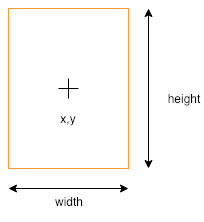
Our collider is a box, of a given width and height, centred on the x and y of the thing it’s connected to:
For checking collisions, we need to know the x values of the left and right side of the box and the y values of the top and the bottom of the box.
For convenience, we write a function which returns an object (using curly brackets) with the left, right, top, and bottom values (shortened l, r, t and b respectively) as properties:
When making an object like this, we set a property value by first writing the property name, followed by a colon (:) and then a space and the value we want it to have. Each property is separated with a comma. The don’t need to be on separate lines, but it makes it easier to read.
Touching Colliders
So how do we know that two colliders are touching? Actually there are four ways in which they definitely can’t be touching:
One is completely to the left of the other
One is completely to the right of the other
One is completely above the other
One is completely below the other
And if none of these are true, then it must be touching. So actually, we’re going to check that they’re not NOT touching (double negative, used correctly!).
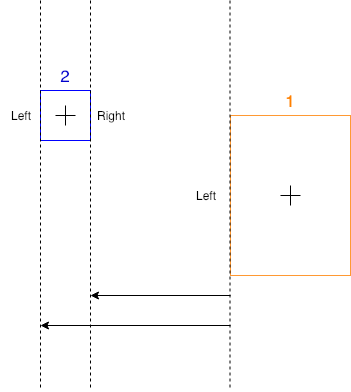
How do we know if something is completely to the left of something else? Look at this diagram:
We know that box 2 (in blue) is totally to the left of box 1 (in orange) because we can see it is, but how could get the computer to check it? Remember, left and right are just x values on the screen. Box 2 is left of box 1 because both it’s left and right values are smaller than the left value of box 1.
The checks for the other directions are very similar:
The second box is right of the first box when both of it’s x values (left and right) are greater than the first’s right side.
The second box is above of the first box when both of it’s y values (top and bottom) are less than the first’s top side.
The second box is below of the first box when both of it’s y values (top and bottom) are greater than the first’s bottom side.
Sending Messages
Each collider has a property disc that describes the thing, or type of thing, that it’s connected to.
All colliders know what they’re connected to, so when we determine two have touched, we call a function called hit() on each of the connected objects, passing it the desc of the other collider. This means, in our game, when our enemy is hit, it can know that it’s been hit by a bullet – or maybe something else – and react appropriately.
Checking Every Collider Against Every Other
In our code, we gather all the active colliders at each frame. We then need to check each one against each every other one. How can we do that?
Consider a list of four items:
To check them all against each other we first need to check 0 against the other three. Simple enough.
We we need to check 1. But we don’t need to check 1 against 0, since we already did that. Nor do we need to check it against itself. We only need to check it against 2 and 3.
If we write out the full sequence, we see that for four items we need three passes to check all combinations:
First pass: Check 0-1, 0-2, 0-3
Second pass: Check 1-2, 1-3
Third pass: Check 2-3
We can write a pair of loops to do this:
for (let i = 0; i < c.length - 1; i++){
  for (let j = i + 1; j < c.length; j++){
    c[i].touching(c[j]);
  }
}
Note two things about these loops:
The first loop goes from zero, but stops one short of the last item in the list (i < c.length – 1). It picks the first item to be checked.
The second loop doesn’t start from zero. It starts from what ever i currently is, plus one. It picks the second item to be checked.
Other Stuff
We also did a few other things this week:
We fixed a small bug that was keeping our spaceship moving when we didn’t want it.
We added a little drag to slow the spaceship down to a stop when we lift our fingers off the keys
We set bullets inactive when they hit something
Download
The files for this week can be found on our GitHub repository.
This week we continued our Shootah project. We did two main things;
Changed the code to control the total number of bullets to those actually on screen
Added an enemy that loops backwards and forwards across the screen
Controlling the Number of Bullets
In Part 2, we made a new bullet every time the user pressed the Up key and put it in the bullets list.
This meant that after a while we could have a lot of bullets, most off the top of the screen, which was even slowing some machines down.
To limit the number of bullets we did four things:
Added a new property to the Bullet class called active and set it to be true
In the move() function for the bullet class, we added a check for the bullet going off the top of the screen (this.y < 0) and, if true, set the active property to false
In sketch.js, we moved the lines of code in the draw() function responsible for moving and drawing the bullets into a new function called manageBullets() and called it from draw().
In manageBullets() we made a new list called active and put every bullet that was still active into it. We then made this the new bullets list.
We write a little code that printed out the total number of bullets to verify this was working.
Adding an Enemy
We added a new file called enemy.js and included it in the index.html file.
This file looked a lot like player.js. The main different was the move() function. Our enemy moves constantly left-to-right. When it gets too far off the right-hand side of the screen (checked in move()) we set its x position to be off the left-hand side of the screen instead. This makes it loop around.
TODO
We still have loads to do and we made a list on the day:
No more infinite bullets!
Check edges so spaceship doesn’t disappear
Enemies
Collision detection
Enemies shoot back (bombs)
Lives/score
Levels
Background music
Moving background
Story
We’ve done two and we’ll do some of the others for sure.
Download
The files for this week can be found on our GitHub repository.
mouseIsPressed – true whenever the mouse button is held down
mouseX – contains the X position of the mouse pointer
mouseY – contains the Y position of the mouse pointer
We put the call to background() in the setup() function because we didn’t want to clear the background every frame. After that, in the draw() function, we just needed to draw an circle at the mouse’s position every time the mouse button was pressed.
This gave us an very basic painting program in just a few lines of code!
Toolbar
We then looked at the idea of a toolbar to contain buttons for selecting colours and the size of the brush.
We first need to decide where it would be (the left side of the screen) and we created a variable toolbarSize to store the width of it.
In the draw() function we then added a check not to draw an circle if we were inside the toolbar area.
We then added a new function called mouseClicked(). This is a special function name (like setup() and draw()) that P5.js will call at the appropriate time. In this case its called when the mouse is clicked (button pressed down and the released).
Colour and Sizes
We created two arrays to store a list of colours and brush sizes at the top of our script:
let colours = ['black', 'white', 'red', 'blue', 'green'];
let sizes = [5, 10, 20, 40, 80, 160];
To draw the toolbar, we made a new function called drawToolbar() and put a call to it in our draw() function. In the new function, we looped over the colours array, drawing a new button, filled with the respective colour and then another loop over sizes drawing a square with a circle inside to represent the brush size. We needed to scale those circles to make them fit inside our buttons.
Detecting Selected Button
Since everything in our toolbar was toolbarSize high, to determine what had been clicked on, we just needed to divide mouseY by toolbarSize to get the index of the button that had been clicked on. We looked at that index, if it was less than the number of colours, we must have clicked on a colour. If greater, it had to be a size (or beyond the end).
Selected colours and selected sizes were stored in two variables called currentColour and currentSize respectively and used within the draw() function when creating our circles.
Featured Artwork
Mark suggested that people draw a portrait of me to test our new program and there were some brilliant renderedings. Three people were kind enough to share theirs with me so that I could put them here. I think they’re great!
Download
The files for this week can be found on our GitHub repository.
This week we looked at a representation of a robot arm. The body of our robot is allowed to slide horizontally and the arm can pivot at the shoulder (where the upper arm attaches to the body) and at the elbow (where the lower arm attaches to the upper arm).
Transformations
An important point about this project was to show how transformations add up together. Transformations include translations (moving in straight line), rotations (turning about a pivot point) and scaling (changing size). We’ve used translations and rotations for our robot.
In P5, the origin, or place where the x and y coordinates are both zero is at the upper left-hand corner of the screen. The x coordinate gets bigger as we move right and the y coordinate gets bigger as we move down.
When we translate, we move the origin to somewhere else. This is handy for a few reasons but if we are performing rotations. All rotations happen around the origin, wherever that happens to be at the time.
This diagram shows all the transformations we use for our robot:
Translate to move the origin to the centre of the robot body
Translate to move the origin to the shoulder
Upper arm rotation at the shoulder
Translate to move the origin to the elbow
Lower arm rotation at the elbow
Because these transformations stack up on top of each other, this is what each part experiences:
Body – Transformations: 1
Upper Arm – Transformations: 1, 2, 3
Lower Arm – Transformations: 1, 2, 3, 4, 5
The body is only affected by one, but the lower arm is affected by all five.
Movement
To move the robot, we set up three variables:
bodyPos to store the body position (our first transformation)
upperArmAngle to store the rotation at the shoulder (our third transformation)
lowerArmAngle to store the rotation at the elbow (our fifth transformation)
We created a function called handleInput() called from the draw() function (which is called every frame). In that we used the keyIsDown() function from P5 to check for keys being held down. We made the left/right arrow keys move the body horizontally, the up/down arrow keys rotate at the shoulder and the Z/X keys to rotate at the elbow.
Today in Creators, we took another look at our old friend Random and discovered that there are many kinds of random that can be used for different things (this wiki page has a surprisingly long list of other types of random … Continue reading →
The snakes head moves and the rest of the snake’s body is made up of places the head’s already been, up to a certain point. For this we use a JavaScript array (we’ve also called it a list at times).
We don’t want the snake’s length to grow indefinitely, so we have a maximum length. Once the list of stored locations gets larger than this, we use the JavaScript splice() command to remove the first (oldest) element from the list.
Direction and turning
We assign numbers to represent directions on the screen. Zero is right, one is up, two is left and three is down. Note then that if the snake is heading right (in the screen sense) and turns left it goes to up (in the screen sense); direction goes from zero to one. Similarly, if going up (in the screen sense) and it turns left then it goes to left (in the screen sense).
Generally then we note that turning to the left makes the direction number get bigger while turning to the right makes it get smaller. This rule hold until we get to a number bigger than three or smaller than zero; these make no sense. If direction is at zero and the snake goes right, we set direction to three. Similarly, if direction is at three and we turn left, we set direction to zero.
Getting this week’s code
As always, all the code from our Creator group can be found on our GitHub repository.