Week 4, 2014 Scratch Beginners – Pen Commands

Hello Everyone,

Thank you all for coming again this week, and thank you all for your generous donations.

I think the Mic made a big difference this week!           mic

This week we looked at pen commands, we have not done this before in the Scratch Beginners so it was new for everyone.

pencommand

We also created some variables which we set as sliders which again is something we had not done before with this group.sliders

And lastly we added buttons to our game. We added two separate buttons, a Start and Stop. In a few weeks time, I will show you how to have just one button, changing costume and activating the appropriate code.

There is no Coderdojo in Athenry next week, so enjoy the break.
I will be away for the following two weeks but Oliver has kindly offered to take over the group, along with his own.

Here are the full Pdf version of my notes from this weeks session. CDA-S3-Challenge-Pen Command.pdf

Martha

ModderDojo Java Modding 10: A Recipe for Our New Item

To have something useful we can do with our item, let’s add a recipe to turn two of our coins into a diamond. (You could probably do something better, like shapeless recipes to turn 10 coins into a diamond or a diamond into 10 coins.)

Here is the full class including the parts we added earlier:


package modderdojo.firstitem;

import net.minecraft.init.Blocks;
import net.minecraft.init.Items;
import net.minecraft.item.Item;
import net.minecraft.item.ItemStack;
import cpw.mods.fml.common.Mod;
import cpw.mods.fml.common.Mod.EventHandler;
import cpw.mods.fml.common.event.FMLPreInitializationEvent;
import cpw.mods.fml.common.registry.GameRegistry;

@Mod(modid = "firstitem", name = "First Item Mod from ModderDojo by Michael", version = "1.0")
public class MyFirstMod
{
   @EventHandler
   public void preInit(FMLPreInitializationEvent event)
   {
      MyFirstItem first = new MyFirstItem();
      first.setTextureName("modderdojo:md2");
      GameRegistry.registerItem(first, "MichaelFirstItem"); // This name doesn't have to be same as unlocalised name, but no harm in them being the same

      // Recipe to turn 2 of our items into diamond
      ItemStack myStack = new ItemStack(first);
      ItemStack diamond = new ItemStack(Items.diamond);
      GameRegistry.addRecipe(diamond,
         "x ",
         " x",
         'x', first);
   }
}

Note that for built-in items like a diamond, you can write Items.diamond to get a diamond object to use in your  recipe code. Since our item is not built-in, we have to create an item object. We already have one called first in the preInit code, so we use that in our addRecipe code.

ModderDojo Java Modding 9: Giving our Item a Display Name and Texture

First, let’s add a language resource so that we can give it a name that looks reasonable.

To do this, in the folder src/main/resources add a new package. I called it assets.modderdojo.lang: you can change “modderdojo” but the other parts have to stay the same.

In the package, add a new file called “en_US.lang” which indicates that it is for Minecraft when the language is set to English – US. The file has one line which tells us what English name to use for the item with the unlocalised name MichaelFirstItem:


item.MichaelFirstItem.name=Michael's ModderDojo Coin


Now let’s add a texture.

Using a painting package (for example Microsoft Paint or Paint.NET), create 16×16 pattern. Give it a transparent background. Then save it in PNG format.

In the src/main/resources folder, create a new package called assets.modderdojo.textures.items (you can change modderdojo to something else, but the rest has to stay the same). Put the PNG file in it. In my case, the file is called md2.png:
addpng


In your mod class preInit method, add one more line:


first.setTextureName("modderdojo:md2");

The name you set is based on where you put it “assets.modderdojo.textures.items” followed by a colon “:” followed by the name of the PNG file put without “.png”: md2.png.

Now when you run the code, your mod should have its correct name and appearance.

ModderDojo Java Modding 8: A Simple Item Mod

2014-02-15_08.36.11

Note: my main sources of information for this post were the following, though I had to update them quite a bit:

You need at least three things to create a new Item:

  1. A new item class that extends the standard Item class
  2. A mod class where you add it to the game registry
  3. A language file where you specify its name.

modfiles

Later we will add a texture. Until then, its appearance will be a pink and black chequer pattern.

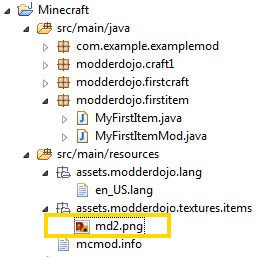
In the src/main/minecraft folder, create a new package. I called it modderdojo.firstitem.

In this package, create a new class. I called it MyFirstItem. Replace the automatically generated code with the code below:

package modderdojo.firstitem;
import net.minecraft.creativetab.CreativeTabs;
import net.minecraft.item.Item;
public class MyFirstItem extends Item
{
   public MyFirstItem()
   {
      // This is the constructor for our new item. Set basic properties in it.
      setMaxStackSize(64);
      setCreativeTab(CreativeTabs.tabTransport);
      setUnlocalizedName("MichaelFirstItem");
   }
}

The code above does the following:

  • It defines a new Java class  for your new type of item: extends Item means that it is based on the standard Item type, and you will then modify it. Note that you could extend another kind of item, such as Diamond.
  • In its constructor (a special method with the same name as the class, which is called whenever you create an item, it sets basic properties: the max stack size, which tab it will be on, and an unlocalized name (a name that will be used internally in Minecraft).
  • Note: normally the unlocalised name does not have any spaces.

Now create a second class that initialises the mod that will include this item:

package modderdojo.firstitem;

import net.minecraft.init.Blocks;
import net.minecraft.init.Items;
import net.minecraft.item.Item;
import net.minecraft.item.ItemStack;
import cpw.mods.fml.common.Mod;
import cpw.mods.fml.common.Mod.EventHandler;
import cpw.mods.fml.common.event.FMLPreInitializationEvent;
import cpw.mods.fml.common.registry.GameRegistry;

@Mod(modid = "firstitem", name = "First Item Mod from ModderDojo by Michael", version = "1.0")
public class MyFirstMod
{
   @EventHandler
   public void preInit(FMLPreInitializationEvent event)
   {
      MyFirstItem first = new MyFirstItem();
      GameRegistry.registerItem(first, "MichaelFirstItem"); // This name doesn't have to be same as unlocalised name, but no harm in them being the same
   }
}

The code above creates a basic mod, like we did earlier. The main difference is in the preInit method, where we create an object of our MyFirstItem class. We call the object first. We use this object to add the item to the game registry, again giving it a name that will be used internally.

You can run your code now, and the mod should appear, displaying its unlocalised name and with the default texture. Next we will see how to change them.

ModderDojo Java Modding 7: Adding Smelting

This is even easier than a recipe. The code can be added to init or preInit. (Note: In Forge 1.7, they recommend using putting recipes in preInit rather than init.)

You specify an input, an output and experience. The input and output are both an ItemStack with either a single item or you can specify how many items, as in recipes. Experience is a number between 0 and 1. In Java, we use a float (short floating-point number) to represent most decimal numbers, so 0.1f means a float with value 0.1.

(Thanks to Luke for this code.)

smelt

Web Development – Making text bold and italics!

Hi all,

This weeks notes are all about making text bold and using italics. In the notes we learn about these new tags and add them to the Coderdojo Athenry information page we have been working on. As we go along we can  add what we have learned to this webpage! coderdojo_first_web_pageNext week we will learn more tags! Remember if you have any questions to just send me an email, my email address is in the notes! Here are this weeks notes! WebsiteDevelopment4

Python Beginners – Driving Game

trackCap

This week we looked at code for the bare bones of a race car game.
We started off by just moving a block around the screen and then rotating it. Then we figured out how to drive it around the screen.
Finally, we looked at how to give the impression of movement to our car sprite by scrolling the track around behind it.
For next week I want the Python group to look at Scratch Beginners week 2 and week 3 as we are going to attempt the same thing in Pygame.
You can find our code from this week here.

Week 3, 2014 Scratch Beginners- Scrolling Backgrounds Contd

Hi everyone,

We completed our Mario game this week. We coded Mario so that he always floated down on to the wall. We added a fraction of a second of a wait so that it appears that he floats as he comes down. This also allows time for you to navigate left or right as needed.

CDA-S3-Challenge09-Scrolling

We also introduced a more advanced concept, the Parallax effect, whereby objects further away appear to move slower than objects nearer. We coded mountains and a Sun to demonstrate this.

CDA-S3-Challenge-Scrolling

Next week, everyone is going to start on there own games, using the code and concepts we have learnt over the last couple of weeks, so bring your imagination with you.

You will a full version of the my notes in pdf form here.CDA-S3-Challenge09-Scrolling.pdf

See you all next week

Martha

Website Development Week 3

Hi All,

This week the notes are mostly a refresher because a lot of ground has been covered in the last two weeks and I want to give a chance to anybody who wants to start learning HTML a chance to catch up. The notes just recap what we have done so far and also explain why it’s not a good idea to use Microsoft Word to make our HTML files! The notes also show that there are some excellent websites on the internet for learning HTML. You can type the HTML on one side, and see what kind of page this code creates on the other. This is super for experimenting with the different HTML tags so give it a go! When I went around to the classes this week some people did mention to me that they were interested in learning HTML, remember if you ever have any questions feel free to email me or talk to me at the Coderdojo every Saturday!

Here are this weeks notes!

James

Python Beginners – Space Defender

                                       ImageToday in the Python group we looked at how a few simple changes can change the look and feel of a game. Our space Defender game uses code recycled from last weeks Bunnies And Badgers game combined with a few new sprites to make a completely new game. We also looked at how to use Geometry when moving sprites around the screen.

movex=math.cos(angle_z)*10

movey=math.sin(angle_z)*10

xpos+=movex

ypos-=movey

The above code calculates how many pixels the x and y coordinates of our sprite needs to be changed for it to move 10 pixels in the direction of angle_z. You can learn more about Sin and Cos here.