Advancers – Recursion (Broccolli!)

Introduction

This week we created another drawing program using recursion, code that calls itself.

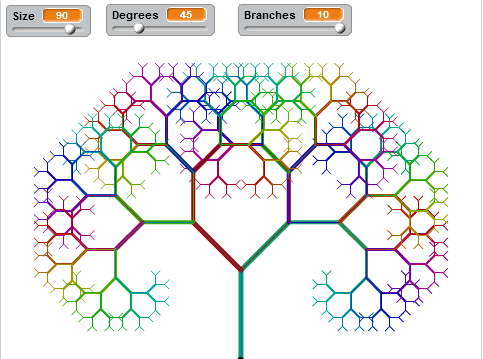
This drawing program will draw a Tree with 2 number of Branches, each Branch will split in 2 and be a little smaller than the previous Branches, The Branches will split X number of times. The finished picture will look something like this when X = 5:

Tree5


You can see that each branch splits into 2 new branches which are a little thinner and a little shorter than the previous branches, just like a real tree.


The Plan

Very simple plan for this one, we wanted to be able to control:

  1. the amount of branches
  2. how many degrees the split should be
  3. and what size the first branch would be

So we created a variable for each of these and left them on the Screen as a Slider. We set some minimum and Maximum values as well.

  1. Branches (1-10)
  2. Degrees (0-180)
  3. Size (30-100)

Sliders

The Code

As always we have some code that initialises everything when the Green Flag is clicked.

GreenFlag


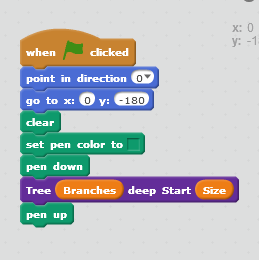
We point upwards, we go to the middle of the bottom of the screen, clear everything, set the Pen colour and then call our code with the values from the Sliders.

Improvement : This should be “When Spacebar Pressed”, then we could just adjust the Sliders and then click the Spacebar to see the next tree.


The recursive code

This is the code that calls itself, because the Branching code is just the same thing repeated over and over again, but with slightly different values (the branches are getting smaller) it is ideal to use recursive code. You just need to remember that the code next to be able to finish.

CustomBlock

The code has two values sent in the number of branches and the size of the branches.

First thing we do is check to see if the number of branches is > 0 otherwise we exit, this is our way to finish the code.

We move (draw the branch), turn and then call ourself with slightly different values.

Just for a bit of variety we change the Pen colour each time as well.


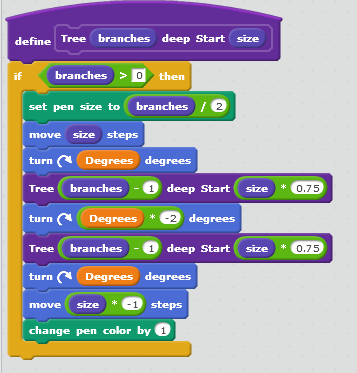
Note: The code for 2019 is slightly different, the middle “turn” code is slightly simpler, we turn anticlockwise and we multiply by 2 not -2, so like this:

Turn01
Both will work as they both do the same thing.

This results in some quite nice Trees 🙂

SampleTree

Notes

The project that we built is available on the Scratch Web Site:

User Name : cdadvancers1819
Password : advancers

Project : ClassVersionRecursion (2018) and Tree-ClassVersion (2019)

Remember, you can put your own projects up there as well if you want.


Creators – Painting

watercolors-854491_640

This week we looked at making a painting program.

We started with three built in P5.js variables:

  • mouseIsPressed – true whenever the mouse button is held down
  • mouseX – contains the X position of the mouse pointer
  • mouseY – contains the Y position of the mouse pointer

We put the call to background() in the setup() function because we didn’t want to clear the background every frame. After that, in the draw() function, we just needed to draw an circle at the mouse’s position every time the mouse button was pressed.

This gave us an very basic painting program in just a few lines of code!

Toolbar

We then looked at the idea of a toolbar to contain buttons for selecting colours and the size of the brush.

We first need to decide where it would be (the left side of the screen) and we created a variable toolbarSize to store the width of it.

In the draw() function we then added a check not to draw an circle if we were inside the toolbar area.

We then added a new function called mouseClicked(). This is a special function name (like setup() and draw()) that P5.js will call at the appropriate time. In this case its called when the mouse is clicked (button pressed down and the released).

Colour and Sizes

We created two arrays to store a list of colours and brush sizes at the top of our script:

let colours = ['black', 'white', 'red', 'blue', 'green'];
let sizes = [5, 10, 20, 40, 80, 160];

To draw the toolbar, we made a new function called drawToolbar() and put a call to it in our draw() function. In the new function, we looped over the colours array, drawing a new button, filled with the respective colour and then another loop over sizes drawing a square with a circle inside to represent the brush size. We needed to scale those circles to make them fit inside our buttons.

Detecting Selected Button

Since everything in our toolbar was toolbarSize high, to determine what had been clicked on, we just needed to divide mouseY by toolbarSize to get the index of the button that had been clicked on. We looked at that index, if it was less than the number of colours, we must have clicked on a colour. If greater, it had to be a size (or beyond the end).

Selected colours and selected sizes were stored in two variables called currentColour and currentSize respectively and used within the draw() function when creating our circles.

Featured Artwork

Mark suggested that people draw a portrait of me to test our new program and there were some brilliant renderedings. Three people were kind enough to share theirs with me so that I could put them here. I think they’re great!

Download

The files for this week can be found on our GitHub repository.

Explorers Week 9 – Maths Game

Hi everyone,

You all did great work on Saturday, there was some quite complex thinking to be done to figure it out but you did great!

CDA-S5-Challenge_10-Maths game-how to

  1. the player picks a level of difficulty and the computer chooses 2 random numbers to add (subtract or multiply- whichever you choose!) together and show the numbers to the player. Fr this we needed 2 SPRITES and 4 VARIABLES called SCORE, LEVEL, NUMBER1 and NUMBER2 as well as 2 BACKDROPS. CDA-S5-Challenge_10-Maths game-ask questions1CDA-S5-Challenge_10-Maths game-ask questions
  2. The player then has to enter an answer to the equation and the computer tells them whether they are wrong or right. CDA-S5-Challenge_10-Maths game-decisions alternative end
  3. We repeated the ask/answer questions 5 or 10 times. Can you figure out where the REPEAT loop fits?
  4. We also had a second sprite who reacted positively to correct answers BROADCAST and negatively to wrong answers BROADCAST. You can use whatever sprites you like and change their look whatever way you like. One coder added a puppy as their second and had him bark whenever an answer was correct. CDA-S5-Challenge_10-Maths game-sprite 2
  5. After all the questions were asked we had the 1st Sprite SAY – Game Over! and BROADCAST Game over so that the backdrop changed and music played. There are two ways to change the backdrop- see below!CDA-S5-Challenge_10-Maths game-alt backdrop CDA-S5-Challenge_10-Maths game-backdropCDA-S8-Week_9_18-MathsGame.pdfCan you improve our game??! Can you figure out how to subtract or multiply instead of add? Can you get the computer to add three numbers together or give the user 3 level options like: easy, medium or hard? The notes for the Maths Game are here:

See you Saturday


Martha

Julie, Ruaidhrí and Eoin

Bodgers – Introducing Gpio Zero

Hi again everyone.

This week we started looking at physical computing and the Raspberry Pi. This involves attaching various components such as sensors, motors or controllers to the GPIO pins on our Pi. This week we connected a LED and two buttons, and we used the GPIO Zero module for Python to control them. I’ve made a video, it’s a little bit long, that covers everything from Saturday’s session.


At the end of the session the group started working on a traffic light idea and we will combine this with HC-SR04 ultrasonic distance sensor next week to create a measuring device.

I don’t have any slides this week as we worked directly from the GPIO Zero Documentation available at https://gpiozero.readthedocs.io. This is also available on Dropbox, along with this week’s code and a sheet that contains a drawing of our circuit and drawing of the GPIO pin layout, here: https://www.dropbox.com/sh/k26mbrfmdvq9tro/AAB5jfjkIlBqLhfnUAVVUvtJa?dl=0.

See you all next Saturday.

Declan, Dave and Alaidh.

Creators: Introducing Force

Last week in Creators, we looked at Vectors and how they can be used to specify things like position, velocity and acceleration.  This week, we looked at what can actually cause something to accelerate – FORCE!  First we talked and played a bit with force and then we created a simulation of something that we could apply different forces to.  We wanted to think about a scene where we had lots of objects and different forces acting like wind, gravity, friction, etc.

What the heck IS force?

We started off by looking at the laws of motion from Sir Isaac Newton, who was the first guy to think hard about this (or at least to come up with good theories).  Everyone knew about the apple but not many about what it made him think of.  We googled his laws of motion and arrived at a NASA web Page that had a nice short explanation:

newton

Newton’s laws of Motion (NASA)

Like all great ideas, these look obvious when you know the answer, but were huge ideas at the time!  I’ll butcher the above laws by trying to re-word them to capture the interesting thing about them from our point of view!

Continue reading

Week 8 2018 Explorers – Paint Program

Hi everybody,

our drawing program. We made good use of costumes this week to make it look like we were dipping our paint brush in each of the different colours.

We also used a variable similarly to how we used in the Piano Game we made. We made it into a slider and then code select the Pen Size we wanted.

Here are the notes in PDF. CDA-S7-Week_08-Paint.PDF


Martha


Bodgers – Finishing Our Game

Hi again everyone.

This week we put the final touches to our game.

uwin

We added some code to increase the speed of the alien sprite as the score increased to make the game a little more difficult.

We then added some code to control what happens when the game is over.

You can find our code on Dropbox here: https://www.dropbox.com/sh/ccfaycpa1zluh8l/AAAA4dQH8EPNJicsQj7RwGgsa?dl=0

Next week we will do a quick recap of this game and then we will start looking at hardware on the Raspberry Pi.

See you all then.

Declan, Dave and Alaidh.

Advancers – Calculater

Introduction

Todays project is a Calculator that will be able to do simple addition, subtraction, multiplication and division.

There will be a Sprite for each number button and for each type of sum, plus an equal and a clear button, so lots of Sprites. The finished Calculator might look something like this:

CalculatorFull

The Plan

As always, it’s a good idea to have a think about what Sprites, Variables and Code you might need, having a think about the Calculator, we came up with the following list:

  • Sprites
    • 1 Sprite for each number button and one for the decimal point, so 11 in total.
    • 1 Sprite for each of the sum buttons, +, -, X and / so 4 in total.
    • 1 Sprite for the equals button.
    • 1 Sprite for the clear button.
  • Variables
    • 2 Variables, one for each number in the sum.
    • 1 Variable for the sum type.
    • 1 Variable for the full sum being calculated.
    • 1 Variable for the answer.
    • 1 Variable to indicate which number variable we should use.
  • Code
    • Code for a number buttons.
    • Code for the sum type buttons.
    • Code for the equal button.
    • Code for clear button. 

We also thought that it would be a good idea to complete only 1 number button and 1 sum type button and make sure that was all working before adding the rest of the buttons.

The Variables

We created all the variables we would need first:

Variables 

  • Variables
    • NumberOne – this is for the first number in the sum
    • NumberTwo – this is for the second number in the sum
    • Flag – this is to indicate which number we should be using when a button is pushed.
    • Operator – this is to indicate what sum, + – X or / we should be doing.
    • Question – this is to hold the complete sum, e.g. 10+23
    • Answer – this is to hold the answer, e.g 33

The First 3 Sprites

To get things started we created a number Sprite, a plus (+) Sprite and an equal Sprite

All the Sprites are very simple, just a square with text in the middle, just remember to make sure that there is a background colour as well, so the When Clicked code will work correctly.

The code for the Number Sprite looks like this:

NumberCode

The code will check the Flag variable and then add 1 to either the NumberOne or NumberTwo variable, it will also add 1 to the Question variable.

Note that the number 1 is added to whatever is already in the number or question variables.


The code for the + Sprite is very simple:

OperatrorCode

We just set the Flag to indicate that we should move on to NumberTwo, we set the Operator to + and finally we put the + in the Question as well.


The code for the equal Sprite again is quite simple as we only have one sum type.

EqualCode

We check the value of the Operator and if it is + we add the NumberOne and NumberTwo variables together and put the result in the Answer Variable.


The other Numbers and Sum types

Once we had the number one, the + and the equal Sprites working it was quite simple to copy and create the other number Sprites. The process was:

  • Right click on the Number One Sprite and Copy it.
  • Change the Costume of the Sprite to the next Number.
  • Change the code of the new Sprite to the next Number.

The bits of the code that we changed are circled in red here:

NumberCodeChanges

The other sum types we did the same way, copy the + Sprite and adjust the code circled in red:

OperatrorCodeChanges

As we added the different sum types we also had to add more code to the Equal Sprite, which ended up looking like this, where there is one IF for each sum type:

EqualCodeAll

The Clear Button

In order to do more sums we also added a clear button, again it is a simple Sprite with some text on it, the code looked like this:

Clear

This code was placed on the Stage, as we needed to run it when we clicked on the Green Flag as well as when we clicked on the Clear Sprite.

Notice that most of the variables start with nothing in them, so they are blank, it is only the Flag that needs to have 0 in it.


Notes

The project that we built is available on the Scratch Web Site:

User Name : cdadvancers1819
Password : advancers

Project : Class-Calculator

Remember, you can put your own projects up there as well if you want.

Advancers – Programming

Introduction

We used Scratch to build our own Programming Language

Scratch used different blocks for different commands, so we decided to write our own Programming Language that would then call the different blocks. This may sound strange, but what it means is that we can have a simple and generic Scratch Program that can run code written in a simple file.

The Plan

  • Describe how our language would work.
  • Create a List variable to hold all our commands.
  • Create a variable to hold the parameter value.
  • Write some test commands to the List variable.
  • Write some code to get the parameter from our commands.
  • Write some code to translate our commands to Scratch commands.

First job was to describe how our language would work with Scratch, we decided that our Programming Language would be able to Draw pictures using the Pen Down, Move, Turn and Pen Up controls.

So we needed 4 commands in our Language, we decided that all the commands would use the same format:

  • First Letter would indicate the command
  • Second Letter would be a colon “:”
  • The rest of the command would be the parameter to use with the corresponding Scratch command.

For example to Move the Sprite 10 steps we would use:

M:10

 To Turn the Sprite 90 degrees we would use

T:90

To put the Pen Up or Down we would use:

P:1 for Pen Down
P:0 for Pen Up

And then we wrote some test code to put some of these commands in to our list variable.

TestCommands

If you look closely you can see that the commands should draw a square, Pen down, Move 100, Turn 90 and so on until we have the square drawn.


This code was put under a When Green Flag temporarily for testing.

We then moved on to the code that would get the parameter value from the command, for example the command M:100 the Parameter is the 100 part. We used a Custom Block for this called P1. Which looked like this:

P1

We send in the full command (M:100 for example) and then we read each letter and if we are on the 3rd letter or more, we add the letter to the P1 Variable, this is similar to what we did for the Calculator numbers.


The last piece of the puzzle was to add some code to read every item in the List and process each command, again this was very similar to the Calculator where we have an IF block for each possible command. Something like this:

Play


We read all the items in the Program List and we check the first Letter, this will tell us what Scratch block that we need to use to run the code.

You can see for each item in the Program List we call the P1 block to get the Parameter value, which we then use in the Scratch Block.


This is what the project looks like when you run the Test Program:

FinalRun

Notes

The project that we built is available on the Scratch Web Site, note that I added a couple more commands Pen Colour and Pen Width as we may need these at some point.

User Name : cdadvancers1819
Password : advancers

Project : ClassVersionProgramming

Remember, you can put your own projects up there as well if you want.

Creators: Objects and Vectors!

This week in Creators we covered a few very important concepts which we will likely need to run over a few times until we get them solid!

What are Vectors?

First we looked into a concept called Vectors, in particular 2D Vectors.  We saw that at the most basic, a Vector is a simple way of holding an x and a y in one variable.  This is useful for keeping track of the position of an object as you only need to keep one variable e.g. “rocketPosition” rather than two “rocket_x, rocket_y”.

vector-add3

The other thing we talked about is how this X and Y can represent a change in a given direction – i.e. a vector with x=10 and y=5 can mean “change X by 10 and y by 5”.  This way it’s useful for ANYTHING that might be in a given direction – things like velocity and acceleration for example!

The other thing cool about the vector object in p5 is that it has a bunch of functions that allow you to add, subtract, etc them.  This would allow you to e.g. add a velocity vector to a position vector to come up with a new position vector!

This web page has some nice details on the maths behind vectors.


Position, Velocity and Acceleration

We saw that position, velocity and acceleration are really common uses of vectors.

Continue reading