Week 3 – Scratch Beginners – Ghostcatcher

Hello Everyone

Hope you are enjoying the Halloween break.

Great to see so many of you there on Saturday, especially since it was a bank holiday weekend.

This week we created a Ghostcatcher game. We used the paint editor in Scratch for the first time. As I said on Saturday, It makes things easier if you think in shapes.

PACMAN

Using the code we have learnt so far, we moved the Ghostcatcher with the mouse and the Ghosts randomly. We also added sounded and score.

PACMAN2

For those of you who would like to add more complexity, I have a couple of ideas at the end of the notes. Give it a go and if you need any help, just ask myself or one of the mentors at the beginning of the next session.

P.S. No session next week, hope you have fun over the Halloween and we will see you back on the 8th.


Here are this weeks notes in PDF. CDA-S4-Week_03-Ghostcatcher.pdf

Scratch Advanced – Custom Blocks and Coordinate Geometry

This week in Scratch Advanced we looked at two areas of scratch that are really useful to get the hang of if you want to build cool games.

Custom Blocks

Scratch comes with many blocks built in, but custom blocks let you actually create your own blocks that you can re-use over and over.  Using custom blocks can make your scripts much tidier and shorter and easier to write.  They are similar to broadcasts, but better because you can pass values to them to make them behave differently.

To create a custom block you go to the “more blocks” menu and add a block.

custom_block1


Give the block a name that describes what it is doing – in the example here I call it “jump”

custom_block3


You can see this is really handy and lets us add jump to our sprite easily without having to copy lots of code around.  You can make it even better by adding “inputs” to the block.

custom_block4

To add an input expand the “options” on the block and click the input for the data type you want – in the case of jump, height might make sense as shown below.


custom_block5


Now we have a jump block that will let us use the block for a normal jump and a super jump – maybe after a powerup or whatever.  You can see how handy this could be for anything you want to do over and over!  If you find yourself writing similar code in more than one place for a sprite, it might be a good time to think about writing a custom block.  One thing we didn’t mention on Saturday which is worth a look is the option for “run without screen refresh”.  When this is pressed, a block will run very quickly and only update the screen when it’s done.  This can be a way to speed up things like drawing programs.  Try it out on the jump example above to see what it does.  When it’s clicked, it will look like the sprite doesn’t do anything.. this is because he jumped up and right down again only updating when the block was finished – and he was right back where he started!.

Writing a Square Block

On Saturday, we used custom blocks to write a function to draw a square using a pen.   Then we showed how easy it was to create nice patterns by just calling the block different ways.

The code we came up with for the block was:

custom_block6


We spent a fair bit of time thinking about X and Y coordinates in Scratch and how to figure out where to move your sprite to get the shapes you want.  One example of how to use our new block is below.  Lots of the clever scratchers came up with much cooler ones than this though!!

custom_block7


custom_block8

Topic 4: Planning and Building a Complex Structure Mod in Minecraft

PyrimidInside This week we have one main goal: build a substantial mod in ScriptCraft that, when you run it, will create an impressive-looking structure! This will include:

You might find it helpful to work in pairs on designing and coding your mods. During the session, I will ask people to load their mods onto my computer, demo them to the group, and explain how their code works. To get things started, at the top and bottom of this post are pictures of mods created by Ruaidhri and Luke. We will take a look at how they work.

Tunnel1

Practical notes:

  • During development and testing, you can end up with lots of incomplete structures that slow down your CraftBukkit server. A simple fix is to delete your world:
    • Stop your CraftBukkit server
    • Open the CraftBukkit folder on your computer: in it you will see folders called world and possibly world_nether and world_the_end delete them all
    • While you are at it, edit server.properties in the CraftBukkit folder to make your new world superflat, write level-type=flat and you could also change other properties such as spawn-monsters=false
    • Restart your CraftBukkit folder to create a new, empty world
    • Re-run your scripts to recreate structures that you want
  • Read the ScriptCraftJS API reference to see what commands you can use for your structures: https://github.com/walterhiggins/ScriptCraft/blob/master/docs/api.md

Week 2 – Scratch Beginners – Building on our first game

Hi everyone,

Great to see you all there on Saturday. This weeks starting point was our game from last week. We wanted to add extra functionality. We added code to the Snowflake so that something happened when the Penguin touched it. Most people added some sound.

sensing

We also made our first variable. We did this so that we could keep track of our score. Using this score we also could add code to make something happen when you reached a certain score and win the game. Again here we added a sound and switched backgrounds.

variable

We learned and used a lot of new code this week and we will see over the coming weeks how we can incorporate it into many different types of games.

Why don’t you try using all the code you have learnt so far to create your own game. We will take time at the beginning of next weeks session to look at any games that people want to show us.

yourgame

See you all next week!

Here are the notes from todays session in PDF CDA-S4-Week_02-FirstGame-Part2.pdf

Python Games – Week 2 : Preparing for our Adventure Game

We made fantastic progress again in the Python Games stream.

We covered Escape Characters, Functions and Boolean Logic (with a quick look at logic gates). Then we looked at the Dragon’s Realm game code available here.

We had a brainstorming session with some great ideas from the ninjas for our own adventure game which we are going to start coding next week.

DSC_0479

My slides from today are available here.python session_2

Topic 3: Creating our First ScriptCraft Mods

2014-10-17_20.54.57

(Notes updated September 2015.)

Previous Topic: Connecting to Each Other’s Servers.

Our First Mod: sayhi.js

I’ll show you how to write a very simple one, sayhi.js, and then a more complex one, scraper.js. After that, it’s up to you to figure out what you can do!

In the Canarymod folder, find the folder scriptcraft / plugins, then make a new folder with your name (or any unique folder name).

Using Notepad++, type in the code shown below and save it in a file called sayhi.js. Here are explanations of what everything means:

sayhi-scriptcraft

Try it out in Minecraft and see if it works!

NOTE: Every time you create a new ScriptCraft program or edit one, you have to type /js refresh() in Minecraft to update your changes. If no commands run, make sure you are opped. (In the Canarymod window, type op <your_mincraft_name>).

To run it, type /js sayhi() in Minecraft.

A More Complex Mod: scraper.js

This makes the skyscraper shown above. We will figure out together how it works!

scraper-scriptcraft

Topic 2: Connecting to Each Other’s Servers

bukkit

(Notes updated September 2015.)

Note: This continues what we started in Topic 1: Getting Started with ScriptCraft and JavaScript.

Next step: Creating our first Scriptcraft mods. https://cdathenry.wordpress.com/2014/10/17/topic-2-connecting-to-servers-and-creating-our-first-mod/

Previously, we installed a Canarymod server and inside it we installed ScriptCraft, a mod that will allow us to build structures in MineCraft by writing JavaScript code.

Canarymod is a Minecraft Server. Therefore, the instructions we followed to connect to it were:

  • Start MineCraft, making sure it’s the same version (1.8 in our case)
  • Choose Multiplayer, then Direct Connect and enter localhost as the server address
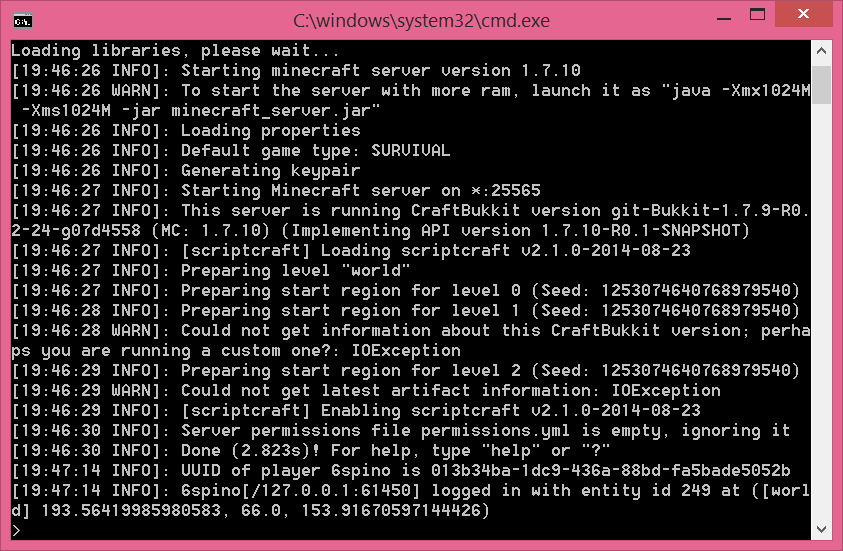
  • If this works, in your CraftBukkit window you’ll see a message that you connected.

Here, localhost is actually means “the address of this local computer”.

But you can also connect to a friend’s computer, if you are all on the same network and you can find out their address. (If you are on different networks, things get a bit more complex: you will have to search online about how to set up port forwarding on your router, and you will probably also need a free Dynamic DNS service.)

On a local network, to find your IP address, open a command window. (In Windows, run or search for cmd.) In the command window, enter the command ipconfig and read through to find an entry like this:

Wireless LAN adapter Wi-Fi:
    Connection-specific DNS Suffix . :
    Link-local IPv6 Address . . . . . : fe21:9ba2:9db6:13e9%4
    IPv4 Address. . . . . . . . . . . : 192.168.1.17
    Subnet Mask . . . . . . . . . . . : 255.255.128.0
    Default Gateway . . . . . . . . . : 10.101.0.1

The IPv4 address is what you need. Get a friend to start Minecraft on their computer, then Direct Connect and enter your IP address. They will then be connected to the server on your computer!

This can be handy if you want to work on projects together.

Next step: Creating our first ScriptCraft mods.

Week 1 – Scratch Beginners- First Game

It was great to see so many of you there yesterday! Welcome back to anyone who was here last year and a big welcome to all our new Ninjas.

We were able to get down to work very quickly yesterday and that was all down to our mentors who got everyone up and running. Thank you, Neil, Julia, Ciara F, Dermot and welcome to our newest member Ciara D and thank you for giving your time.

One of the first things we did yesterday was to go through the Scratch interface and familiarise ourselves with the Menu

sprites

menus

Our first game had two sprites, one which moved by using the arrow keys and one which moved randomly. Now we could have taken the easy option here with this code but instead we looked at the idea of using the X and Y axis and degrees and rotation.

firstgame

As I said yesterday, these are hard concepts for the younger Ninjas to understand at first, but we will be using them week in and week out and they will soon grasp it.

Here are the notes from yesterdays session in PDF CDA-S4-Challenge01-FirstGame.pdf

Next week we will be building on this game and then the Ninjas will build their own game using the code we have learnt so far.

Looking forward to seeing you all back next week!

Python Games – Week 1: Our First Game

We covered a lot of ground today in the Python Games stream . We looked at variables including strings, math operators, inputs and outputs, while loops and if statements. The code from our number guessing game along with some of the code snippets from today are available here.
Ninjas can read the first few chapters of Invent Your Own Computer Games with Python as they deal with the same concepts.
Next week we will run through what we have covered so far, do more work on improving our number guessing game and if we have time, start working on a text based adventure game. Here are my slides fron today’s session python2014_session1.