We started of this week’s session by looking at the recent Soyuz rocket launch which was to send two people to the ISS. During the launch one of the booster rockets failed and the launch had to be aborted. Both crew members, astronaut Nick Hague and cosmonaut Aleksey Ovchinin, escaped without injuries.
Official astronaut portrait of Tyler (Nick) Hague – Blue Flight Suit Picture. Photo Date: January 13, 2014. Location: Building 8, Room 183 – Photo Studio. Photographer: Robert Markowitz
We then continued to work on our pictures and messages for the Mission Zero Challenge. I made a video of some of the work we did, but it’s very hard to film LEDs so the quality is very poor.
If you want to find out more about the Soyuz incident and have another look at how to make pictures and messages with the Sense-hat LEDs my notes are here day 4.
Next Saturday we’ll start looking at Pygame Zero. See you all then.
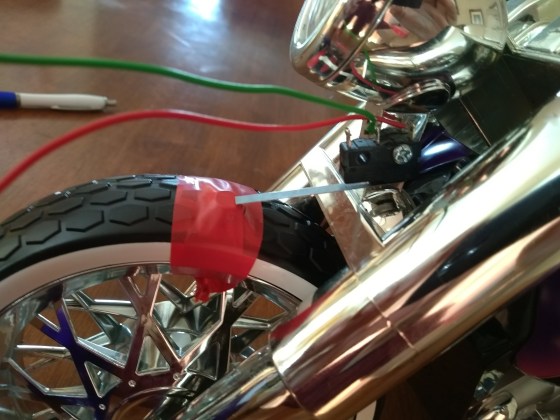
Last Saturday we had a look at how we might figure out how far and how fast a bike is going using a Raspberry Pi. We used a very basic set up with just a micro-switch attached to a toy trike with a little nut taped to the front wheel, each time the wheel rotates the nut would “click” the micro-switch.
We would need to use a reed switch or a hall effect sensor and a magnet attached to the wheel if we were to use this on a real bike.
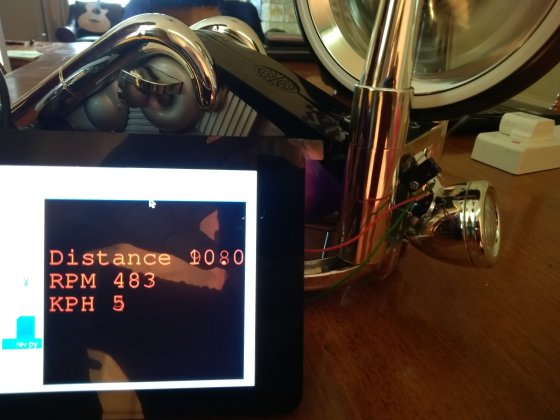
We started of our coding by looking at the time.time() function. This function returns the number of seconds, in decimal form, since 01 January 1970. If we want to time an event all we have to do is use time.time() to get the start time and use it again to get the end time and then subtract the the start time from the end time.
We used this to get the the amount time it takes to do one rotation. Now we want to find out how many rotations we have per minute or RPM (revolutions per minute). As our result is in seconds the easiest thing to do is calculate revs per second so we divide 1 by the time it takes to do 1 rotation and then multiply the answer by 60 to get RPM.
Now we wanted to get KPH(kilometres per hour) so first we measured the circumference of the wheel and found it was 50cm or 0.5 Metres. We then calculated metres per minute by multiplying our RPM by 0.5 and we then multiplied this by 1000 to get KPH.
Here’s a picture of what our results could look like when displayed using Pygame. We will look at Pygame later on as it’s an excellent way of displaying information.
This week we looked at two very useful concepts in JavaScript, Arrays (we’ve also called them lists) and Classes (we’ve also called them objects). They are both things that allow one variable to store more than one value at at time. This can often be very convenient and has the potential to save us a lot of typing! Who doesn’t like that?
Arrays
A plain variable in JavaScript can store a single value, we’ve seen that loads of times:
let a = 5;
let b = 7;
let c = a + b; // will be 5 + 7 = 12
An array variable in JavaScript can store more than one value, just by putting them in square brackets and separating them with commas:
let a = [5, 7]
let c = a[0] + a[1]; // This is the same as above!
The code here does the exactly the same thing as the block above it. See that a now has two values in it and we use a[0] to get the first value and a[1] to get the second. This technique isn’t super useful when we only have two values, but the more we have to store, the more useful this gets. Imagine if we had 10 values, how much shorter would the array version be?
You can also create an empty array and put values in it later:
let a = [];
a.push(5);
a.push(7);
In the code above we create an empty array (nothing between the square brackets) and then use the push() function to add two values into it.
Concept of Classes
A class is a programming concept that lets you define objects which contain both Properties and Methods. Properties are values associated with the object. Methods are actions that we can ask the object to perform.
Think of yourself as a Person object and imagine some of the Properties and Methods you might have.
Your Properties might include Name, Age, Height, Weight, etc. A simple Method you might have could be SayHi(). That would make you say “Hi, it’s <Name>!”.
A method might have arguments, so it could be SayHiTo(“Dave”) which would make you say “Hi Dave!”.
Classes in JavaScript
Making classes in JavaScript is pretty easy. Let’s look at the Person class we showed above:
We say “class“, the name of the class and a pair of curly brackets. Inside these brackets we have three functions (but notice we don’t have to say “function“).
Let’s look at the first of these, called constructor(). This is where we set the class properties. Note that we must put “this.” before properties to distinguish them.
The second two functions, SayHi() and SayHiTo() aren’t too usual, again note that we must use “this.Name” to get the value of the name property.
Download
This week we created a class to represent a bouncing ball and we saw how easy it was, once we’d created the class, to make several of them, all bouncing around simultaneously. This would have taken us a lot more code to do if we hadn’t made a class. As always, the files can be downloaded from our Github page.
This week we worked on getting input from the user and making the game react to it.
InputManager
Unity has a build in system for handling user input. The InputManager can be found under the Edit|Project Settings|Input menu:
The Unity input system is based on the concept of “axes”. The game request if there is input on a specific axis, giving the axis name. What that means in terms of button presses, mouse or controller input depends on the settings in the InputManager. Axes have a value that ranges from -1.0f (full negative, if negative values are allowed) through 0.0f (no input) to 1.0f (full positive).
Pre-defined Input Axes
While the game programmer can define as many input axes themselves as they like, Unity come with many common ones built-in. The first two shown above, called “Horizontal” and “Vertical” are commonly used for movement. The third “Fire1” is usually used for shooting.
We redefined “Fire1” from it’s default key (Left Ctrl) to bind it to the space key instead.
Updating the Code to Detect “Fire1”
We originally had a force applied to our ball in the “PushSphere” script as soon as the game started. We modified the code so that in the Start() method all we did was to retrieve and store the Rigidbody component. In the Update() method (called every time the game draws) we ask if there’s been any input on “Fire1” and only if there has, do we apply a force to the ball:
using UnityEngine;using System.Collections;publicclassPushSphere:MonoBehaviour{publicfloatPushStrength=1.0f;privateRigidbodyrb;//Usethisfor initializationvoidStart(){rb=GetComponent<Rigidbody>();}//Updateiscalledonceper framevoidUpdate(){floatfire=Input.GetAxis("Fire1");if(fire>0.0f){rb.AddForce(Vector3.back*PushStrength);}}}
Before proceeding, we ran our game and tested to ensure it was working correctly.
Moving Our Aimer
The aimer was rotated using input from the horizontal axis. We added a script called AimerController to our Aimer game object. A public property called RotateSpeed gives us a way to tune the speed our our aimer. We don’t need anything in the Start() method, and it’s been removed here for clarity. The Update() method looks for input on the “Horizontal” axis (which maps to the left and right keys) and applies a rotation to the Aimer’s transform using the following logic:
amount to rotate = speed of rotation * user input * time
User input here will either be -1.0f, 0.0f or 0.0f. This equates to rotate in a negative direction (anti-clockwise), don’t rotate or rotate in a positive direction (clockwise).
using UnityEngine;using System.Collections;publicclassAimerController:MonoBehaviour{publicfloatRotateSpeed=1.0f;//UpdateiscalledonceperframevoidUpdate(){floathoriz=Input.GetAxis("Horizontal");transform.RotateAround(transform.position,Vector3.up,RotateSpeed*horiz*Time.deltaTime);}}
Note that we’re rotating about the vertical axis and the rotation is centred around the aimer’s position.
Linking the Aimer and the Sphere’s Direction of Fire
To link the aimer’s with the sphere’s direction of fire, we needed to provide the sphere with a new public property which could store a reference to the Aimer’s game object:
publicGameObjectAimer;
We then simply had to update the AddForce call, in the Update() method, to take the aimer’s direction into account:
Note that we had to also multiply by -1.0f as the ball was initially going opposite to the direction we wanted.
Prefabs
Prefabs are objects, or collections of objects that we want to re-use multiple times. To create a prefab, all we need to do is to drag an object from the Hierarchy to a project folder. We made a prefab of our pin by doing this. Note that prefabs show up blue in the hierarchy to mark them out. When the prefab is changed, all copies of it in the hierarchy are updated as well.
Automatic Creation of Game Objects at Run-Time
Once we created our pin prefab, we worked on adding pins automatically into the game a run-time.
We added a new empty game object and named it PinManager, we then added a component to it of the same name. This script was given a public property, of type GameObject, to store a reference to the prefab. In the Start() method, we use two loops to place nine pins automatically into the scene, using the Instantiate() method:
using UnityEngine;using System.Collections;publicclassPinManager:MonoBehaviour{publicGameObjectPinPrefab;//Usethisfor initializationvoidStart(){for(intx=-1;x<=1;x++){for(intz=-2;z<=0;z++){Vector3pos=newVector3(x*2,0.5f,z*2);Instantiate(PinPrefab,pos,Quaternion.identity);}}}}
Note that there are several versions of the Instantiate() method. The version we’re using allows us to specify the position and rotation of the newly created object. A Quaternion is variable type that can store a rotation. Quaternion.identity simply means “no rotation”.
Testing
Project File
The latest project files can be downloaded from here.
We’ve been busy the last two weeks covering the basics of Unity. Among the topics we’ve touched on are:
Customising the Unity layout
Explaining what the main Unity windows (Scene, Game, Hierarchy, Project and Inspector) are each for
Talked about 3D space and vectors and talked about the difference between local and global axes (child objects)
Shown how to place objects in the scene and how to position, rotate and scale them
Shown how to “fly” around the scene view
Explained how the physics engine works (Physics clock monitoring and moving rigidbodies and tracking collisions and other interactions)
Built a simple physics-based scene which had a ball fall, hit a ramp and roll into a bunch of stacked block
Wrote a script to have the camera follow the ball as it moves
Additionally Mike kindly filled in and talked about the basics of object oriented programming, classes and class diagrams. There is a post from last year that covers this well for those who’d like to read it.
Additionally, the basics of the C# language that we discussed are covered in both that post which we have already linked to above and another which can be found here. The topics we touched on were:
Curly braces as “containers” and the requirement that they occur in pairs.
How semicolons (;) mark the end of statements
Using directives and namespaces.
A basic class declaration
Properties, both public and private
Methods, both public and private
How Unity automatically calls certain methods at certain times, and some specific examples of this:
Start() called when we start the game
Update() called every time the scene is drawn
The up-to-date project file can be found here. Please note it will require Unity 4.5.1 or later.
Hi folks. This week we continued work on our Amazing Racer project. We explained what heightmaps are and we imported a standard heightmap into a terrain object. We also added water and trees to our game map.
Apart from that, I also showed two little fun experimental projects that I worked on over the Christmas break to test a couple of game ideas. I thought I’d upload them here so you can play with them yourselves; maybe even use them as the basis for a game idea?
The first project, called “Physics Test”, is just a Jenga-like tower of bricks, a ramp and a dropped sphere. The sphere and the bricks have custom physics materials to define their friction and bounciness. It can be downloaded from here.
The second is called “Wheel Collider Test”. It uses Unity’s Wheel Collider on a simple vehicle made of a box and four cylinders. The whole thing is on a simple map made from a basic terrain with a flat interior and a raised edge (to keep the car in!). The awesome (cough) textures are from random Windows backgrounds. The Unity documentation for the WheelCollider can be found here. I note reading it that our project sets up the visual elements to represent the wheels differently to the method recommended in the documentation, but it seems to work OK. The project itself can be downloaded from here.