Hi folks, here are the notes for Modelers Week 4, we completed our island scene with materials, lighting and effects.
Copies of files can be found on our Github.
Hi folks, here are the notes for Modelers Week 4, we completed our island scene with materials, lighting and effects.
Copies of files can be found on our Github.
This week we took a pre-made scene with some problems and set out to fix them.

The first two issues were that the plane was flying backwards and at great speed. The initial challenge was to identify what was making the plane move. Looking at the plane, called Player in the scene, in the inspector, we could see it has a script component called Player Controller X added to it.

Double-clicking on the name of the script file (PlayerControllerX.cs) in the inspector allows us to open it. The code for moving the plane is in the Update() method:
        // get the user's vertical input
        verticalInput = Input.GetAxis("Vertical");

        // move the plane forward at a constant rate
        transform.Translate(Vector3.back * speed);

        // tilt the plane up/down based on up/down arrow keys
        transform.Rotate(Vector3.right * rotationSpeed * Time.deltaTime);
We need to concentrate on the line that starts transform.Translate(…). The comment above it says “move the plane forward”, but the line itself is specifying Vector3.back as the direction of movement. Changing this to Vector3.forward makes it move in the right direction. The plane is still much too fast though. This line is asking the plane to move the distance specified by the speed parameter (by default 15m) every frame. What we need to do is to multiply here by Time.deltaTime, the amount of time since the last frame, to convert this movement into 15m per second, not per frame. Here’s the corrected line:
        // move the plane forward at a constant rate
        transform.Translate(Vector3.forward * Time.deltaTime * speed);
The next problem is that the plane turns on its own. In fact, although we’re gathering the value of the “Vertical” input axis in the code, pressing the arrow keys does nothing. We can identify the line of code that’s making the plane turn:
        // tilt the plane up/down based on up/down arrow keys
        transform.Rotate(Vector3.right * rotationSpeed * Time.deltaTime);
This is asking the plane to rotate around Vector3.right (horizontally through the plane) by the number of degrees specified by the property rotationSpeed (with a default value of 100) every second. The multiplication of Time.deltaTIme is what makes it “every second” and not “every frame”, as before. So the plane is turning 100degrees every second, making it do a full loop approximately every three and a half second.
Nowhere here are the user inputs taken into account. How can we use them? Remember that the “Vertical” input axis in Unity works like this:
| Input Option 1 | Input Option 2 | Axis Value |
| W | Up-arrow | +1 |
| <No key pressed> | <No key pressed> | 0 |
| S | Down-arrow | -1 |
We’re gathering this axis value into a property called verticalInput already, we just need to use it. When multiplied in, it works like a switch. If its off (having the value zero) then no rotation happens. If it’s one or minus one, rotation happens in either a positive or negative direction:
        // tilt the plane up/down based on up/down arrow keys
        transform.Rotate(Vector3.right * rotationSpeed * Time.deltaTime * verticalInput);
Now the plane flys correctly and responds to user input, but the it flies directly into the camera and then can’t be seen any more. First we need to grab the camera and move it to the side of the plane, rotating it around to point at the plane. This is better, but it still doesn’t move. The plane quickly flys beyond the area the camera can see. If we look at the camera in the inspector, we can see that it already has a script called Follow Player X on it:
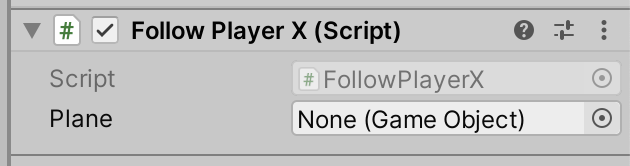
It has a property called Plane, but nothing’s assigned there. We can set this by dragging and dropping the plane from the hierarchy, or by clicking the small circle icon on the right above and picking the “Player” object from the pop-up list. Running and testing this shows that the camera now follows the plane, but it’s right on top of the plane. It needs to be some distance away. Examining the FollowPlayerX.cs script we see at the top there’s a private property called offset:
private Vector3 offset;
that is used in the Update() method already:
transform.position = plane.transform.position + offset;
We just have to give it a value. The easiest way is to change private to public and then specify a value for the offset in the inspector.
The final challenge is to turn the plane’s propellor. Looking in the inspector, we can see this is its own object, a child of the “Player” object:

To make it spin, we can make a simple new script called SpinPropellor.cs and attach it to the propeller. This code works well:
using System.Collections;
using System.Collections.Generic;
using UnityEngine;

public class SpinPropellor : MonoBehaviour
{
    public float spinSpeed;

    // Start is called before the first frame update
    void Start()
    {

    }

    // Update is called once per frame
    void Update()
    {
        transform.Rotate(Vector3.forward * Time.deltaTime * spinSpeed);
    }
}
This is very similar to what we’ve done before, but the axis of rotation is the Vector3.forward here to make the propellor spin in the expected way. I found a value of 1000 or more was good for spinSpeed.
Note that although we’re moving the propellor ourselves, or at least rotating it, that doesn’t interfere with the fact that it’s moving with the plane, because it’s a child object.
Code for this Week
Updated code is on our GitHub repo: https://github.com/coderdojoathenry/Creators-2022 The problems with projects not loading correctly when downloaded has been corrected.
Hi folks. We finished off our game controller by adding buttons and materials. Here are my video notes:
Here’s a link to the folder where all our files. You’ll find a new file in there called controller_3.blend, containing everything we did this week.
Hi everyone,
You all did great work on Saturday, there was some quite complex thinking to be done to figure it out but you did great!


Can you improve our game??! Can you figure out how to subtract or multiply instead of add? Can you get the computer to add three numbers together or give the user 3 level options like: easy, medium or hard? The notes for the Maths Game are here: CDA-S9-Week_4_20-MathsGame.pdf
and here is a link to the game
https://scratch.mit.edu/projects/367754778/embed
See you all in two weeks, enjoy the mid term break!
Martha
Julie, Ruaidhrí, Eoin and Iseult
Hi Folks, this week we started to model a sword using the sword found here as inspiration.
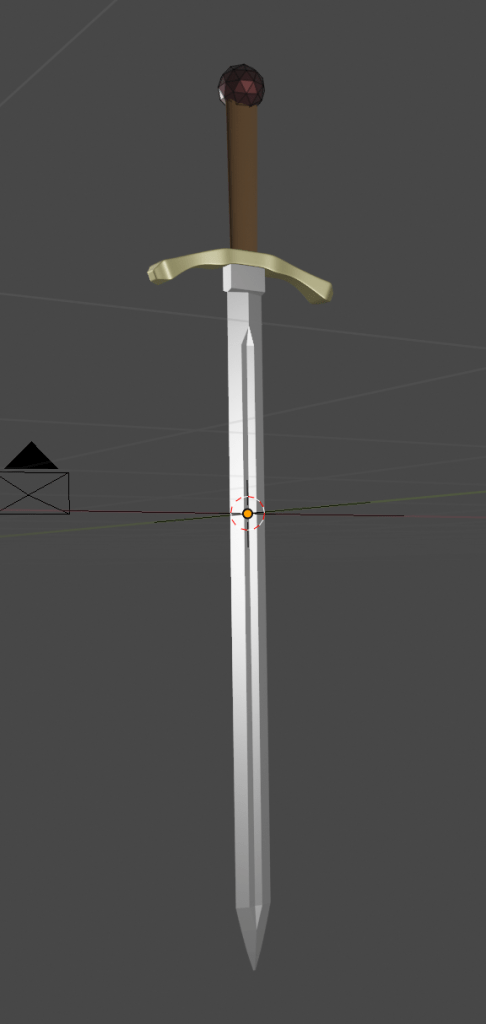
We got 85% of the way through modelling the blade this week. Next week we’ll finish the blade and construct the guard, handle and pommel. These should prove considerably easier than the blade which is the most complex part.
I’ve made a video version of the building of the blade, in so far as we got it to this week:
If anyone would like my Blender file with the part-completed blade, it can be found here.
Hello everyone,
Thank you again to you all for coming on Saturday and I hope you all had fun, which is what Coderdojo Athenry is all about!
We had some great new code to learn and to use all our coding concepts we have learned so far.

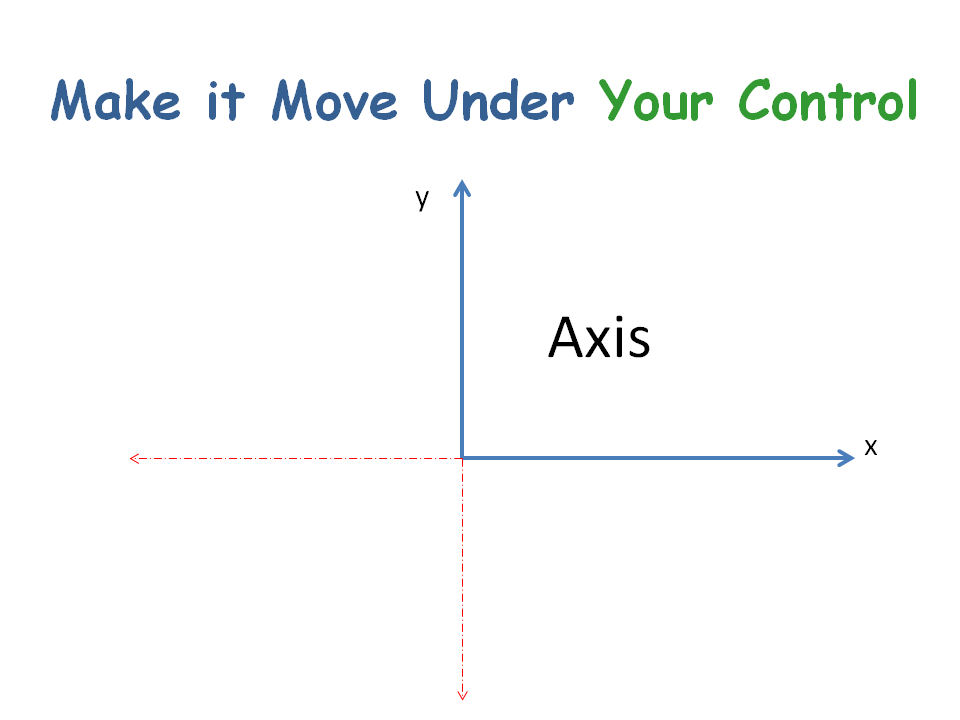
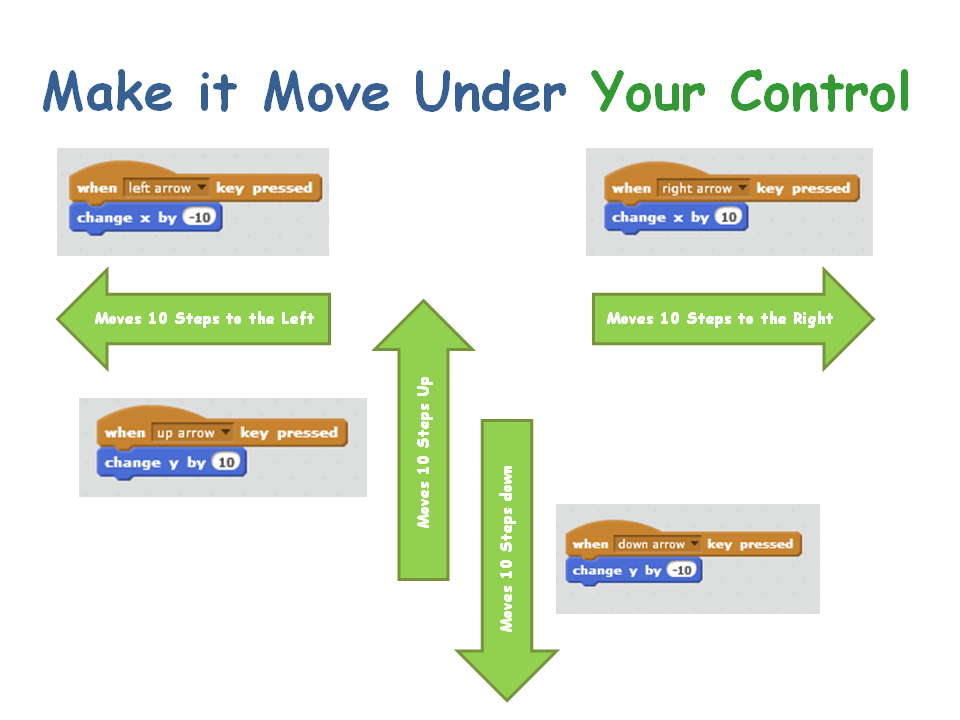
For the first time we wrote code to control our sprite, rather than it moving randomly as it did last week. For this we took a look at X,Y, axis and used this rather than the steps.


We also used our sensing blocks for the first time as we wanted something to happen when our character went off the path.
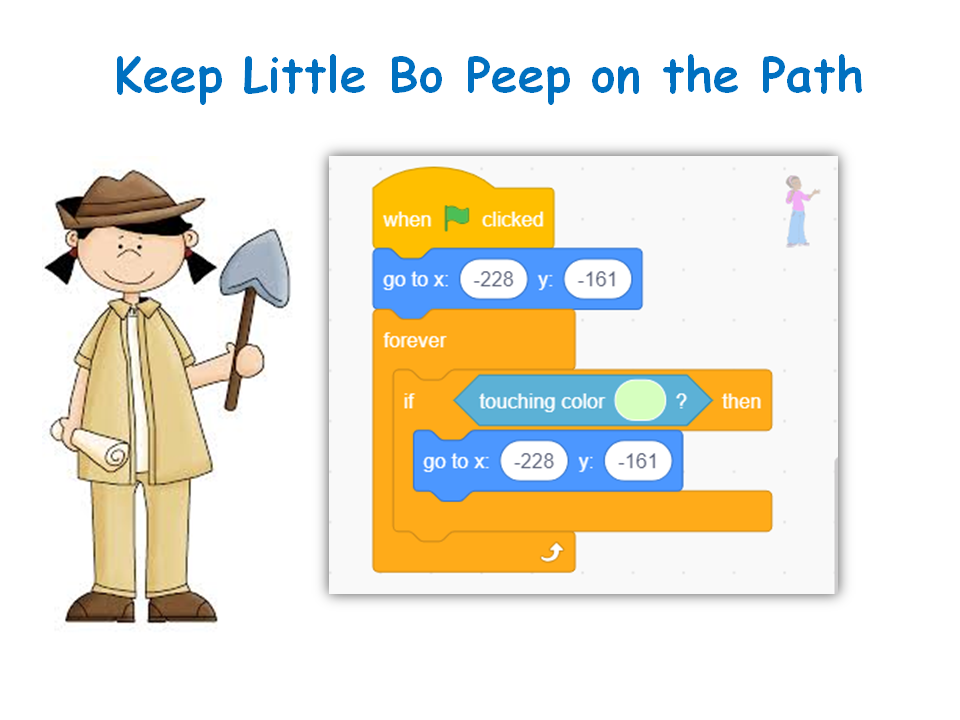 Here are the notes from this weeks session in PDF CDA-S8-Week_04-DinoHunter.PDF
See you next week.
Martha
Julie, Iseult, Eoin and Ruaidhrí
Hello everyone.
Good to see everyone there on Saturday. We finished our game from the previous week, similar to on old game called Breakout.

We used a number of important coding concepts again this week, loops and decisions, Variables, broadcasting, etc.

Don’t forget we are off for the next two weeks. Enjoy the Break!
Here is a link to the notes: CDA-S8_Week 8-Wipeout.pdf
Martha
Hi everyone,
Thank you do everyone you came along on such a lovely day on Saturday, hope you all got to go outside when you went home and enjoyed the weather.
This week, we improved on our game from last week.

Most games reward us for achievements (Gaining:Scores/Money/Health) and penalise us for making mistakes (Losing:Lives, Health, Money)
To this we had to create a Variable. Remember my box with the blocks. A variable holds information for you that you can use again. Remember to always give it a name that is meaningful….

Everything we have learned so far we will be using in ,most of our games we will make in future sessions. Don’t worry if you didn’t understand everything, we will be going over it again and again.
Have fun with the code you have done. Maybe try making another game!
Here are the notes from last week in PDF CDA-S7-Week_04-FirstGame-Part2.pdf
See you all next week
Martha & Julie, Ruaidhrí and Eoin
Hello everyone,
Thank you all for coming yesterday on such a lovely day.
This week we did a simple Piano.

We only had to draw two keys, and then could duplicate these and change the names. The same applied to the code. The code is the same for each key apart from one small change so the note is the appropriate for the key.
REMEMBER! You need to make four changes each time you duplicate:
Change the name of the spite to the next Note
Change the name of the TWO costumes
Change the NOTE played


Remember, no sessions for the next two weeks. Have a nice break and for anyone with confirmations to attend next week I hope the weather is extra nice for you.
See you back on the 4th of March
Here are notes from this week in PDF cda-s6-week-4-17-piano.pdf
Martha
This week we started our first game in earnest. Let’s talk about the design and the steps we took to begin implementing it.

Game Design
The game involves a simple play area with pins. The players tries to knock down the pins by controlling the direction and force at which the ball is projected. The number of pins knocked constitutes the score. The game shares element of classic games such as pinball, bowling and skittles, to name a few.
Setting up the play area
To establish the play area, we used a plane (for the ground) and four cubes stretched to size to provide the walls:
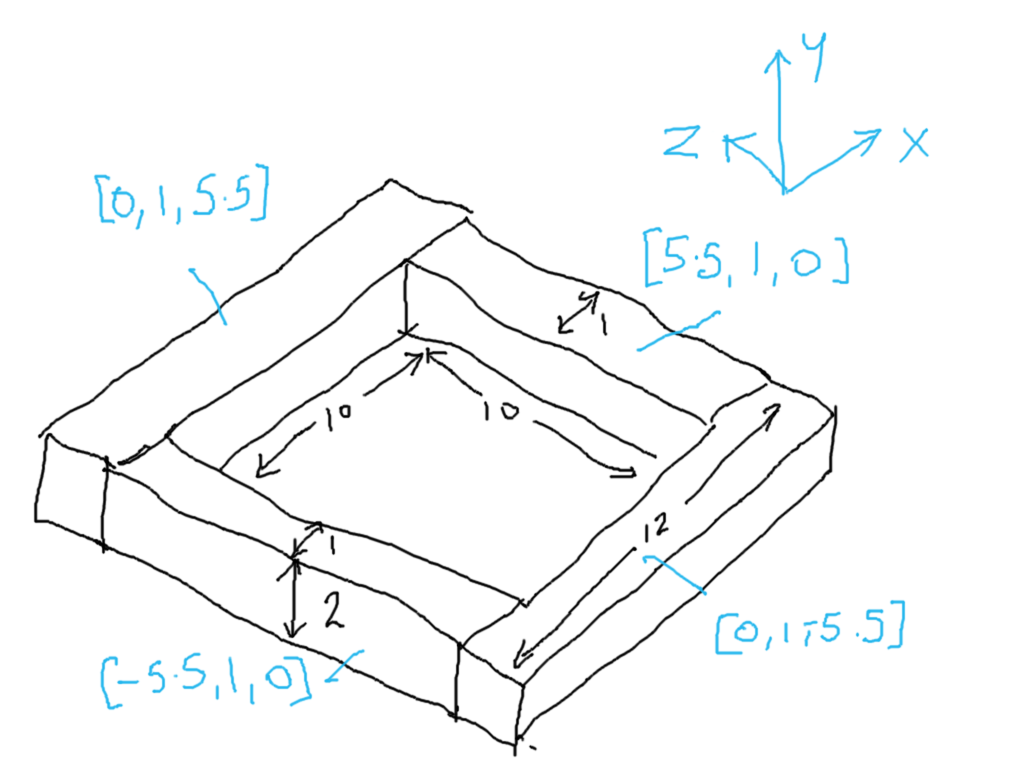
Because we don’t want gaps in our walls, we’ve been careful to be precise with the positions of everything.
Applying a Force to our Sphere
We added a sphere to our scene and made sure that it had a RigidBody body component. The RigidBody component makes it so that the physic engine takes care of the movement of the sphere.
To test adding a force to the sphere we added a temporary script to the sphere and had it add a force to the RigidBody as soon as the game starts.
Immediately it was clear that the force was too weak, so we added a property to the script which allowed us to scale the force. In testing 1000 proved to be a good value. Here is the script:
 using UnityEngine;
 using System.Collections;

 public class PushSphere : MonoBehaviour
 {
   public float PushStrength = 1.0f;

   // Use this for initialization
   void Start ()
   {
     Rigidbody rb;
     rb = GetComponent<Rigidbody> ();
     rb.AddForce (Vector3.back * PushStrength);
   }

   // Update is called once per frame
   void Update ()
   {
   }
 }
We also experimented with creating a physic material and assigning it to the sphere. Different levels of friction and bounciness give different behaviours.
Testing With a Single Pin
To test the sphere colliding with a pin we added a single cylinder to the scene. Like the sphere, we made sure it had a RigidBody component attached to it. When the game started the ball shot forward and knocked the pin, as we’d hoped.
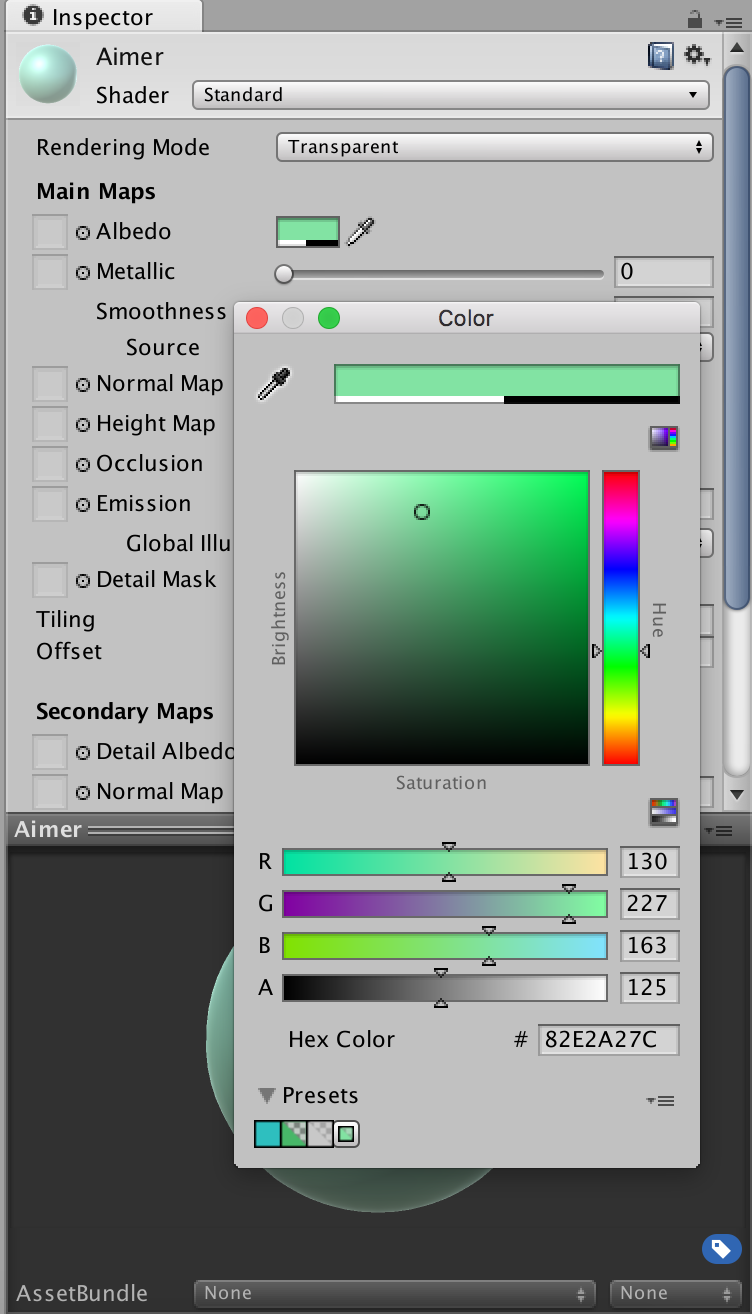
Aimer
To aim our sphere and control the strength of our shot, we created an aimer. The aimer is composed of an empty object containing two cylinders, one pointing forwards and one pointing crossways.
We didn’t want the aimer cylinders interacting with anything so we made sure to remove the colliders from the cylinders.
We also wanted the aimer to be partially transparent so we created a new material, setting the Rendering Mode to “Transparent”, choosing a colour from the Albedo colour picker and setting the Alpha value to a value less than 255.
Project
Updated project files for this week’s project can be found here. This requires Unity Version 5.4.1f1 or later.
