Demos and Pizza – Christmas 2018

Here are photos from our Christmas party and Show & Tell day at CoderDojo Athenry on 08 December 2018.

This slideshow requires JavaScript.

It was fantastic to see the things that our young people had created.

We are very grateful to our supporters in the community around Athenry:

  • Clarin College and Principal Ciaran Folan, who are so generous with their space every week
  • Galway & Roscommon Education & Training Board, who provide us with an annual Youth Club Grant
  • HEA (Higher Education Authority) and NUI Galway School of Computer Science, who provide us with funding towards equipment.
  • Medtronic and Declan Fox, who have provided us with a grant linked to Declan’s volunteering
  • Hewlett Packard Enterprise and Mark Davis, who provide us with loaner laptops
  • Boston Scientific and Kevin Madden, who provide us with the loan of 3D printers.
  • Supermacs, who gave us a great deal on the food for the Christmas party

And of course, we are eternally grateful to our wonderful mentors, and to the parents who come along with their children every week. Thank you!

Hackers – Starting with object recognition

This week we looked at two ways to do object recognition.

Kevin went through the steps involved in finding an object with a particular colour in an image.  He started on an image with six circles each of a different colour, and demonstrated finding a green circle in the image.  Then he stepped through the Python code and explained each task.

Here’s the image:

circles_small

OpenCV, the Open Source Computer Vision library, has lots of functions for transforming and processing images.

We started with a standard RGB (red, green, blue) JPEG image, which OpenCV stores in memory as BGR (blue, red, green).  Then we transformed the image to HSV (hue, saturation, value) format.  The HSV colour space has a very useful property:  colours are described by their hue and saturation.  The value represents the intensity of the colour.  This means that we can use H and S to find a colour, without having to worry much about lighting or shadows.

Next we used the known value for the green circle to apply a threshold to the image:  any colours above or below the threshold are converted to black.  Any colour at the threshold is converted to white.  Here’s what the thresholded image looked like:

threshold_small

Then we found the white area in the image.  To do that, we used an OpenCV function that gets the co-ordinates for contours that can be drawn around the boundaries of all the white regions in the image.  We calculated the areas of each contour, and took the largest.  We’ll find out why this is useful later.

To show that we had found the right circle, we calculated the co-ordinates of its centre-point.  Finally, we drew a small cross at that centre-point to mark it, and displayed the full image on screen.  This is what we ended up with:

green_smallSince we had a contour, we also used that contour to draw a line around the perimeter of the circle.

Next, we took a photo of a blue marker, found the HSV value of the blue, and used that value to find the marker in a live image.  We held the marker in front of a laptop webcam, moved the marker around, and watched as the spot moved with it.  Our method for finding a particular colour works for any shape, since we use a contour, not just circles.

Michael introduced us to TensorFlow, a machine learning library.  Once trained, TensorFlow can identify specific objects by name.  It’s a lot more sophisticated than finding something by colour.  We spent some time setting the library up on a Raspberry Pi.  The Pi isn’t powerful enough to train the software, but it is capable of doing the recognition after training models on more powerful computers.

Or final goal is to build an autonomous robot to play a game of hide and seek.  We can use one of our remote-controlled battlebots from last year to hide, and the new robot to do the seeking on its own.  One way to do the seeking would be to go after the biggest thing in the robot’s field of view that has a particular colour – the colour of the hiding robot.  Another way to do the seeking would be to train a TensorFlow model with pictures of the hiding robot, so that the seeker can recognise it from different angles.

It’s going to take us a while to figure out what works best, and then we have to work out how to control our robot.  It should be an interesting new year.

Bodgers – Traffic Light with Buzzer

This week we continued working with GPIO Zero, at the end of last week’s session we had started working on a simple LED traffic light, we finished of that this week and we added a buzzer to it.

circuit2

I had hoped to work on the HC-SR04 distance sensor but there seems to be an issue with them on the Raspberry Pi at the Moment.

Here is a video that demonstrates what we covered on Saturday.

See you all next Saturday (08-Dec) for our Christmas party.

Declan, Dave and Alaidh


Advancers – Program + Recursion

Introduction

This week we looked at both the Progam project and the Recursion (Branching) project. with a plan to get the output of the Recursion project be the input of the Program project.

The 2 Projects

Program Project

The Program project that we did a couple of weeks ago can read a list of commands and get Scratch to perform those commands. We programmed it to be able to:

  • Put the Pen Up or Down (P:0 or P:1)
  • Move some steps (M:100, where 100 is the number of steps)
  • Turn in a different direction (T:90, where 90 is how far to turn)

Each Command was identified by the First Letter.

Recursion Project

The Recursion project that we did last week can draw a branching Tree pattern. The commands it uses to draw the Tree are:

  • Pen Up and Down
  • Move some steps
  • Turn in a different direction.

Joining them together

The Recursion Project changes

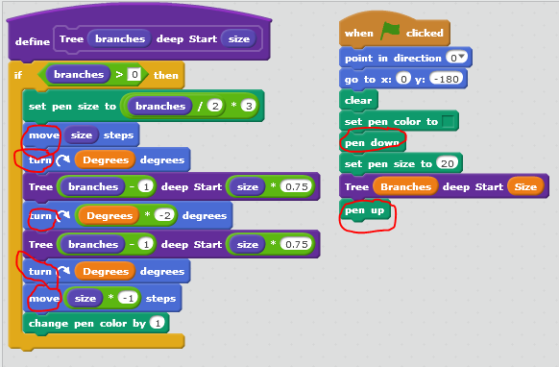
You can see that the Recursion project using the same commands as the Program project, but in order to get the commands from the Recursion project to the Program project we have to add some code to the Recursion project.

First job is to create a List, we called it Commands as it will store all the commands that we have run.

CommandsList

We then need to read through the code and wherever there is a Pen Up, Pen Down, Move or Turn we need to add an item to the Commands list.

This is the code and I have highlighted where

You can see that I have marked 7 places where we need to add code to Insert into commands.

AllCodeMarked

When the Inserts are added the code will look like this, just remember that the Insert has to put in the Command letter that Progam needs Joined to the same action that the Recursion code is doing. All the entries go in the last place in Commands.

GreenFlagCommands


You can see that we have added a delete all to start and then after the Pen down we have added a P:1 to the last place in Commands.

On the Pen up we have added a P:0 to the last place in Commands.


Then we did the same to the Code that did the drawing of the Branches.

CustomBlockCommands


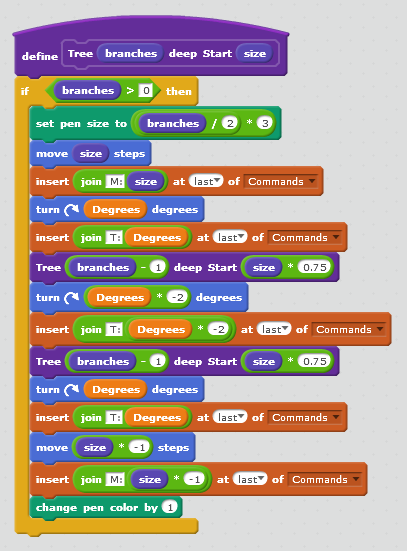
Notice that all the Inserts use a JOIN block, the first section is the Command letter that the Program project is expecting, the second section is the exact same code from the code block above.

For example when the code turns Degrees * -2 the insert also has Degrees * -2 in the second section of the JOIN.


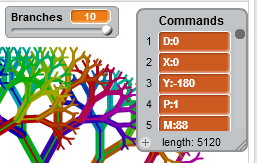
If we run the Recursion Program now, the Commands list will end up with lots of commands, if you have 10 Branches it creates 5117 Commands!

CommandsPopulated


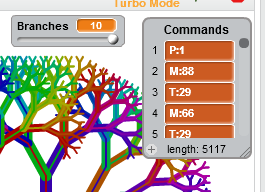
You can see that Commands starts with a Pen Down (P:1) and then starts all the Moves (M:…) and Turns (T:…) and when the Tree is finished there are 5117 items in Commands.


Next step is to Export the Commands to a file. This is simply a case of Right Clicking on the Commands List and selecting Export, just make sure you add a .txt to the file name and also remember where you saved it!

The Program Project changes

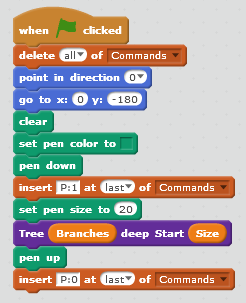
Now we switch projects and open the Program Project.

First thing we changed was to remove all the test code, add some instructions and move the broadcast Play to when the space key pressed.

Instructions

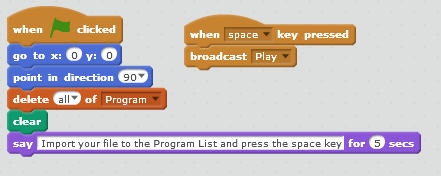
Next step, click the green Flag and follow the instructions.

So right click on the Program List and Import the file that you Exported from the Recursion Project. And then press the Space key…

FirstTest

Hmm, not quite what we were expecting, but close, the Tree is on it’s side and the drawing has started in the centre of the screen rather than at the bottom.

This test has highlighted a number of problems with our Program Project. We don’t have any code to set the Direction of the Sprite or the X and Y Positions.

Well that is easy to fix, we just add some more Command Letters to our Programming code:

  • D:nnn – This will set the Direction to point in, where nnn is the Direction to point in.
  • X:nnn – This will set the X Position, where nnn is the X position.
  • Y:nnn – This will set the Y Position, where nnn is the Y Position.

This gave us 3 more IF sections in our code like this:

NewCommands


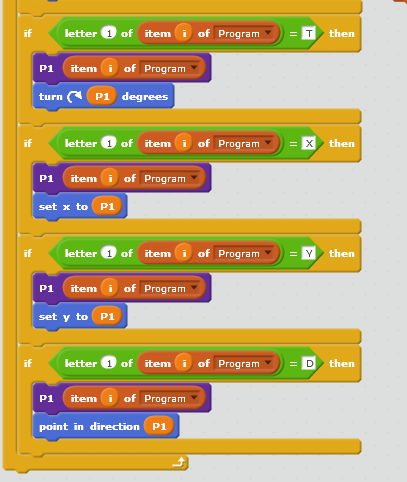
You can see that the new commands are almost the same as the old ones, we just change the letter we are looking for and the code block that gets run if we find one of the New letters.

So D:0 for example will run the Point in Direction code with the value 0 (Up).


The Recursion Project – more changes

Now this where we have to jump back to the recursion project and add some more Inserts so we can set the correct direction and the correct X and Y positions. Again this is not too difficult, we just look for code that sets the direction or X and Y Positions and add some Inserts into the Command list.

ExtraInserts


You can see 3 extra insert code blocks, 1 for the point in direction code and 2 for the go to x: y: code block. We have to add 2 here because our Program project is very basic and doesn’t know how to do a Go To…


The Commands List will now get 3 new entries at the beginning and have a total of 5120 commands now. Don’t forget to Export this new list to test the Program project again.

ExtraCommands

And Finally

Program Project – test 2

Now that we have the Recursion project writing out the extra Direction and X and Y commands we can test again in the Program project.

And, test 2 is a little better than test 1.

SecondTest


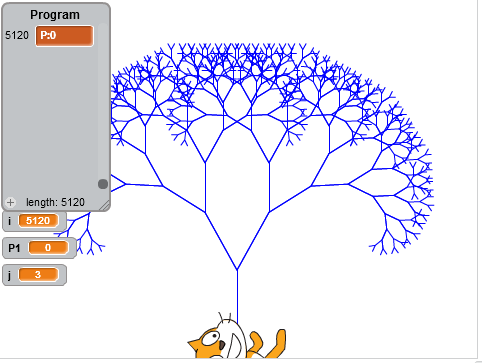
It’s still not perfect, the line is all the same thickness and the colour is always the same.

But you could easily add some more Program letters to add this extra functionality.


Notes:

As always the code is on the Scratch web site, I have added 2 projects that should produce the results you see above:

  • ClassVersion-Program
  • ClassVersion-Recursion

User Id : cdadvancers1819

Password : advancers

Creators – Tanks

tank-1530043_640

The main purpose of this week’s session was to explore the idea of transforms by using them to make a little top-down tank that we could drive about the screen. I close a tank because:

  • It’s easy to draw a recognisable tank with a few simple shapes
  • It’s easy to see which way is forward
  • Tanks move in a very simple way (either turn or drive forward or backwards)

Origin and Axes

We don’t often use the word, but the top left of the screen (0, 0) can be referred to as the origin.

Another useful word is axes (plural of axis). We have two axes in 2D – the X-axis which normally runs horizontally left-to-right on the screen and the Y-axis that runs top-to-bottom.

Transforms

With these words in hand, let’s talk transform. P5 has three functions that allow us to make transforms. Once we call them, they effect everything that’s subsequently drawn. Here they are:

  • translate() – Move the origin by a given amount along the x and y axes.
  • rotate() – Rotate about the origin (wherever it currently is).
  • scale() – Scale along x and y axes.

Design of our Tank class

Our Tank class has five main things:

  • A constructor that takes and stores a vector for the tank’s position [this.pos]
  • A property to store the tank’s angle [this.angle]
  • A function to draw the tank [draw()]
  • A function to tell the tank to turn left/right [turn()]
  • A function to tell the tank to drive forwards/backwards [drive()]

We draw our tank as if it’s centered on (0, 0) and facing right.  We then can use translate(this.pos) to move it and rotate(this.angle) to change its angle.

For turn() all we need to do is to to change this.angle by a requested amount.

For drive(), we do a little more. We:

  • Create a copy of the current position
  • Create a vector (1, 0) which is facing right (representing the tank’s forward direction)
  • Multiply that vector by how fast we want the tank to move
  • Rotate that vector to point in the tank’s actual direction this.angle
  • Add to the copy of the current position we took initially
  • Check that new position to make sure we wouldn’t end up off-screen and, as long as we we wouldn’t, update the tanks actual position this.pos

Getting user input

We then need to get input from the user. In sketch.js we created a new function getInput() and put a call to it in our draw() function.

In getInput() we just look for the arrow keys. If we see Left or Right then we tell the tank to turn. If we see Up or Down we tell the tank to drive. We use the P5 function keyIsDown() for this.

Download

The files for this week can be found on our GitHub repository. The actual files uploaded have expanded the game a little. There are now two tanks and the Tank constructor takes two new arguments for the tank’s colours. The second tank is controlled not with the arrow keys but with WSAD and we use the P5 variables keyIsPressed and key to detect those being held down (as they’re different to the arrow keys).