Scratch Beginners – White and Yellow Belts

Python Coders

And the Scratch Advanced

And the Party!


Scratch Beginners – White and Yellow Belts
Python Coders
And the Scratch Advanced
And the Party!
Just one thing to say:-
ABOVE ALL, BE COOL.

This week, the challenge in Beginners’ Scratch was to write your own version of the classic Breakout game.
This game uses lots of the big ideas that we have encountered in previous weeks, and that are good to know about when preparing to get yellow belts. These big ideas include:
Here are my notes from the day (PDF format): CDA-S2-Challenge09-BrickGame.pdf
Here is my version of the game: http://scratch.mit.edu/projects/cdathenry/2964870
If you would like a copy of my slides in PowerPoint format, get in touch via Twitter or the comments.
What are we going to learn this week.
1. Global Variables – A Variable that all Sprites can see.
2. More requirements
3. Ninja Belts
And that is about it for new things. We are primarily going to be concerned with getting the Present working in the Christmas Game and the final display of what you have caught.
Now, we will start in reverse and look at the “more requirements” part first. Remember we had a requirement for the game that a present should fall and if we catch it, it should be put under the tree. Well we can write that out a little better as another set of Requirements, so here goes:
More Requirements:
The present should:
1. There should be Ten presents.
2. The presents should fall in the two minutes at random times.
3. Each present should fall from the Sleigh to the ground.
4. If the present touches the fire, then it is caught, and should be moved under the tree, anywhere under the tree, but not all on top of each other.
5. Each present should be a different size and colour.
6. If a present is caught we need to keep track of how many we have caught.
So, what we can do is create one present that meets all of the above requirements and then copy it.
For number 6, it looks like we need a Global Variable so all the Present Sprites can update it. So lets make that..
And while we are on the subject of Global Variables, if the Present Sprite needs to drop from the Sleigh, it needs to know where it is, so the Sleigh needs to update a Global Variable with it’s X value all the time.
If you select the Stage, when you create a variable it is automatically a Global Variable. You don’t get the option to create it “for this Sprite only”
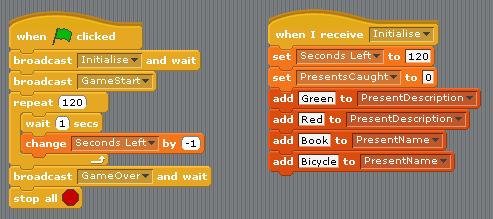
We need one for the X Position of the Sleigh and one to record the number of Presents. Don’t forget to update the Sleigh Sprite so that it updates the X Position variable. Something like this:

Notice that I don’t have the Green Flag to Start the Game, I have used a GameStart broadcast, this is Broadcast from the Stage where I have all my initialisation code as well.
While we are creating the Global Variables, we can also create the two lists that we need to store the names and descriptions, so two lists as well.
This is what I have to set the lists at the begining of the Game:
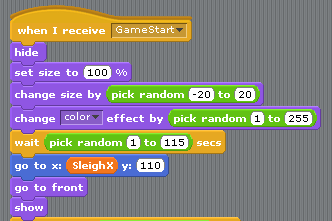
Now back to the Present and the requirements.
This is the code that I have that meets the requirements… Random Colour, Random time delay, after the delay, go the X Position of the Sleigh…
Now we have to sort out how to recognise if the present has been caught by the fireplace. I picked one of the colours in the fire, and used the if touching code to find out if it has been caught. If it is caught, then we move it to the Tree.
We don’t just move the Present to the same point though otherwise they would all land on top of each other. I pick a random point under the Tree. Like this:

The ninjas of CoderDojo Athenry are starting to get ready for a new challenge: to earn belts!
Like martial arts dojos, the CoderDojo movement award belts of various colours from white to black, in recognition of skill levels in different coding disciplines. One big difference, though: our belts are USB memory keys that you can wear on your wrist!
Two weeks before the day on which we will be awarding belts, we took time to explain the process the the ninjas. The Scratch Beginners can earn one of two possible belts:
The Scatch Advanced group have the potential to earn Yellow or Blue Scratch belts, and the Python Beginners have the potential to earn White or Yellow Python belts.
To earn a Yellow Belt, you have to first be eligible for a White Belt. You also have to write a program in advance, and explain aspects of it to the mentors on the day, in order demonstrate your knowledge of Scratch programming concepts such as:
Here are the presentation slides from the day, in PDF format: CDA-S2-Challenge08-PrepareForBelts.pdf
If you would like us to send you these slides in PowerPoint format, feel free to get in touch on Twitter or via the comments!
What are we going to learn about this week.
1. Code reuse
2. Testing and Debugging
3. Exams!
1. Code Reuse – how to plan ahead and only write something once, remember the button we did that we exported and used again in other projects? Well, you can do the same kind of thing
within Scratch if you need several Sprites to do exactly the same thing.
First you create one Sprite and add all the code that you need for that one Sprite.
When you are happy with the way that Sprite works then just right click on the Sprite and select duplicate. The key to getting the best out this of this functionality is to ensure that the first Sprite that you have done has everythin working correctly.
2. Testing and Debugging – This is normally done using the original requirements, you basically go through the list of things that the Game should do and tick them off if it works. It helps if you have the list written down and then you know what you are testing.
And, it also helps if you get someone else to test your Game, as they will test it differently to you.
So here is the list of requirements from last week:
1.It needs to look like my living room with a nice window and lovely fire place.
2.At Christmas, when you look out the window it is normally snowing.
3.We normally have our tree in the corner, with a nice set of lights on it.
4.Santa normally flies across the top of the house and drops the presents down the chimney, lately he has not had a good aim, so we will need to be able to move the fireplace left and right.
5.If we catch the presents, we can move them to under the tree.
6.I don’t want the game to last more than two minutes.
7.And when it ends I want to know what all the Presents are.
It’s best to use Presentation Mode to do your testing.
And go through each item on it’s own. At the moment we haven’t completed all the code for everything, so you can only test the parts that are complete.
If it passes, perfect, if not, it’s time to start debugging.
Debugging, the first thing to do is run your test again, to confirm that it’s not working. There are two very important things to know here:
1. What SHOULD happen – this is what is described in the list of requirements.
2. What is happening – this is the result of your test.
When you have those two bits worked out, you can start looking at the code to see what is wrong.
In Scratch, it is possible to see which piece of code is actually running, this is done using the Edit – Start Single Stepping.
Try it out, but DON’T use the Green Flag to start everything, just click on one of the Control Blocks to start that one piece of code.
3 Exams – ok, don’t panic, but it is that time of year again.
We are all going for the Blue Belt this time, and your knowledge will be tested on what we have learnt in the last 8 weeks. Here is a refresher of the things that we have covered:
Week 1. Movies.
Week 2. Sliders and Buttons
Week 3. Random Numbers, Stamping, Saving Images.
Week 4. Exporting Sprites
Week 5. Code Reuse – Parallel and Sequential Programming.
Week 6. Lists, for saving data and reading it out.
Week 7. Code Modules, using LIsts as a Database.
Week 8. Coding to Requirements.
Dear Santa,
I would like a nice new game for Christmas.
I would like it to be a Christmas game where you have to catch the presents in the fireplace
Just to make it easier, here are some more things that I would like it to do.
So you might need to think about the following:

These are the notes from our seventh challenge in Season 2 of Scratch Beginners, CoderDojo Athenry.
The challenge this week was to work on your own game. The coding concepts for this challenge are:
A key point in developing your own game is to start simple, get the first idea tested and working, and then start adding more. We also spoke about the usefulness of planning on paper, rather than jumping straight into coding (which can be a tough one to sell!)
Here are the notes from the day (PDF): CDA-S2-Challenge07-YourGame.pdf
If you want to check how we did things in previous challenges, you can find the programs here: http://scratch.mit.edu/galleries/view/183379
We will continue to work on our own games next week, and I will post a link to a gallery of games that ninjas have produced.
What are we going to learn this week:
Modularistion – How to make your code simpler and easier to look after.
Sequential Processing – review
Databases – storing static data to use later in the day.
Remember the Piano last week, where we ended up with the same code repeated again and again, all that copying, yeaagh!!!
Well this week we are going to have a look at doing the same thing but a little smarter.
This is the code that we ended up with last week, where everything was the same apart from the Mouses X position that we were checking.

Well we are going to look at making this a lot smarter.
Let’s imagine if we could get the notes on the Keyboard to got from 1 to 15 instead of 48 to 72, that should then make things a lot simpler. In order to do this we need to do a little number crunching, don’t worry if you don’t understand all of what follows.
My Piano Keyboard goes from X = -222 to x = +222 it would be easier if it went from 0 – to 444?

We can sort this out easily enough, we just make our own variable to store the Mouse X value, and add 222 to it, like this:

So our Keyboard is now 444 units wide and there are 15 keys on it, that means that each key takes up (444 / 15 ) 29.6 units.
If we divide the MouseX value by 29.6, we get the number of the Key that has been pressed (ranging from 0 to 14). For example if the User clicks on the third note, this would have an X value of around -150, we add 222 to that, which gives us 72, we then divide 72 by 29.6 which gives us 2.43, if we just take the number before the decimal point, this gives us 2, which is the third key 0,1,2. And to make it three we just add one.

Now to get just the number to the left of the decimal point is not as simple as rounding, as we always want to round DOWN. So the simplest way to do it in Scratch is to just treat as some text and find out where the “.” is. If it is in the third character then we take tw characters, otherwise we just take one. Fortunately we know that there will only be a maximum of two numbers on the left. And finally we add the one at the end so we end up with this…

Now this has got us a number from 1 to 15, how do we translate that into the correct Note to play?
We need a Database of all the possible Notes that can be played. We will store this information in a List, and fill it full of data when you click on the Green Flag.
The Notes go from 48 through to 72, with a few missing inbetween. What we want to do is have the Notes numbered from 1 to 15. This will make it easier to figure out what note to play when the user clicks on the keyboard.
We fill the list as like this…

So how does this all help us get rid of the big long repeated code block that we had before?
Well, instead of looking to see where the mouse is ourselves we just ask the code that does all the Maths to figure it out for use. We can use a Broadcast and Wait for this, so we have one “if mouse down” which asks the other code what Note should be played.
If you take out the Record and Playback code, this is everything you need…

This week, our challenge is to work on Animation projects. We are looking at two project ideas: telling stories and scrolling backgrounds.
To tell a story, we have two sprites with speech and pauses carefully timed so that they have a conversation with each other. I just did a simple knock-knock joke, but you could do more.
After, we worked on how to make a scrolling background, a bit like the scrolling demo example that is supplied with Scratch. We figured out how to create the appearance of left/right movement by moving a sprite representing the ground in the opposite direction. We also found out how to make distant background objects, like mountains, move more slowly (called the parallax effect).
Coding concepts that we discussed included:
Here are the notes from the day (PDF): CDA-S2-Challenge06-StoriesAndScrolling.pdf
Here is my Knock-Knock animation: http://scratch.mit.edu/projects/cdathenry/2899125
And here is my Scrolling Background with Mario: http://scratch.mit.edu/projects/cdathenry/2531497
If you would like us to send you the PowerPoint slides of my notes, get in touch via twitter or by leaving a comment.


