This week we worked on random pin placement for our game. We updated the existing PinManager component to randomly (as opposed to regularly) place a number of pins into the scene.
Arrays
An array is a way for a variable to hold more than one value. It’s a a very useful concept in programming; complex programs would be practically impossible without them. In C# arrays are declared as follows:
The first line creates a one-dimensional array called nums which has four entries: nums[0], nums[1], nums[2] and nums[3].
The second line creates a two-dimensional array called grid. Note the size in this case depends on the values of the variables rows and cols. The first entry is grid[0,0] and the last is grid[rows – 1, cols – 1]. The total number of locations in this array is rows * cols.
Last Saturday we did a slightly different game to usual., There was no movement, no sensing when something happened. It was a Maths Game, a guessing game where the computer picks a random number and we had to guess the number.
We had to first make sure that a random number was picked using an Operator. Previously we have used a Variable to store a Score or Lives, but this time it was storing the random number and our guesses. Leaving them on screen as we were testing allowed us to understand more about the variable and what it does…it also made the testing a little easier.
Depending how any guesses we were given we repeated our code that number of times. As well as having to make decisions, i.e If_then, we also had to do a comparison before making the decision, to determine whether the guess was correct, too low or too high.
Some of you tried to add a timer and below is the code you will need if you didn’t get it to work. Take a look and add it to your own game/games.
This week we tried something different with some text based coding. We learned that for text based coding, we need a good text editor. The text editor we picked was called “Atom” as it’s a free, powerful text editor that works on Mac, Linux and Windows.
Unfortunately.. with some network and pc problems.. it took longer than I hoped to get things installed on people’s PCs, but even then we managed to make a great start on some code and actually built some quite cool stuff.
For anyone that missed last week.. it would be great if you could run through the steps below and we will be ready for the next stage!
This week we spent some time adding sound to our game.
Recording
We needed a rolling noise and a falling pin noise. I worked on these sound at home.
To get a rolling sound, I recorded several different objects rolling, but settled on a roll of duct tape rolling across a wooden table top. It had the pace and tone I was looking for. For the falling/impact sound, I recorded a wooden muddler (visible above the duct tape above) falling over on the same wooden table.
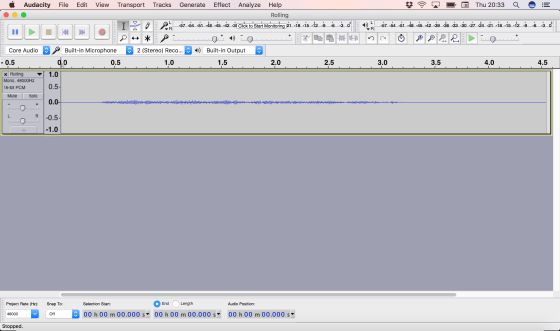
The sound clearly had quiet portions at either end and the sound ramped up and down either side the relatively steady portion in the middle. We selected a reasonably steady central portion of the sound and removed the rest.
This sound was intended to loop seamlessly. Normally the start and end of a sound don’t line up well and there’s a clear point at which the loop starts again.
A useful property of this rolling sound is that sounds much the same backwards as forwards. We were able to take advantage of that to produce a smoothly looping sound. We copied the sound, pasted it to a new track, reversed the new track and mixed them together. This meant that either end of the new sound was identical and the looping was seamless.
With the impact sound, the process was simpler. The recording had a lot of silence at either end and an impact noise with two peaks:
This had resulted from the muddler bouncing after the initial impact and coming down a moment earlier to hit the table a second time.
Since we only wanted a single impact noise, we just cut the sound to exclude the first impact.
In both cases these audio files were exported from Audacity as WAV files for use in Unity and we placed them in an Audio subfolder of our project. The edited files are here.
Adding The Sound Files To Our Game
We first worked on adding the rolling sound to our sphere. We wanted two things:
The sound should be louder as the sphere rolls faster
The sound pitch should rise as the sphere rolls faster
To provide a place for the sound to play from, we added an AudioSource component to our sphere and assigned the Rolling sound to it’s AudioClip property. We also made sure that the volume was set to zero and the “Play on Awake” and “Loop” options were both selected.
In our existing PushSphere script, we added two new public properties:
Finally, in the Update() method, where it will be called every frame, we set the AudioSource’s pitch and velocity based on the sphere’s speed (a.k.a. the magnitude of the velocity):
We then tested the game. We found that the rolling sound is pretty quiet and isn’t always that apparent, but I was able to clearly hear it at home.
For things that make a sound when the sphere impacts them, we created a new script called SoundOnImpact. The code in this is very similar to the new code we added to PushSphere and it’s here in its entirety:
using UnityEngine;using System.Collections;using System.Collections.Generic;publicclassSoundOnImpact:MonoBehaviour{publicfloatVelocityVolumeFactor=0.1f;publicfloatVelocityPitchFactor=0.1f;privateAudioSourceaudioSource;//Usethisfor initializationvoidStart(){audioSource=GetComponent<AudioSource>();}voidOnCollisionEnter(Collisioncollision){audioSource.volume=collision.relativeVelocity.magnitude*VelocityVolumeFactor;audioSource.pitch=collision.relativeVelocity.magnitude*VelocityPitchFactor;audioSource.Play();}}
Note that the code assumes that the game object this is attached to has both an AudioSource component and a collider of some kind. When a collision is detected, the sound is played. The volume and pitch of this sound are proportional to the impact velocity, in a manner similar to before.
We attached this script, and an AudioSource component, to both the walls and the pin prefab.
This week we worked on the function calls for our robot, however as most of the robots were low on battery power we didn’t get a chance to test them properly. I will have new batteries when we return on November 5th and we’ll spend a while running through the obstacle course. You can find code with the finished function calls on Dropbox.
We also talked about The Future Maker Awards which is a competition being run by CoderDojo and Liberty Global. I mentioned that you can use video as part of your entry this is an example of a video from Google Science Fair.
We finished off our Ghostbusters game this week, there are no new notes, last weeks notes contain all the code you will need. I hope you will continue with your game that you started on Saturday, I would love to see them all when we come back after our Halloween break. Here is a link to the Cheat Sheets I gave out if anyone wants them. cheatsheet.pdf
On 15 Oct, we spent the session figuring out the basics of programming and electronics with an Arduino micro-controller. We had a couple of Arduino Unos (pictured above) and a Genuino 101.
We then built a simple circuit to turn on an LED, using a breadboard:
After connecting the 5V side of the circuit to Digital pin 2 on the Arduino, we started experimenting with writing code to control it, using the C-based language of the Arduino IDE:
After that, group members started experimenting with more complex programs and hardware, such as pressure and temperature sensors, which they had working by the end of the 2-hour session. I was very impressed with the speed with which they made progress!
This week we worked on getting input from the user and making the game react to it.
InputManager
Unity has a build in system for handling user input. The InputManager can be found under the Edit|Project Settings|Input menu:
The Unity input system is based on the concept of “axes”. The game request if there is input on a specific axis, giving the axis name. What that means in terms of button presses, mouse or controller input depends on the settings in the InputManager. Axes have a value that ranges from -1.0f (full negative, if negative values are allowed) through 0.0f (no input) to 1.0f (full positive).
Pre-defined Input Axes
While the game programmer can define as many input axes themselves as they like, Unity come with many common ones built-in. The first two shown above, called “Horizontal” and “Vertical” are commonly used for movement. The third “Fire1” is usually used for shooting.
We redefined “Fire1” from it’s default key (Left Ctrl) to bind it to the space key instead.
Updating the Code to Detect “Fire1”
We originally had a force applied to our ball in the “PushSphere” script as soon as the game started. We modified the code so that in the Start() method all we did was to retrieve and store the Rigidbody component. In the Update() method (called every time the game draws) we ask if there’s been any input on “Fire1” and only if there has, do we apply a force to the ball:
using UnityEngine;using System.Collections;publicclassPushSphere:MonoBehaviour{publicfloatPushStrength=1.0f;privateRigidbodyrb;//Usethisfor initializationvoidStart(){rb=GetComponent<Rigidbody>();}//Updateiscalledonceper framevoidUpdate(){floatfire=Input.GetAxis("Fire1");if(fire>0.0f){rb.AddForce(Vector3.back*PushStrength);}}}
Before proceeding, we ran our game and tested to ensure it was working correctly.
Moving Our Aimer
The aimer was rotated using input from the horizontal axis. We added a script called AimerController to our Aimer game object. A public property called RotateSpeed gives us a way to tune the speed our our aimer. We don’t need anything in the Start() method, and it’s been removed here for clarity. The Update() method looks for input on the “Horizontal” axis (which maps to the left and right keys) and applies a rotation to the Aimer’s transform using the following logic:
amount to rotate = speed of rotation * user input * time
User input here will either be -1.0f, 0.0f or 0.0f. This equates to rotate in a negative direction (anti-clockwise), don’t rotate or rotate in a positive direction (clockwise).
using UnityEngine;using System.Collections;publicclassAimerController:MonoBehaviour{publicfloatRotateSpeed=1.0f;//UpdateiscalledonceperframevoidUpdate(){floathoriz=Input.GetAxis("Horizontal");transform.RotateAround(transform.position,Vector3.up,RotateSpeed*horiz*Time.deltaTime);}}
Note that we’re rotating about the vertical axis and the rotation is centred around the aimer’s position.
Linking the Aimer and the Sphere’s Direction of Fire
To link the aimer’s with the sphere’s direction of fire, we needed to provide the sphere with a new public property which could store a reference to the Aimer’s game object:
publicGameObjectAimer;
We then simply had to update the AddForce call, in the Update() method, to take the aimer’s direction into account:
Note that we had to also multiply by -1.0f as the ball was initially going opposite to the direction we wanted.
Prefabs
Prefabs are objects, or collections of objects that we want to re-use multiple times. To create a prefab, all we need to do is to drag an object from the Hierarchy to a project folder. We made a prefab of our pin by doing this. Note that prefabs show up blue in the hierarchy to mark them out. When the prefab is changed, all copies of it in the hierarchy are updated as well.
Automatic Creation of Game Objects at Run-Time
Once we created our pin prefab, we worked on adding pins automatically into the game a run-time.
We added a new empty game object and named it PinManager, we then added a component to it of the same name. This script was given a public property, of type GameObject, to store a reference to the prefab. In the Start() method, we use two loops to place nine pins automatically into the scene, using the Instantiate() method:
using UnityEngine;using System.Collections;publicclassPinManager:MonoBehaviour{publicGameObjectPinPrefab;//Usethisfor initializationvoidStart(){for(intx=-1;x<=1;x++){for(intz=-2;z<=0;z++){Vector3pos=newVector3(x*2,0.5f,z*2);Instantiate(PinPrefab,pos,Quaternion.identity);}}}}
Note that there are several versions of the Instantiate() method. The version we’re using allows us to specify the position and rotation of the newly created object. A Quaternion is variable type that can store a rotation. Quaternion.identity simply means “no rotation”.
Testing
Project File
The latest project files can be downloaded from here.
This week we created our own folders on our Raspberry Pi3s, this will allow us to each find our own code and keep working on it.
We finished off the code for our own robot functions which we will use to navigate an obstacle course next week. The finished code is available on Dropbox here. These are my slides from Saturday finished-functions.
After we are finished with the obstacle course we will look at controlling our robot from our keyboard. I will use Pygame to do this and as Pygame is used for Graphical applications such as games and GUIs we will have to use VNC to connect to our Pi3s. Pygame will also allow us to use a webcam to capture video so if you have an old USB webcam please bring it in.
CoderDojo and Liberty Global are due to launch the Future Maker Awards this week FAQ here and more information here scroll down to see how one of our Bodgers uses his super power. I’ll have more information next Saturday after the launch.
See you then.
Hi everyone,
We completed our Mario game this week. We coded Mario so that he always floated down on to the wall. We added a fraction of a second of a wait so that it appears that he floats as he comes down. This also allows time for you to navigate left or right as needed.
We also introduced a more advanced concept, the Parallax effect, whereby objects further away appear to move slower than objects nearer. We coded mountains and a Sun to demonstrate this.