Creators: Shootah Part 6 – Enemy Shooting Back

alien

This week we did our last iteration on Shootah and added a Bomb to be dropped by the enemy to try to hit the player.

Bomb Class

We copied the existing Bullet class and called it Bomb instead. The main changes we had to make were:

  1. Changing the speed to a negative number so that it moved down instead of moving up (as the Bullet does)
  2. Changed the check for the top of the screen to one for the bottom of the screen instead (to account for the fact it moves down)
  3. Changed the check in its hit() function so that the Bomb doesn’t interact with the Enemy when it’s dropped, but will be marked as inactive it if hits anything else.
  4. Changed the colour of the bomb to red

Manages Bombs

It happened that the code we had already written to manage bullets was already perfect for managing bombs as well.

We used Visual Studio Code’s built-in capability to automatically rename symbols to:

  1. Rename the bullets array to projectiles
  2. Rename the manageBullets() function to manageProjectiles()

This was enough to have bombs move, draw and be removed when it becomes inactive.

Dropping Bombs

We added a new function to Ememy called shoot(). In that function we generated a random number from one to two hundred. We then dropped a bomb every time that number was less than five (we tuned this small number to get a good rate of bomb drops). This meant that the enemy dropped a bomb at random intervals, to make it impossible for the player to anticipate.

Download

The files for this week can be found on our GitHub repository.

Creators: Robot Arm

cpccg_screening_robot

This week we looked at a representation of a robot arm. The body of our robot is allowed to slide horizontally and the arm can pivot at the shoulder (where the upper arm attaches to the body) and at the elbow (where the lower arm attaches to the upper arm).

Transformations

An important point about this project was to show how transformations add up together. Transformations include translations (moving in straight line), rotations (turning about a pivot point) and scaling (changing size). We’ve used translations and rotations for our robot.

In P5, the origin, or place where the x and y coordinates are both zero is at the upper left-hand corner of the screen. The x coordinate gets bigger as we move right and the y coordinate gets bigger as we move down.

When we translate, we move the origin to somewhere else. This is handy for a few reasons but if we are performing rotations. All rotations happen around the origin, wherever that happens to be at the time.

This diagram shows all the transformations we use for our robot:

Robot DOFs (1)

  1. Translate to move the origin to the centre of the robot body
  2. Translate to move the origin to the shoulder
  3. Upper arm rotation at the shoulder
  4. Translate to move the origin to the elbow
  5. Lower arm rotation at the elbow

Because these transformations stack up on top of each other, this is what each part experiences:

  1. Body – Transformations: 1
  2. Upper Arm – Transformations: 1, 2, 3
  3. Lower Arm – Transformations: 1, 2, 3, 4, 5

The body is only affected by one, but the lower arm is affected by all five.

Movement

To move the robot, we set up three variables:

  1. bodyPos to store the body position (our first transformation)
  2. upperArmAngle to store the rotation at the shoulder (our third transformation)
  3. lowerArmAngle to store the rotation at the elbow (our fifth transformation)

We created a function called handleInput() called from the draw() function (which is called every frame). In that we used the keyIsDown() function from P5 to check for keys being held down. We made the left/right arrow keys move the body horizontally, the up/down arrow keys rotate at the shoulder and the Z/X keys to rotate at the elbow.

Source Code

As always, the code can be downloaded from our GitHub repository.

Creators: Snake

This week we looked at creating a user-steerable snake in the style of the classic phone game.

8185657641_2761c2acd2_z

Image from James Hamilton-Martin, Flickr

Things we need

The snakes head moves and the rest of the snake’s body is made up of places the head’s already been, up to a certain point. For this we use a JavaScript array (we’ve also called it a list at times).

We don’t want the snake’s length to grow indefinitely, so we have a maximum length. Once the list of stored locations gets larger than this, we use the JavaScript splice() command to remove the first (oldest) element from the list.

Direction and turning

Screen Shot 2018-02-06 at 22.59.28

We assign numbers to represent directions on the screen. Zero is right, one is up, two is left and three is down. Note then that if the snake is heading right (in the screen sense) and turns left it goes to up (in the screen sense); direction goes from zero to one. Similarly, if going up (in the screen sense) and it turns left then it goes to left (in the screen sense).

Generally then we note that turning to the left makes the direction number get bigger while turning to the right makes it get smaller. This rule hold until we get to a number bigger than three or smaller than zero; these make no sense. If direction is at zero and the snake goes right, we set direction to three. Similarly, if direction is at three and we turn left, we set direction to zero.

Getting this week’s code

As always, all the code from our Creator group can be found on our GitHub repository.

Creators: Spirograph

This week in the Creators group we looked at emulating the classic toy, the Spirograph.

spirograph3

The Spirograph consists of geared plastic discs. One disc is fixed in place over a sheet of paper and the other, with a pencil tracing the path, is allowed to spin around it. The result is a complex and beautiful design on the paper.

Screen Shot 2018-01-30 at 17.04.14

This diagram should help explain in conjunction with the photo. The centre of the black disc spins around the centre of the red disc, which itself doesn’t move. So the centre of the black disc rotates around in a circle. Pretty simple?

Now, the pencil itself rotates around the centre of the black disc. Shouldn’t that make a circle too? Well it would if the black disc wasn’t moving. Thankfully though, it is and that’s what makes this interesting.

Finding the Location of the “Pencil”

So how do we find the location of the pencil? Let’s look at our diagram again, but with things re-labeled a bit:

Screen Shot 2018-01-30 at 17.33.58

  • Centre: Formerly “centre of red disc”. It’s the fixed centre of our spirograph
  • Centre2: Formerly “centre of black disk”
  • Point: The point on our curve. This is where the pencil would be in a physical spirograph.
  • Radius0: Distance from Centre to Centre2
  • Radius1:Distance from Centre2 to Point
  • Angle0: The current angle of the line between Centre and Centre2
  • Speed0: The amount that angle0 increases every time we draw
  • Angle1: The current angle of the line between Centre2 and Point
  • Speed1: The amount that angle1 increases each time we draw

So at any time the location of our point is:

Point = Centre + [Centre2 relative to Centre] + [Point relative to Centre2]

So know where Centre is and if we can calculate where Centre2 is relative to Centre and similarly where Point is relative to Centre2, we can just add them all together!

Given an angle and a distance, can we get a location?

The answer to this is a resounding “yes”! Look at the diagram:

Screen Shot 2018-01-30 at 17.56.34

given an angle and a radius, we can calculate the X and Y position of any point around a circle. The magic is the COS and SIN (pronounced “kos” and “sign”) functions. These functions exist in almost all programming languages and JavaScript’s no exception.

Using p5.Vector

The last big concept we tackled thus week was using P5js’s built-in vector class to store (x, y) points and make our code tidier. To make a vector we just use createVector(x, y). We can then use functions to add them together, etc. We would get the same result working with the X and Y values separately but the code is a lot neater and shorter.

And in conclusion

This looks pretty cool:


Getting this week’s code

As aways, all the code from our Creator group can be found on our GitHub repository.


Bodgers – Making More Progress

This weekend in the Bodgers Group our three Raspberry Pi Pioneers teams continued to work on their projects.

The Zombie Herders were working on a PIR (passive Infra-red) sensor which is the type of sensor commonly found in burglar alarms.

IMG_20171022_141129

They used the GPIOZero library for Python and sample code which can be found here. However they didn’t have much success so we need to do more testing on our sensor and if necessary order a new one.

The zombie trolls worked on creating a 3-D model for their project using FreeCAD which they will print out when we return after the break.

stopper_3d

I’m afraid I not allowed to discuss what it will be used for at this point :-).

Team Green Fingers worked on more scripts for their project including using their Arduino and a relay to switch a 12 volt automobile bulb on and off.

flash

As with most projects like this we had a little trouble getting it going as we forgot to set the pin we used on the Arduino as an Output. Thanks to James and his Dad for bringing in the 12 volt powerpack.

We are off for the next two Saturdays and we’re back again on the 11th of November.

See you all then

Declan, Dave and Alaidh.


Creators – Being Random

Screen Shot 2017-10-17 at 00.56.49

This week we mainly looked at three things:

  • How data is organised on your computer
  • Creating functions
  • Using randomness to make things interesting

Data Organisation

Most of us had heard of a hard-disk before. This is a stack of metal disks inside your computer. Each metal disk has a special coating made of millions of tiny magnets (like you might find stuck to the fridge) that can be turned on and off.11644419853_9499fa0faa_b

We saw that able to turn something on and off, like a switch, was enough to count from zero to one, but the more switches we added, the higher we could count. Two switches can count from zero to three:

Switch 1          | Switch 2          | Total (Add)
[Off = 0, On = 1] | [Off = 0, On = 2] |
------------------+-------------------+-----------
Off = 0           | Off = 0           | 0
On  = 1           | Off = 0           | 1
Off = 0           | On  = 2           | 2
On  = 1           | On  = 2           | 3

With enough of these tiny switches, we can store anything we need. Each of these tiny switches is also known as a ‘bit’ and a 1 terabyte hard disk has a billion of them!

We also saw that the files on your disk are arranged with folders (also known as directories). Folders can contain both files and more folders. This allow us to keep our hard disk organised; without them all our files would be in the same place which would be difficult once we had more than a few. The location of a file is called its “path”. Looking at the highlighted file on the desktop of my Mac we can see the full path would be:

Screen Shot 2017-10-16 at 22.19.59

/Users/kierancoughlan/Desktop/Ball and Bat Sounds.m4a


This means that, reading backwards, the file called ‘Bat and Ball Sounds.m4a’ is in a folder called ‘Desktop’ which is itself inside a folder called ‘kierancoughlan’ which is, at the highest level, inside a folder called ‘Users’.

Functions

A function is a collection of commands that do a job together. We’ve already encountered them, even if you hadn’t especially noticed:

  • Our P5 template already contains two functions called start() and draw()
  • All of the P5 commands we have used, such as createCanvas() and rect() are functions themselves

We could add all our code to start() and draw(), in fact, that’s what we’ve done before this week. That’s fine starting out, but it does mean, once there are a lot of commands in those functions, that our code is gets harder to read and understand. Breaking out a few commands into a new function and giving it a name that describes what it is doing, really helps.

Once we’ve written a function, it can be called as many times, and from as many places, we as need.

Functions can do one other thing too: they can give back a value to the place where they were called from. For this we use the special word return. For example, let’s see what a function to pick the largest of two numbers, we’ll call it Max(), might look like:

function start(){
    let a = 4;
    let b = 10;
    let c = Max(a, b);
}

function Max(n1, n2){
    if (n1 > n2)
        return n1;
    else
        return n2;
}

We give Max() the two numbers we are comparing. If the first one is bigger than the second, it gives back the first. Otherwise, if gives back the second. Note too that the names of the variables in Max() are different to those in start(), and that’s not a problem.

Random

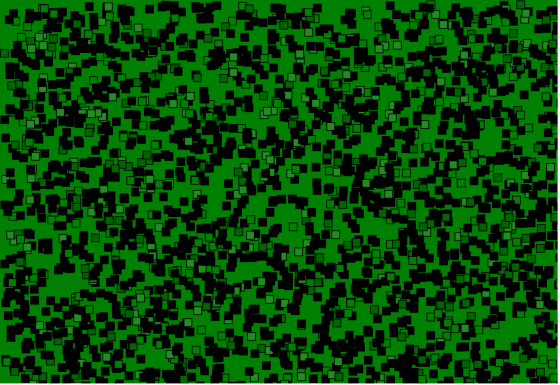
Finally, we looked at the P5 function random(). We used it two different ways:

random(); // gives a number between 0...1
random(n); // gives a number between 0...n (where n is a number!)

In the first form, we used it to pick a random colour. In the second, we used it to pick a random position for our squares.

Files

As usual, all the code is on the creators github repository. Head there and download it!! The files for this week contain both the script we wrote (sketch.js) and a longer version that I wrote (sketch2.js). Feel free to take a look at both!

Unity – A Basic Inventory System

backpack-145841_1280

Image from Pixabay

One of our ninjas was looking for a basic inventory system that he could use, so we knocked up something very quickly.

It’s all based on the standard .NET Dictionary class, documented here.

Dictionary allows us to store keys and associated values. In our specific case, our key is a string (the name of the item) and the value is an int (the count of items of that type).

This is all implemented in a script called InventoryManger.cs which is attached to an empty game object, also called InventoryManagement, for convenience. The InventoryManager class provides the following public methods:

void AddItem(string name)

This takes an item name. It looks to see if there’s an item of this name already in the inventory. If there is, it increases the count by one. If not, it adds it with a count of one. This cannot fail, so it doesn’t return anything.

bool RemoveItem(string name)

This takes an item name. It looks to see if there’s an item of this name in the inventory and that its count is greater than zero; it’s possible that it’s listed there, but the count is zero. If there is, it decreases the count by one and returns true. If not, it returns false. The true/false return value allows us to test, when calling this method, if it succeeded, if that’s important to us.

int GetCount(string name)

This takes an item name. It looks to see if there’s an item of this name in the inventory. If so, it returns its count. If not, it returns zero.

So that allows us to add, remove and track an arbitrary number of items with very little effort.

The sample project also has a few other scripts. The intention is that the player picks up objects by moving over them. Pickup objects are tagged “PickUp”. The HandlePickup.cs script is added to the FPSController to detect moving over a pickup. Pickups have a PickupDetails.cs script attached. This automatically tags them “PickUp” and contains the items name (to use in the inventory). The project also has a FruitStealer.cs which removes one banana from your inventory every time you pass through its gate. It’s just there to show the RemoveItem method in action.

Screen Shot 2016-05-15 at 13.33.13

The files for this project can be found here.

Other small things of note about this project: the “bananas” and “apples” are animated, as is the UI-text containing the text “Fruit Stealer”. The material used for the Fruit Stealer is transparent.