Finishing our Game Projects

110401-N-HC601-027

Image from US Navy via Wikipedia Commons

With two more regular dojo sessions to go before our final party and belt awarding ceremony, the finish line’s in sight and we’ve been concentrating on helping people work on their projects.

Some projects are already looking good, and that’s fantastic. Others however aren’t showing a lot of progress.

If you are struggling, please remember – overly ambitious scopes are the things that ruin most game projects. Ask yourself: what are the basic things that will be the most fun in my game? Maybe it’s exploration. Maybe it’s shooting. Whatever it is, get that working as soon as possible. Don’t do ten weapons, do one. Other features can be layered on over time as long as the fundamentals are there. Try hard to have something working for the next session. We’re here to help.

In the next session we’ll talk about the specific belts we’re going to be awarding. We’ll explain how they’re earned and we’ll try to get an idea of how many people are going for each category.

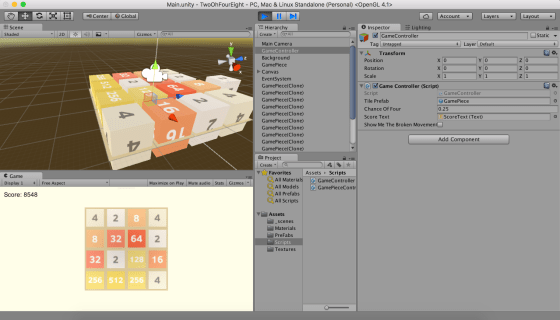
Basic Sample Projects

I briefly showed a number of sample projects that I’d been playing around with this week. These projects are intended to demonstrate certain useful things that you might want to put in your own game.

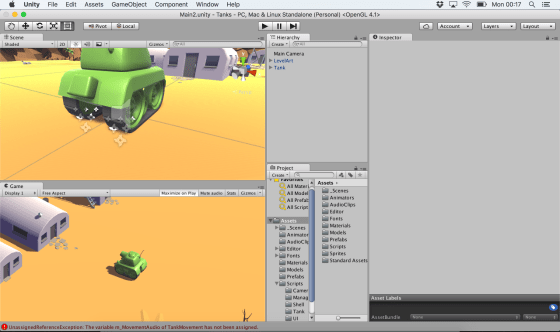
The first sample project was a modified version of SprocketLeague. The modifications were relatively modest: each car was given its own camera which was set to render into half the screen. The original top-down camera was set to render into a small area at the top of the screen.

The project files are available here.

The second project, called BasicAI, was just an experiment with baking a NavMesh and having an AI character follow you about. For extra fun, the followers spawn every 1.5s and they’re labeled “HipsterISIS” thanks to a very funny gag one of our ninjas made when watching the game run.

The project files for this are here.

Doors Project

This project wasn’t working fully during our session. It is now. The project contains two scenes. Both implement a door but in different ways. The two scenes can be found in the _scenes folder.

The first implementation is a physics based door. There is a box called DoorFrameRight which has a RigidBody component but is constrained so that it can neither move nor rotate:

Screen Shot 2016-05-08 at 14.57.38

Immediately to the left of this is the Door itself. This is also a box with a RigidBody component. In addition, it has a HingeJoint component. This HingeJoint component links it to the DoorFrameRight box. The HingeHoint is just visible as a small orange arrow on  the left hand side of this picture:

Screen Shot 2016-05-08 at 14.56.18.png

The HingeJoint component is positioned exactly where the door and door frame meet and its axis is set to be vertical, as the door is to swing around the vertical. It also has a spring which will close the door again (more or less) once the thing pushing it open moves away:

Screen Shot 2016-05-08 at 14.56.33.png

A regular FPSController can’t push this door, as it has a kinematic RigidBody (no physics), so note that we use the RigidBodyFPSController instead to represent the player in this scene.

The other door works in a very different manner. The door consists of a frame and a “hinge”. The hinge is just an empty GameObject which contains all the parts of the door that will be moving. It’s origin is at the left-hand edge of the door panel; this means that when we change the hinge’s Y rotation, the door will pivot about it’s left-hand side. The hinge’s origin is shown here:

Screen Shot 2016-05-08 at 15.40.36.png

I could have made the hinge rotate in code, but instead I decided to create animations to do the same thing (change the hinge’s Y rotation). To explain how animation works in Unity is beyond the scope of this post, but I’ll give a very broad introduction to it in the next session.

The door has a box collider around it. When it detects that the player has entered the collider, it triggers one of the opening animations (the direction depending on which side of the door it determines the player to be). Once the player leaves the collider, it closes the door again.

Screen Shot 2016-05-08 at 15.59.07

The files for this project are here.

Random Maze Project

This project was started live in our last session on the suggestion of one of the ninjas; it generates a random maze using a very simple algorithm.

An empty GameObject called MazeGenerator is placed in the scene. In its Start method, it constructs a random maze which appears in the scene. An FPSController from Standard Assets allows us to navigate this maze and try to find our way out.

The MazeGenerator constructs a 2D array of bool values to represent the maze. All the values in this array are ‘false’ by default and we take this to mean ‘solid’. Taking a point in the centre of the array we mark it ‘true’ to indicate an empty space. We then randomly pick a direction from North, South, East or West and set a new position. We check if we’ve moved outside the bounds of the array yet, if not, we mark this as another empty space and continue until we are outside.

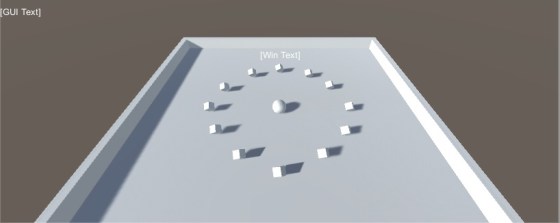
Once we have this maze generated, we know we have a path from the centre (the start) to the exit (the outside of the maze). We loop over all elements in our array and place a solid block (from a prefab) everywhere we find a ‘false’, unless we’re at the edge of the maze in which case we place a special prefab that detect the player and plays a sound. This is our ‘exit’. For a ‘true’ we do nothing. The picture below shows one such generated maze from above.

Screen Shot 2016-05-08 at 18.35.04.png

To make this more fun to play, we also added a script to the FPSController to drop “breadcrumbs” as we move. This shows where we’ve already been so that going around in circles shouldn’t be a problem.

The files for this project are available here.

Review and a Couple of Sample Projects

This week we did a review of everything we’ve covered so far in Unity this year. It was a really usefully exercise as we ramp up to doing our own projects. People talked about their project ideas and I even got so see a few things running. I was impressed with the ingenuity and inventiveness. As I explained, over the coming few weeks, I won’t be presenting much in the way of new material. We will instead concentrate on getting our projects running and polishing them to the best of our ability.

I presented a couple of small sample projects intended to inspire game project ideas. The first was a top-down, single-keyboard, two-player game where two cars complete to drive a ball into their opponent’s goal area. If this sounds familiar, then you’ve heard of Rocket League. This low-rent version I dubbed “Sprocket League”. It can be downloaded from here. It uses the car from Standard Assets, slightly modified to allow the input axes to be defined in the inspector so that each can be controller independently. The red car uses the arrow keys and the blue keys uses WSAD for movement. To make it into a full game some means of keeping score and timing the game would be needed.

Screen Shot 2016-04-18 at 22.58.09.png

I also posted a basic sliding tiles game based on 2048. It is intended to show that we can achieve a 2D game appearance, even while using the 3D elements we have been working with. Although the basic game mechanics are there, it would ideally need a lot of work to bring it up to a reasonable standard. The real game provides a lot more visual feedback to the user than this version. Again, it can be downloaded from here. For those that recall, my broken attempt at making the tiles animate can be enabled via the “Show Me The Broken Movement” checkbox on the GameController object.

Screen Shot 2016-04-18 at 22.54.20.png

Best of luck working on your projects over the next two weeks and I’ll see you all when we return!

Shooting Mechanics In Unity

It was a thrill to have such significant games industry figures come to visit us on Saturday. The mentors, dads and dad-mentors were probably the most excited; Wolfenstein 3D, Doom and Quake were probably the most exhilarating games of our generation.

I was unsatisfied with how much benefit people were getting from continuing with the Tanks tutorial and I decided that we’d looked at it enough. Partially because I know some people want to implement shooting for their own projects and partially because one of our guests had invented the entire first-person-shooter genre, I decided to do a project to demonstrate different ways of implementing shooting in a game.

Please excuse the tinny sound; I was using the computers built in microphone.

There are two main ways to handle shooting: ray-casting and physics-based projectiles. We’re going to do both so lets discuss them in turn.

Ray-casting

Ray-casting uses mathematics to determine if a target is in our cross-hairs and, if it is, registers a hit instantly. It’s a good technique to use where the bullet is very fast moving and distances are relatively short. Regardless of action movie tropes, nobody is dodging a fast-moving bullet in real-life!

In Unity the Physics class contains several Raycast methods (documentation here). They all look along a line from a point and return ‘true’ if that line crosses through a Collider. The specific version we’re using can fill in a RaycastHit object with information about what it hit, if it hit anything.

To determine if we hit anything we must:

  1. Find the position and forward direction of the FPS Camera. This represents where we are and where we’re looking towards.
  2. Call Physics.Raycast with this information. If it didn’t cross any colliders, then we are finished.
  3. If it did hit something, then we check to see if that object is a target. We have tagged all target objects in the scene as “Target” so we can easily check this.
  4. If it is a target, we perform the effect we want. In this case, we push the target away from us with force applied to its RigidBody . In another case, we might want to actually destroy the GameObject instead.

Physics-based projectiles

A physics-based projectile is actually an object in the scene. It has a Collider so that it can detect collisions and a RigidBody so that it is affected by physics.

In many cases of physics-based projectiles, the Collider is simply a trigger and once an collision is detected, an effect, such as reducing the target’s health, is applied to the target.

Our specific physics-based projectile weapon is a cannonball. In this specific case, we actually allow the cannonball to hit the target and the physics engine takes care of the effect (knocking the target away).

The general steps that we need for physics-based projectiles are:

  1. Find the position and forward direction of the FPS Camera. This represents where we are and where we’re looking towards.
  2. Instantiate an instance of our projectile prefab. Position it so that it’s slightly in front of us and not intersecting with the FPS Controller’s own Collider.
  3. Give the projectile some forward velocity.
  4. Either:
    1. Have the projectile detect collisions and perform an appropriate effect on the target, or
    2. Simply allow the physics engine to take care of the impact.

The cannonball prefab has a small script attached to it. It detects collisions. Once the first collision is detected, a coroutine is launched. This coroutine waits for two seconds and then destroys the GameObject. This means that cannonballs have a limited life-span and don’t end up littered all over our level.

Area-effect weapon

We have also implemented an area-effect weapon, namely a grenade. In many ways it is similar to the cannonball but we project it with a more modest velocity.

Once created, however, it’s behaviour is very different. A coroutine is launched as soon as it is created. This coroutine waits for a few seconds to mimic a grenade fuse. It then “explodes”.

To explode, the grenade does the following:

  1. Plays an explosion sound on it’s own AudioSource.
  2. Instansiates a particle-effect prefab at the grenade’s location to display an visual explosion effect.
  3. Disables the grenade’s MeshRender component so that he body of the grenade can’t be seen any more.
  4. Uses Physics.OverlapSphere (documentation here) to find all Colliders within a given radius of the grenade
  5. Loops over these Colliders. If the collider is not attached to an active GameObject or if that GameObject is not tagged as a target, we ignore it.
  6. If it is an active target, we use RigidBody.AddExplosionForce (documentation here) to apply an explosion force, emanating from the grenade’s position, to the target.

Two seconds after the “explosion” the grenade GameObject, now invisible, destroys itself to remove itself from the scene. This short delay gives time for scripts to complete and sounds to finish playing.

Please note that although the grenade wasn’t working correctly on Saturday during our session, it’s fully functional now.

Gun selection

Gun selection is handled using the “[” and “]” keys. In the past we have tended to use Input.GetAxis to detect user input. This is good for where we wish to perform an action continuously as long as a key is held down. It’s not so good where we wish to perform a since action in response to a single keystroke. For that, using Input.GetKeyDown (documentation here) is better and that’s what we do.

The selected weapon is stored using an enum. An enum is a special variable type which can only take one of a number of pre-defined values. Since we have a limited list of weapons, three to be exact, this works well for us.

Putting it all together

Screen Shot 2016-04-12 at 21.17.02

Our level is a simple terrain. It’s been textured and had trees, grass and a wind zone added to it. There is a simple lake. A few target spheres have been positioned around the map and a box containing a number of small targets has been created as a good place to test the grenade in particular.

A standard first person controller prefab has been added to the scene. Our own GunController script has been attached to it as a component. GunController handles all the aiming and firing of the weapons.

Sound effects for the project are all from www.freesound.org with thanks to the original creators. All other third party assets are from the Unity Standard Assets pack.

Downloading the project

The project can be downloaded from DropBox here. Please ensure you have updated to Unity 5.3.4 before opening this project. Be aware, it’s relatively large at 160MB+.


Unity – Tanks Tutorial Part 2

Introduction

This week we looked at getting our tank to move.

Tanks, and all tracked vehicles, have a very particular way of moving. By turning their tracks on both sides in the same direction, they can move forwards or backwards. By turning their tracks in opposite directions, they can turn around. In our game, we don’t model the tracks explicitly, but we do want our tank to behave in this same way.

Input Manager

In our previous two projects, we didn’t concern ourselves too much with how the keys we pressed caused actions to occur in the game. It mostly “just worked”.

In Roll-A-Ball we used the method Input.GetAxis() with axes called “Horizontal” and “Vertical” and these allowed us to control our player object.

The Input Manager allows control axes to be defined. It can be found under the Edit|Project Settings|Input menu. We can add as many control schemes as we need for our game here.

Screen Shot 2016-03-06 at 21.16.37

In the case of Tanks, we need controls for two players so we have Horizontal1, Vertical1 and Fire1 and also then Horizontal2, Vertical2, and Fire2.

When we retrieve the axis values in our code, it will have a value between -1 (full negative) and 1 (full positive). A value of zero indicates no input on this axis. When we’re dealing with keys, the only possible values are (-1, 0, 1) but if we had an alternative controller such as a gamepad, we would have values in-between too.

Calculating How Much to Move

The tank’s vertical axis controls how much to move forwards and backwards. To calculate how much the tank should move in one physics frame and in what direction we use the following code:

 Vector3 movement = transform.forward * m_MovementInputValue * m_Speed * Time.deltaTime;

It’s a vector, so it it has direction as well as magnitude. The direction comes from transform.forward – this vector always points in the tank’s forward direction, regardless of how the tank has been turned, and is always 1 unit long. It’s worth noting that there are companion vectors called right and up.

The m_MovementInputValue part is how much the user is currently pressing the keys in the vertical axis. As already discussed, it will be either -1 (full speed backwards), 0 (no movement) or 1 (full speed forwards).

The m_Speed property is a value we’ve set which sets the tanks maximum forwards/backwards speed. We have it set to 12 (distance units per second).

If we multiply all of these three things above together, we get a vector that points from the tank’s current position to the location the tank will be at in one second, if nothing else changes.

This is good, but it isn’t taking into account how often we’re doing our physics calculations (i.e several times a second). Time.deltaTime is the time since the last physics calculation. It will be some fraction of a second. Multiplying by this, we get a vector that points from the tank’s current position to the location the tank will be at after one physics calculation. That is what we want.

Calculating How Much to Turn

Calculating how much to turn is easier. This is the code:

 float turn = m_TurnInputValue * m_TurnSpeed * Time.deltaTime;

It’s a float describing how many degrees we’re turning.

As before, m_TurnInputValue represents the user input. The value is either -1 (turn anticlockwise), 0 (don’t turn) or 1 (turn clockwise).

The m_TurnSpeed property is a value we’ve set which sets the tanks maximum turning rate. We have it set to 180 (degrees per second).

Finally, for the same reason as before, we multiply by Time.deltaTime to get the number of degrees we’re turning in this physics calculation.

Applying the Movement

The movement was hard to calculate, but it’s easy to apply:

 m_Rigidbody.MovePosition (m_Rigidbody.position + movement);

We just tell the Rigidbody to move to a new position. That new position is simply the old position with the movement vector we calculated added on.

Applying the Turn

The turn was easy to calculate, but applying it is a little more complex. It’s not important to understand why it work the way it does, just know that if you’re applying an additional rotation to something that you can’t just “add it on” as we did with the positioning. Here is the code:

Quaternion turnRotation = Quaternion.Euler (0.0f, turn, 0.0f);
m_Rigidbody.MoveRotation (m_Rigidbody.rotation * turnRotation);

To turn the rotation into something we can use, we need to construct a Quaternion. A Quaternion is a special way of storing a rotation. The Quaternion.Euler() method allows us to create a Quaternion from X,Y,Z axis rotations. Here our turn was about the Y axis and the values for the X and Z rotations are simply zero.

Once we have our Quaternion, you might imagine that we add it to the Rigidbody’s existing rotation, but that wouldn’t work. We actually have to multiply it to get the correct new rotation for our Rigidbody.

Changing the Engine Sound

Another thing we spent a good bit of time on was checking to see if the tank was moving and changing the engine sound between an idle and driving sound.

We used the Mathf.Abs() function to get the absolute value of m_MovementInputValue and m_TurnInputValue. The absolute value of something is the value with the negative sign ignored. We compared these to a very small value to determine if the tank was currently stationary, or not.

Once we determined if the tank was stationary or not, we checked the engine sound that was playing. If it wasn’t the one it should be, we swapped in the correct one, taking time to randomly alter the pitch a little so that the two tanks won’t sound identical.

Project Download

The up-to-date files for the project are here. Please download these and we will all start from this point next week!

Unity – Tanks Tutorial Part 1

Update: This post has been updated with a link to download the project. See the bottom of the post.

Screen Shot 2016-02-29 at 00.17.14

This week we started work on the Unity Tanks tutorial. This is a single-keyboard, two-player, tank game where users can complete in a number rounds against each other.

We began with downloading the tutorial assets from the Unity Assets Store. This tutorial comes with many lovely assets including 3d models and audio clips.

The assets, as downloaded, contained a “Completed” folder. We deleted this first, as it has a second copy of many of the scripts and assets in the project and had the potential to create confusion.

We created a new scene and deleted the default directional light as we wouldn’t be needing it. Then we added the provide “LevelArt” prefab. This prefab contains the entire playing area and also contains a directional light. We discussed the different types of lighting that we can have in a game: ambient, directional, point, and spotlight. The image below shows the same scene lit in each of these four ways, respectively.

lighting

We then set our camera to be orthographic. We described the difference between orthographic and perspective cameras. With perspective cameras, the space the camera sees in front of it is shaped like a pyramid and things that are further away look smaller (as in real life). With an orthographic camera, the space the camera sees in front of it is box-shaped and things do not get smaller the further away they get. For some game types, the less realistic orthographic camera is a good stylistic choice. We also removed the standard skybox and just changed the background to a solid colour, again a good stylistic choice for this game.

We then started to build our tank. The 3d model was pre-supplied, so we added it to the hierarchy. We then added a rigidbody, a box collider and two audio sources for the playback of sounds. We were able to add constraints on the rigidbody to prevent the tank from ever moving vertically, or from rolling or pitching. Applying these constraints both prevents unwanted movements and makes the physics engine’s job much easier.

Screen Shot 2016-02-29 at 01.02.07

Finally, we added two dust trail particle effects to the tracks of the tank. These were also pre-supplied as assets for the project.

We had just started to look at tank movement and that’s where we’ll pick it up again next week. The project can be downloaded here.

Remember that you should now be starting to plan and work on your own projects for the end of the year. Best of luck and we’re here to help in any way we can!

Playing With Unity Physics and Wheel Colliders

Hi folks. This week we continued work on our Amazing Racer project. We explained what heightmaps are and we imported a standard heightmap into a terrain object. We also added water and trees to our game map.

Apart from that, I also showed two little fun experimental projects that I worked on over the Christmas break to test a couple of game ideas. I thought I’d upload them here so you can play with them yourselves; maybe even use them as the basis for a game idea?

PhysicsTest

The first project, called “Physics Test”, is just a Jenga-like tower of bricks, a ramp and a dropped sphere. The sphere and the bricks have custom physics materials to define their friction and bounciness. It can be downloaded from here.

WheelColliderTest

The second is called “Wheel Collider Test”. It uses Unity’s Wheel Collider on a simple vehicle made of a box and four cylinders. The whole thing is on a simple map made from a basic terrain with a flat interior and a raised edge (to keep the car in!). The awesome (cough) textures are from random Windows backgrounds. The Unity documentation for the WheelCollider can be found here. I note reading it that our project sets up the visual elements to represent the wheels differently to the method recommended in the documentation, but it seems to work OK. The project itself can be downloaded from here.

See you all next week!

Unity – Week 7

unityssample

This week we started with a very short demonstration of some additional C# concepts, building on what we’d done last week.

After that, we continued with Roll-A-Ball.

We quickly finished off our walls and moved on to the Pick Up objects.

Pick Up objects are small cubes that float over the paying surface and that rotate to catch the user’s attention.

We added one Pick Up object and made it rotate. After that, we made it a “prefab”. Setting a property on one prefab object will automatically replicate that setting to all other prefabs of the same type. We didn’t take advantage of that this week, but we will next week.

We duplicated our Pick Up object and arranged twelve of them around our playing surface.

Next Week

Next week we’ll hopefully have enough momentum to finish off Roll-A-Ball completely.

After that we will start on some terrain modelling basics.

To be ready for terrain modelling basics, please be sure to have imported the standard assets package into a new empty project in Unity. To do this, follow these steps:

  1. Open Unity and create an empty 3D project, call it “Amazing Racer”
  2. Under the Windows menu in Unity, open the “Assets Store”
  3. In the “Assets Store” look for the “Unity Essentials” category
  4. Under “Unity Essentials”, find “Standard Assets” and import them

This process takes quite a bit of bandwidth and time, so you will need to have this done before coming to Dojo next week.

See you all then!

Unity – Week 6

C#

This week we had a short session because of the fantastic demonstration that Colmac Robotics were kind enough to give us.

Following feedback from a few ninjas and ninja parents, I decided to do an impromptu session on the C# language. I had hoped that we’d perhaps just try to pick this up as we went along, learning through practical examples, but it was clear that the transition from visual languages to code-based languages was tough for some.

We used MonoDevelop to create a simple test application. Originally I had intended to use Visual Studio, but some people have had installation problems with it. I encourage everyone to re-install Unity at home when they have time, so that we can all standardise on Visual Studio in the near future.

Concept of Classes and Basic Structure of A C# File

I ran over these topics quickly again, but they were covered in last week’s post. Please do review it if you didn’t get a chance to read it before. It can be found here.

Simple Test Application

In our test application, apart from reinforcing the basic concepts mentioned above, we also touched on number of other concepts:

  • We looked how the class definitions in our files are blueprints for how the class is structured and operates. We never actually have a copy, more commonly known as an instance, of that class until we actually create one ourselves with the new keyword.
  • We discussed class constructors, the special method, with the same name as the class itself, that is called when we make an instance of that class.
  • We saw how Console.WriteLine() can output text to the Windows console.
  • We created a class called Shape. We said it was abstract; which meant that we would never be making an instance of the Shape class itself. We would purely be using it as a base for other classes.
    • We said that Shape had a public method called Area(). We made its return type double, but we also marked it as abstract and provided no body for the method. This meant that we were saying all classes based on Shape would have to provide their own version of Area(), but that Shape itself had no definition for it.
  • We defined a class called Circle. We made it so that it was derived from Shape.
    • We gave it a property called Radius of type double and marked it public.
    • We used the override keyword to make our own Circle specific version of Area(); “override” meaning that we were over-riding or replacing the method definition from the base class (Shape).
    • We provided a means to set the Radius property through an optional argument to the constructor method Circle().
  • We defined a class called Square. We made it so that it was derived from Shape.
    • We gave it a property called Length of type double and marked it public.
    • We used the override keyword to make our own Square specific version of Area(); “override” meaning that we were over-riding or replacing the method definition from the base class (Shape).
    • We provided a means to set the Length property through an optional argument to the constructor method Length().
  • When writing our Circle.Area() and Square.Area() methods, we saw how the built-in Math object has lots of useful mathematical properties and methods. We used the property Math.PI and the method Math.Pow() (to raise a number to a given power) to perform our area calculations.

Inheritence

In the end we had a small sample program that could defined instances of circles and squares, calculate their areas and output the results to the console window (command prompt window).

On-line Resources for Learning C#

If you want to brush up on your C# skills, outside of our CoderDojo sessions, there are a number of useful on-line resources:

  • LearnCS.org: An on-line tutorial for C# which lets you build and test code right in a browser window
  • tutorialspoint.com: Another on-line tutorial for C# which also lets you build and test code right in a browser window
  • msdn.microsoft.com: Microsoft’s vast library of C# related resources including tutorials

Next Week

Next week, we’ll be taking a few minutes to close off this sample application, so that we can quickly illustrate a few outstanding points, and then return to roll-a-ball to, hopefully, close it out. See you next week!

Week 5 – Unity

UnityLogo

This week we returned to the Roll-A-Ball game that we had shown in the introductory session. Because people were at different levels of completion with this, we started from the beginning again, but we put some detail around things that we’d glossed over the first time around.

Concept of Classes

A class is a programming concept that allows you to define objects which contain both Properties and Methods. Properties are what they sound like; a value associated with object that we can get or set. Methods are actions, in the form of a function, that we can ask the object to perform.

SampleObject

If you think of yourself as a Person object then you could imagine some of the Properties and Methods you might have.

For Properties you might have things like NameAge, HeightWeight, etc. An example of a Method you might have could be SayHi() [notice the round brackets after the name marking this as a method]. That would make you say “Hi!”. A method might have arguments, so it could be SayHiTo(“Dave”) which would make you say “Hi Dave!”.

A method could equally calculate a value. An example might be CalculateBMI() which would calculate your Body Mass Index (BMI) value based on your Height and Weight properties.

Another nice thing about classes are that we can create specialised versions of them. They get all the Properties and Methods of the base class, plus all the new Properties and Methods that we defined for the derived ones. In this example, we might want to declare SchoolChild and Worker as new classes, both based on Person. SchoolChild might have additional properties such as School and Class while Worker would have WorkPlace and JobTitle. They would still share Name/Age/Height/Weight, etc.

Classes in Unity

Unity has a base class called MonoBehaviour and when we define behaviour for a game object, we do this by deriving a specialised class of our own design based on MonoBehaviour.

There are four Methods that MonoBehaviour has that we have looked at so far:

  • Start()
  • Update()
  • FixedUpdate()
  • LateUpdate()

We have provided custom versions of these in our own classes to define the behaviour that we want. This behaviour is also known as “overriding” as we are overriding the base behaviour of these Methods (which is to do nothing).

  • Start() is called when our game object is created. We can so things here that we need to do once when the game object is created.
  • Update() is called every time the scene is drawn. It’s a good place to do any updates that impact how the scene looks. However, it’s not called at a constant rate and that makes it unsuitable for some jobs.
  • FixedUpdate() is called every time the internal game timer for physics calculations fires. This is guaranteed to be at a regular interval. Any physics based calculations where time is a component should therefore should be done within FixedUpdate() rather than Update().
  • LateUpdate() is called after all game objects have had their Update() functions called. Use this when we need to be sure that another object has definitely been updated before we do something based on that object’s Properties.

Vectors & Physics

If I tell you that someone is moving at 5kph and ask you were they’ll be in 10mins, you won’t be able to answer that question. If I tell you that they’re moving 5kph due North, then you will. That combination of a quantity and a direction is called a vector.

vectors_basicA vector in 3D space is usually represented as three numbers, written as (X, Y, Z). Let’s see what the vector (1, 2, 3) looks like.

We’re familiar enough with using vectors like this to indicate a position, but what about representing a velocity or a force? The direction is apparent, but what about the quantity? Well the quantity is simply the length of the vector. This is calculated using Pythagoras’ theorem:

distanceeq3

So we can calculate the quantity or magnitude of the vector (1, 2, 3) as approximately 3.74.

Note too that if our vector (1, 2, 3) represents a force then a vector (2, 4, 6) also representing a force, would be a force in the same direction but twice as strong. You can see that each part of the vector has simply been multiplied by two.

Basic Structure of a C# File

When we derive custom behaviours for our game objects, Unity is kind enough to provide us with a basic file containing a class definition containing empty methods for Start() and Update()monobehaviour

It’s tricky making the transition from a visual language like Scratch to a language like C# where you have to type code. A few simple rules may help:

  • Lines starting in two forward slashes (//) are comment lines. They have no effect on the program; they’re there for you to read. You can delete or change them as you need.
  • Semicolons (a dot over a comma) mark the end of statements. They’re easy to forget at first so you need to be careful.
  • You need spaces and newlines to separate things, but this does not have to be precise. Two spaces are equivalent to one. Because a statement doesn’t end until a semicolon, you can split if across several lines and it will still be fine. Hard to read though.
  • Braces (or curly brackets) enclose things and they must always be in pairs (open/close). In the sample code the braces are such that the methods Start() and Update() are inside of (and belong to) the class NewBehaviourScript because they are inside its braces. Similarly any lines we add inside Start() will belong to that method because they are inside its braces.
  • Neat formatting really helps keep your code readable and helps you quickly find mistakes. Try to mimic how code is formatted in the examples, especially the practice of “indenting” lines; placing spaces at the start of the line to make it clear what it is inside of.

Next Week

Next week we will continue to develop Roll-A-Ball and hopefully get it finished up.

Taster Session Week 4 – Unity 3D

UnityLogo

For our fourth taster session, on next Saturday 17th October, we’ll be giving an introduction to Unity. Unity is a cross-platform game engine which has been used to create many successful games.

In preparation for next week please:

  1. Go to the unity website: www.unity3D.com
  2. Click the “Get Unity 5” button
  3. Download and install the free “Personal Edition”
  4. Run Unity once and register an account – you will need your email address

We will be trying to build as much as possible of the “Roll-a-ball” demo that I showed in our introductory session. Ongoing participation in the Unity group will require a good understanding of advanced programming concepts, but for the taster session, we will try to keep that stuff to a minimum so everyone can follow along and have fun.

unityssample