Beginner’s Scratch Challenge 9 – Storytelling

We had a great day in Scratch Beginners on Saturday! We created a project in which the Sprites all communicated through the use of broadcasts. Each broadcast caused a reaction in the other parts of the program such as the other sprites and even the stage. To begin, we all added two sprites from the library and two backdrops from the backdrop library to the stage. My sprites came with several costumes already supplied, but you can use whatever costumes you like. CDA-S5-Challenge_09-Storytelling-how to

Next, each coder had to decide on a story, conversation or a joke to have one sprite tell the other. After that we placed each character apart on the screen by using the GO TO: command and then had then move together using the GLIDE command. Each part of the conversation is shown on screen with the SAY FOR 2 SECONDS command after which the same words are broadcast to the whole program using the BROADCAST command. The second sprite responds to the first Sprite’s broadcast by SAYing his part of the joke and then broadcasting the same words. This goes back and forth until the story is finished. Keep trying out your scripting by pressing the GREEN FLAG and seeing how it is working. CDA-S5-Challenge_09-Storytelling-1st sprites script

CDA-S5-Challenge_09-Storytelling-2nd sprite script

At the very end, I have the 2nd Sprite send out a final broadcast which causes the backdrop to change and music to play while both Sprites simultaneously do a dance! I just threw that in for fun and to show that BROADCASTS can cause any part of the program to switch on or off. Here is the slide show if it helps a bit more: CDA-S5-Challenge_09-Storytelling. Also, I put my program up on the SCRATCH.MIT.EDU website for you to play with. Search for projects made by cdathenry1516. This project is called –JulieKnockKnockJoke23-01.

Hope to see you all next week when we work on a guessing a number game which requires input from the user to guess the number the computer has picked!

Julie

PiDojo-Robots

This week the PiDojo group started to experiment with building our own robots.

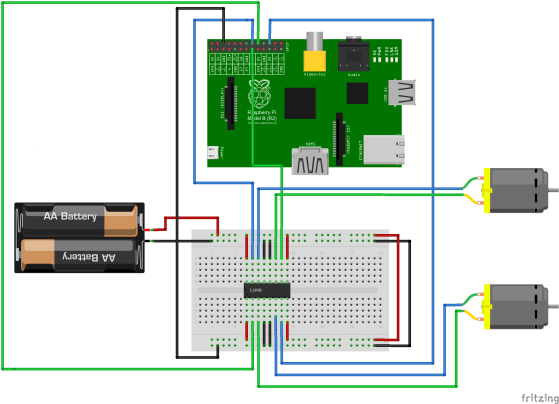
To build a basic robot all you need is motors, a driver chip, some batteries and of course a Raspberry Pi.

IMPORTANT: Do not connect a motor, no matter how small directly to the Raspberry Pi, it will damage your Raspberry Pi. 

We use a L293B motor driver chip which is like is a little current amplifier that takes a low-current control signal and then turns it into a higher-current signal that can drive a motor.

I would also recommend using separate batteries to power the Raspberry Pi and the Motors as the motors can sometimes draw a lot of power from the batteries for example when starting up and this could cause the Raspberry Pi to restart. We used a “Power Bank” from Penneys to power the the Raspberry Pi and four AA batteries to power the motors. Here is a drawing of our circuit.

robot_bb

We wired up our circuit and placed it into a container that had the motors attached to it.

IMG_20160116_094949

Once we had our robot assembled we loaded up this code and tested it out then we tried to program our robots to follow a preset path but the lack of a third wheel made this very difficult, something we will have to improve for next week.

This week was also our first time using Gpio Zero which is a new Python library for controlling the GPIO pins on the Raspberry Pi. It makes physical programming much more straight forward and really helped to speed up our work this session.


“Tick” Technique in Scratch – Illusions and 3D printing!

Today in scratch advanced, Mark covered a very useful method to organize your programs better if there are lots of moving sprites – which he calls the “tick” technique.tick_loop The idea is that a single master loop ticks time and the Sprites react to this tick in their own way.

We showed two examples of using this tick – an optical illusion that shows that things can move in circles while just doing straight lines and a technique for building 3D models by layering sprites the same way that a 3D printer layers resin.

illusion_path


The FULL Instructions for today’s projects are here – Enjoy!!

It would be great if you tried out some of your own Tick projects, and demonstrated them next week at Scratch Advanced!

Playing With Unity Physics and Wheel Colliders

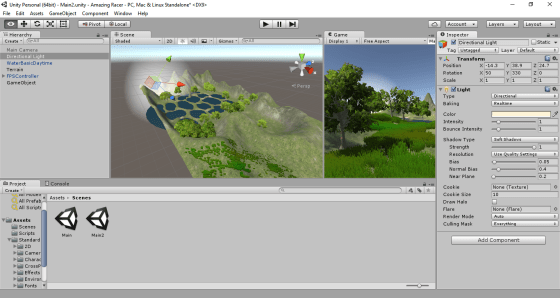
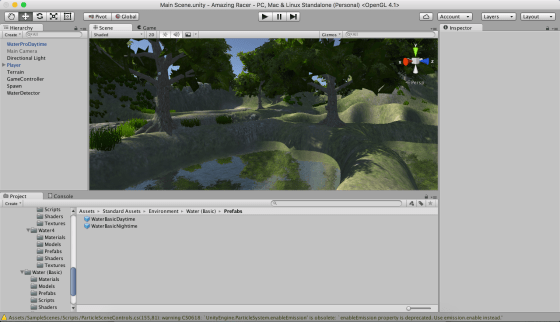
Hi folks. This week we continued work on our Amazing Racer project. We explained what heightmaps are and we imported a standard heightmap into a terrain object. We also added water and trees to our game map.

Apart from that, I also showed two little fun experimental projects that I worked on over the Christmas break to test a couple of game ideas. I thought I’d upload them here so you can play with them yourselves; maybe even use them as the basis for a game idea?

PhysicsTest

The first project, called “Physics Test”, is just a Jenga-like tower of bricks, a ramp and a dropped sphere. The sphere and the bricks have custom physics materials to define their friction and bounciness. It can be downloaded from here.

WheelColliderTest

The second is called “Wheel Collider Test”. It uses Unity’s Wheel Collider on a simple vehicle made of a box and four cylinders. The whole thing is on a simple map made from a basic terrain with a flat interior and a raised edge (to keep the car in!). The awesome (cough) textures are from random Windows backgrounds. The Unity documentation for the WheelCollider can be found here. I note reading it that our project sets up the visual elements to represent the wheels differently to the method recommended in the documentation, but it seems to work OK. The project itself can be downloaded from here.

See you all next week!

PiDojo-Project Ideas

In the Raspberry Pi group we had planned on everybody building some small projects together before the Christmas break and then moving on to bigger individual projects after Christmas. Unfortunately we’re a little behind on our small projects due to the taster sessions in the beginning of the year and the fact we didn’t have a proper session in December but we’ll catch these up in the next couple of weeks.

However as the difference between a good project and a really great project is sometimes the idea behind it I decided to spend most of this week’s session looking at ideas for our projects. I asked the Ninjas to ask themselves the following questions if they were stuck for ideas.

  • What do I like to do?
  • What/Who do I care about?
  • Is there something I’ve always wanted?
  • What’s going on? (In the news, in my community etc.)

IMG_20160116_133645

As you can see from the picture we had loads of ideas to start with and I’m sure we will come up with many more before we finally have to start working on our project.

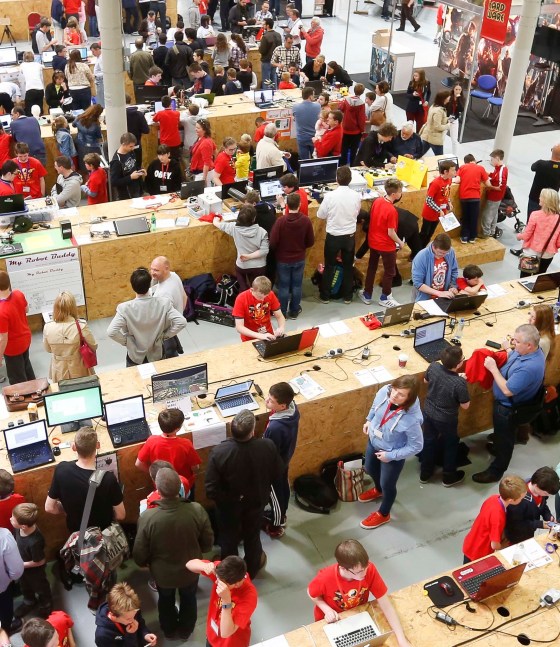
We also discussed the Coolest Projects Competition but as we’re planning on sharing information with the whole Dojo soon I won’t say much about it for now but here’s a picture from last year’s competition.coolest pic1


ModderDojo Topic 7: Planning and Building a Complex Structure Mod in Minecraft

PyrimidInside

This topic continues from ModderDojo Topic 6: JavaScript Operators and ScriptCraftJS Drone Functions.

Sharing a Server:

In previous weeks before we stopped for Christmas, some people struggled to make progress through no fault of their own: they were hampered by CanaryMod crashing a lot on some people’s computers.

To work around this, everyone can connect to my computer as the Minecraft server, and I will also create a shared folder on the computer so you can drop your mods into it.

Please review these notes from several weeks ago: Topic 2: Connecting to Each Other’s Servers.

This Week’s Challenge:

This week (and for the next week or two), your challenge is build a substantial mod in ScriptCraft that, when you run it, will create an impressive-looking structure!

A key step to success here is planning and design: as I have said before, a  programmer’s most important tools are paper and pencils, for figuring out what you want to create before you write code for it.

You should review the following:


Tunnel1


Happy New Year 2016!

Happy-New-Year-2016c

CoderDojo Athenry will resume on Saturday 16 January 2016 at our usual time and place, 12:00 in Clarin College Athenry (formerly called Gairmscoil Mhuire / The Tech). See you there!

We are very grateful all of our members in CoderDojo Athenry for your involvement and enthusiasm during 2015. And of course we are hugely grateful to our mentors who are so generous with their time and expertise every week, and to the school for accommodating us.

We are looking forward to another year of fun coding and excitement learning about new technologies in 2016, and we hope you are looking forward to it too!

Beginners Scratch – How to make an animated Christmas Scene

Because our last lesson on animation was cancelled, I thought I’d post a lesson online that the kids could access over the Christmas holidays. This Scratch project(Julie’s Christmas Scene) is on the Scratch.MIT.edu website user:cdathenry1516, pw:cdathenry if you want to download it to your computer.

Screenshot (3) I searched the internet for Christmas Cartoon Images and saved a few to my computer:Screenshot (14)

Once I had all the images I wanted for Sprites, I opened SCRATCH and imported the Sprites From File but I noticed that each Sprite had a white background that blocked my nice backdrop. I decided to delete the background from each sprite.christmas scene delete image background

I did this for all my sprites. Next I decided to make the dog wag is tail by

  1. Duplicating the doggie’s costume,
  2. using the select tool to select just his tail and then rotating the tail with the little button at the very top of the selection rectangle.christmas scene make tail wag edit costume

I did the same with Santa’s arm and his shoes. I just rotated them a bit in each costume, back and forth. christmas scene make santa dance edit costume christmas scene make santa wave edit costume

For the lights on one of the christmas trees, I just

  1. duplicated the tree costume 3 times,
  2. poured different colours into the round decorations in each costume.

Lastly, I scripted each of the Sprites like this:christmas scene snow flake script Christmas scene santa script Christmas scene doggie script

That last script is for the doggie! You can script your Sprites in any way you would like. Can you put in a snowman and make him dance about? or bounce around. Can you have presents dropping from the sky like my snowflakes??

Christmas Pizza Party next week!!! Don’t forget to wear a santa hat and decorations! Bring your favourite scratch project and we’ll show the rest of the Dojo!

Julie

ModderDojo Athenry Topic 6: JavaScript Operators and ScriptCraftJS Drone Functions

Operators:

Operators in any programming language are used when you want to calculate something new: they operate on values. variables, or expressions to produce a new value.

Since ScriptCraft is built on the JavaScript langauge, it uses standard JavaScript operators. As it happens, many other programming languages (including C, C++ and Java) use the same operators or very similar ones.

JavaScript Operators

Drone Functions:

As we have seen before, in ScriptCraft you use a drone to do your building for you. The drone has functions that are part of it.

Here are some of the main drone functions that are useful when building your mods:

ScriptCraft Drone Functions

You can find lots more about these and other functions in the ScriptCraft API Reference: https://github.com/walterhiggins/ScriptCraft/blob/master/docs/API-Reference.md

Example: Build a Pyramid

This example is based on a very nice program writing by Ruaidhri from Coderdojo Athenry last year, updated slightly because some ScriptCraft commands have changed in the meantime.


// Copyright Ruaidhri from ModderDojo Athenry,
// slightly updated by Michael and Alex.
// Builds a pyramid with entrance and lights inside.

exports.pyramid = function()
{
echo('making a pyramid');
var d = new Drone(self); // 'self' means start drone beside me
d.up(1);

d.chkpt('begin');

var size=31;

// Make the walls
while (size > 0)
{
d.box0(blocks.sandstone,size,1,size);
d.right(1);
d.fwd(1);
d.up(1);
size=size-2;
}

// Entrance
d.move('begin');
d.right(15);
d.box(blocks.air,1,2,3);

// Lights inside
d.move('begin');
d.right(4);
d.fwd(4);
d.up(3);
d.turn(2);
var t = 0;
while (t<4)
{
d.hangtorch();
d.left(11);
d.hangtorch();
d.left(11);
d.turn(3);
t = t + 1;
}
d.move('begin');
}