Hackers – Hide and Seek

We welcomed back Hackers Group members Luke and Sean, who had projects at the Young Scientists Exhibition last week.  Details of their projects are in another post: Congratulations to our members who presented at the BT Young Scientists 2019!

This week we divided the group into two teams to work on our hide-and-seek robots:  One team to build the hider robot, the other to build the seeker robot.

The two robots can use many of the same parts, but the control systems will be different.  The hider robot will be operated by a person with an RC transmitter.  The seeker robot will control itself.

Team Hider started resurrecting a radio-controlled robot that we built last year.  The robot was involved in a battle-bots battle at the end of the year, so it is in pretty poor shape.
Teem Seeker worked on a colour tracking system.  We took the code that we developed on a laptop before Christmas and tried it on two Raspberry Pis.  We found that the original model Raspberry Pi wasn’t fast enough to do the job we needed.  It took 6 seconds to acquire an image from a webcam.  We tried a Model 3 B instead.  This was fast enough for our needs.  We then started work on tuning the colour detection.  There’s some more experimentation to be done to find the best colour range to work with.

Creators: Images and Web Servers

Up to this point in Creators we have been building all of our apps as sketches ourselves using the drawing functions in p5/javascript – ellipse, rect, etc.  This is great but a question we get all the time is “how can I load IMAGES and Sound into my games?”.  This week we got stuck into this, using a project of a very basic shooting game as an example.

However, before we got stuck into writing our game, we needed to install something on our computers called a web server.

What is a web server and why do we need it?

A web server is a program that makes files available on the internet.  Mostly, the files are made available to programs that can understand the Hyper Text Transfer Protocol – or http for short.  “http” probably sounds familiar – this is because you are used to seeing it on your browser before internet links.

Up until this point, we simply opened files on our computer with explorer and if you looked at the browser link you would see something like this:

file:///C:/Users/markdav/code/dojo/creators2018/Week11-shootah/index.html

The “file” at the start means the browser is opening a file on the local computer.  This works great for a lot of things, however if you write a program in javascript which runs on the computer, javascript is not allowed to open files on the local computer.  Why? Because if javascript could open files on the computer of the person opening a website, it would be easy to write a webpage that steals information from people looking at it, without them knowing it.  This would be a BIG security problem!!

Javascript can only open files which are served out by a web server – so in order to load images or sound into a javascript program, we need to make sure that they are served out by a web server.

Installing our Web Server – Node.js

nodejslogo

There are lots and lots of web server programs out there but we decided to install one which is written in javascript – we are javascript nuts after all!  Node.js isn’t actually a web server, but is a set of programs kind of like p5 that make it easy to write or install programs in javascript for your computer – and especially ones like web servers.  Later in the year we will play some more with node.js and write our own programs in it to do some cool stuff.

We installed node.js from the node website here.

Once we installed node.js, we then installed a web server which is written in node.js – we installed one called “local web server”.  To install local web server – we opened a command terminal in the computer and typed the following:

npm install -g local-web-server

npm stands for “Node Package Manager” and it’s a program that makes it easy to install programs written in node on your computer.  Once this was done, we have a new command in our computer – the command is “ws” and what it does is to start a web server that puts the files from the current folder on the internet!

To try it out, we started a new p5 project called “shootah” and right clicked on the folder and selected “open in terminal”.  The command prompt appears directly in Visual Studio Code, which is handy.  We then typed “ws”

markdav@markdav2017 MINGW64 ~/code/dojo/creators2018/Week11-shootah (master)
$ ws
Serving at http://markdav2017:8000, http://192.168.71.1:8000, http://192.168.48.1:8000, http://192.168.1.20:8000, http://127.0.0.1:8000

This started a web server in the folder which serves out the files – to open we used either one of the links given, or actually we kind of preferred to type “http://localhost:8000” which was another way of putting it.  When we did this, the files just showed in the browser!

Developing Shootah

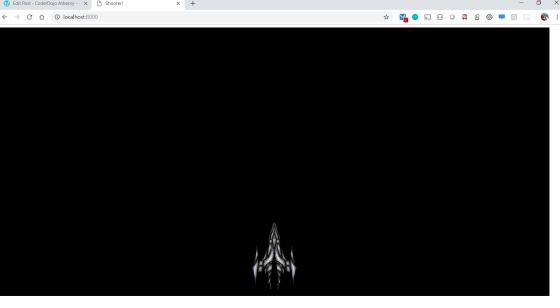
All this installing took us some time, but we were ready to get stuck into developing our space shooting game.  We go to the stage of getting a Spaceship which we could move left and right – but no bullets, sound or enemies, yet.

First we needed a spaceship picture, and we had a bit of fun rooting around on the internet for one.  Some people created their own images.  I ended up picking this picture (you can right-click this picture and save it if you like it too):

big-spaceship

When we had the spaceship picture, we created a folder to store our pictures.  I created a folder called “images” and put the picture in there and called it big-spaceship.png.  Some others called their folder “assets” which is a term you often see used. To be honest my picture was a bit big – you are better off making the images just the right size, as it saves a little bit on memory for the computer when showing them.

We learned that there is another special function in p5 which is best to use when we are loading files like sounds and images into variables – it’s called “preload” and we wrote the code to load our images in there:

let playerImage;

function preload(){

      playerImage = loadImage("images/big-spaceship.png");

}

Once we had the image loaded, we could draw it using the “image” function.   The show function on our player used this to paint the image:

show(){
    imageMode(CENTER);
    image(this.img, this.x, height-100, 100, 100);
}

Aside from that, the code was pretty similar to other sketches we have done.  We put some basic code in to allow the player to be moved left and right.  This is as far as we’ve gotten – next week we’ll work on it some more and see if we can get some enemies, bullets, sounds, maybe stars, scores, better movement, etc.  Code is on github as usual!

shooter-1


Bodgers – Mission Zero & Projects

Hello again everyone.

This week we started getting our entries ready for the Astro Pi Mission Zero Challenge by looking at whose aboard the International Space Station now and what they’re doing. We followed this up by taking another look at programming the Trinket Astro Pi emulator.

31348827717_cd45388c8b_z

We also had a small brainstorming session to come up with ideas for projects that we will be working on for the rest of the year.

img_20190119_135038472_hdr

See you all next Saturday.

Declan, Dave and Alaidh.

Week 2 2019 – Explorers – Piano

Hello everyone,

Thank you all for coming again this week. Today we started looking at the Scratch 3. We had some small issues saving but hopefully all these little issues will get sorted with updates over the next couple of weeks.

This week we did a simple Piano so we could familiarise ourselves with it.

piano

We only had to draw two keys, and then could duplicate these and change the names. The same applied to the code. The code is the same for each key apart from one small change so the note is the appropriate for the key.

REMEMBER! You need to make four changes each time you duplicate:

Change the name of the spite to the next Note

Change the name of the TWO costumes

Change the NOTE played

Piano2

Here are notes from this week in PDF cda-s8-week-2-19-piano.pdf

Martha

Julie, Ruaidhrí and Eoin

Advancers – Mad House

Introduction

This week we built a Mad House with different rooms that you could go into and if you found the right place to click something would happen.

The coding for this project shows how you can re-use code, this has 2 benefits, it makes coding quicker and it also makes all the code consistent, so it all looks the same.

The Plan

As always, it’s best to have a little bit of a plan.

We decided on the following:

  • 4 Rooms – each room would have 2 Sprites
  • Clicking a room would make it large
  • Clicking the Space key would make the room small again
  • We would build one room first so we could copy the code.

The Code

The first room we created was the Kitchen, the plan was when you clicked on the saucepan, it would boil over.

The Sprites need to fill the whole screen and also need a coloured background to ensure that the Mouse Click is recognised by the code.

These are the 2 Sprites that I built:

kitchen


It’s not easy to see, but the “On” Sprite has some flames coming out of the pot.


Because we are having 4 Sprites, when the program starts we need to make the Sprite a quarter of it’s full size and move it to one of the corners of the Screen. We also discovered that we would need a variable (a flag) to indicate if the room was Large (1) or Small (0). We did this in the GreenFlag code like this:

greenflag

We moved to top left corner.
we set the size to 50% (this makes it fill a quarter of the screen
We set the variable to 0 (0 = small, 1 = large)
We set the start costume to the Off costume.


Next step was to write the code for when the Sprite was clicked, this would make the Sprite fill the screen, slowly! It would also set the flag to say that the Sprite was large.

The biggest piece of the code was making the Sprite grow slowly, we did it in 50 steps, changing the size was easy as it just changed by 1 each step, but the X and Y positions were a little trickier as we needed to make sure they were going in the right direction and also changing by the right amount to reach the full size in 50 steps.

spriteclicked

Only run this code if we are small (0)
Make we can’t run again set the flag to 1.
Make sure we are in front of the other Sprites

X needed to go from -120 to 0, 2.4 each time
Y needed to go from 90 to 0, so -1.8 each time
Size was simple, 1 each time
And to make it nice and smooth, we wait for .1 of a second in each step.


We then moved on to the code that should run when the Space key is pressed, this would reverse what happened when the Sprite was clicked.

spacekeyclicked

Again, we only run if we are large (1)

The X and Y changes are the reverse of the ones above.

And finally we set the size back to small again (0)


Now we can move on to the code that changes the costume if the user clicked on a certain spot on the screen.

We decided that the user should click on the pan for the costume to change, so first we needed to work out where the pan is on the screen (It’s X and Y positions). This is easy in Scratch 2, when you move the mouse across the Stage the X and Y position is shown at the bottom of the screen, so you just need to place the Mouse on the 4 sides of the Pan and make a note of the X and Y values. X values for the min and max left/right positions, Y values for the min and max up/down positions. Hopefully this picture will help:

pan$

We needed to place the Mouse on each of the positions indicated, which then gave use the correct values to place in the code.

The code then looked like this:

foreverloop


We loop forever
Only check X and Y if we are large (1) and the Mouse is clicked. Then check where the Mouse is. This where we use the values we got when checking where the Pan was on the screen.


And that is it for the first Room.

The Second Room.

Now that all the code is written for the first Room, the second Room becomes a lot easier, we simply duplicate the first Room Sprite and then make the following changes to the code:

  • Change the 2 Costumes to something else for this new Room.
  • Add a new Variable for this Room
  • Update all the places where the Variable is set to this new one.
  • Update the starting X and Y positions to one of the other corners of the Stage.
  • Update the X and Y changes when the Room grows and shrinks to make sure it is going to the centre of the screen correctly and also back to it’s own corner.
  • Update the X and Y values to a new location on the Screen, depending on what you have drawn on your new Costumes.

The Finished Program

I only got 3 Rooms finished and this what it looked like at the end:

stageandvariables

Next Steps

If you want to improve the program you can look at adding the following:

  • The final Room to make it 4 rooms.
  • Extra code change the Costume back to normal if the item is clicked again, this would check what Costume is currently, this can be done using the “costume #” from the Looks blocks.

Notes

The one I did in the class is available on the Scratch Web Site:

Project Name : ClassVersion-MadHouse

UserId : cdadvancers1819

Password : advancers

Bodgers – Motors and Robots

This week in the Bodgers group we looked at controlling motors and robots withe the Raspberry Pi.

You can find the code for this weeks session here and my notes are here motors and robots

We also talked about ideas for the projects we will be working on for the rest of the year. Tomorrow we will continue to look at robots and we will also do some brain-storming for our projects.

See you then.

Declan, Dave and Alaidh

Creators – Pixels

543px-Liquid_Crystal_Display_Macro_Example_zoom

This week we looked at pixels. Your screen is made up of thousands of them; the picture on it is created by setting each one to the correct colour. We may ask P5 for an ellipse(), but ultimately some piece of code is deciding which pixels to change to the currently selected fill() colour (for the centre) and which to set to the currently selected stroke() colour (for the edges).

Working with Pixels in P5

P5 contains two main functions for working with pixels. The first is loadPixels(). By default it reads all the pixels from the canvas and copies the information into a huge array (or list) called pixels[].

If we then make a change to pixels[], all we have to do is call updatePixels() to copy this information back to the canvas again.

Sound easy? It almost is, but the content of pixels[] isn’t immediately obvious.

Structure of the pixels[] Array

The pixel[] array is one long list of numbers. It is arranged such all the information for the first row on the canvas is first, followed by the information for the second and so on until the bottom of the canvas.

For each pixel there are four numbers representing the red (R), green (G), blue (B) and alpha/transparency (A) value of the pixel. By the time the pixel has reached the  screen, alpha has no more meaning, so we will ignore it and concentrate on the RGB values.

This diagram represents what we’ve been talking about:

pixel diagram

Getting and Setting a Pixel

To make it easy to get and change the value of a specific pixel we can write two functions:

  • getPixel(x, y) which returns an array containing [r, g, b] values
  • setPixel(x, y, colour) where colour is an array containing [r, g, b] values

Both these functions rely on knowing where in pixels[] the data for the pixel at (x, y) is.

We can work out this as:

  1. Location of R: 4 * ((y * width) + x)
  2. Location of G; Location of R + 1
  3. Location of B: Location of R + 2

Knowing this, the functions can be written as:

function getPixel(x, y){
  let loc = 4 * ((y * width) + x);

  return [pixels[loc + 0],
          pixels[loc + 1],
          pixels[loc + 2]];
}

function setPixel(x, y, c){
  let loc = 4 * ((y * width) + x);
  
  pixels[loc + 0] = c[0];
  pixels[loc + 1] = c[1];
  pixels[loc + 2] = c[2];
}

FIlters
We wrote three filters, all very similar. Each used loops to go over each pixel in turn, retrieve the current colour, change it in some way and set it back.
The first was fade(amount) which took a number between 0 -> 1 for amount. It multiplied each of the original RGB values from the pixel with this value. The closer to zero amount was, the more it faded the image to black.
The second was invert(). It subtracted each RGB value from 255. This has the effect of inverting all colours in the image.
The final one was vignette(). This is like fade() but fades pixels depending on how close to the edge of the picture they are.
Animating Fade
Finally, we also animated fade() so that the picture started black and got brighter over a number of frames.
Putting all the filters together:

Download

The files for this week can be found on our GitHub repository.


Explorers – Doubling

Introduction

For our first day back in 2019 we decided to do a simple Paper folding program.

It doesn’t really fold paper though, it just shows you how thick the paper gets when you keep folding it in half! It will get very thick quite quickly!

So we Googled, how thick is a sheet of Paper and we got the number 0.1mm, so quite thin really!

We then Googled a list of items and their heights, so we could write out a message when we reached that height, this was the list we came up with [and a guess of how many folds it would take]:

  • Paper: 0.1mm
  • Baby: 530mm
  • Human: 2 Meters [50]
  • Dublin Spire: 121m
  • Croagh Patrick: 764m
  • Burj Khaleefa: 828m [10,000]
  • Carauntoohill: 1038m [1 billion]
  • Mount Everest: 8848m
  • Galway to America: 6603km [25]
  • Space: 100km
  • Moon:300,000km
  • Mars: 56,000,000 km
  • Sun: 150,000,000 km
  • Pluto: 7,500,000,000 KM

The Program

In order to keep track of how many folds we have done and what height the paper has reached we needed a few variables:

We store the number of folds, and the height in mm, meters and kilometers.

  • folds – to store how many times we have folded the paper
  • mm – to store the height in milimetres
  • metre – to store the height in metres
  • km – to store the height in kilometres

variables

We then made sure that they were all set to the correct value when the Green Flag was clicked.

greenflag

The only one that is not zero is the height in mm which we set the thickness of paper 0.1

Now we can get coding.

We used the Up and Down arrows to fold/unfold the Paper, this would increase/decrease the number of folds and the mm height and then Broadcast to the code that checked everything else.

upanddownarrows

The code that does the checking needs a few IF’s to work out what to do. First of all though it needs to calculate the height in Metres and Kilometres as well.

We used the number of folds to work out if we should be checking the mm, metre or km variable. All we did when we got to a particular height was to Say something on the Screen, but you could do anything you want at these points in the code, maybe show a different sprite or make a sound or something.

This is the code that checked the mm and metre variables

mmandmetre


and this is the code that checked the metre and km variables

metreandkm

And if anyone wants the full project, it is availabe on the scratch.mit.edu web site:

User: cdexplorers1819
Password: exploreres1819
Project: Doubling

Demos and Pizza – Christmas 2018

Here are photos from our Christmas party and Show & Tell day at CoderDojo Athenry on 08 December 2018.

This slideshow requires JavaScript.

It was fantastic to see the things that our young people had created.

We are very grateful to our supporters in the community around Athenry:

  • Clarin College and Principal Ciaran Folan, who are so generous with their space every week
  • Galway & Roscommon Education & Training Board, who provide us with an annual Youth Club Grant
  • HEA (Higher Education Authority) and NUI Galway School of Computer Science, who provide us with funding towards equipment.
  • Medtronic and Declan Fox, who have provided us with a grant linked to Declan’s volunteering
  • Hewlett Packard Enterprise and Mark Davis, who provide us with loaner laptops
  • Boston Scientific and Kevin Madden, who provide us with the loan of 3D printers.
  • Supermacs, who gave us a great deal on the food for the Christmas party

And of course, we are eternally grateful to our wonderful mentors, and to the parents who come along with their children every week. Thank you!