Oculus Rift!

Oculus

It’s great that CoderDojo Athenry can sometimes give young people (and parents) the opportunity to learn about and experience leading edge technologies, such as the 3D printer that Cathal Egan demonstrated at CoderDojo Athenry a couple of months ago.

In January 2015, we have another such opportunity, to try out the Oculus Rift. This is a virtual reality headset that combines 3D graphics with movement tracking, to give you the sense of being fully inside a computer generated world. Wearing it, you can look around everywhere, even over your shoulder, to see the world in 3 dimensions in all directions, and you can even move around it.

The Oculus Rift DK2 (Developer Kit 2) is an early stage technology, only available to software developers rather than the general public, but the ideas are likely to have a big impact in the future in areas such as games, entertainment, and education.

Even though we keep the demos to 2 minutes per person, it will take 3 or 4 weeks for all groups to get to try the Oculus out, because we have so many members in CoderDojo Athenry, and it also takes some time to get it set up.

Thanks a million to Ruaidhri in the Minecraft Modders group who owns it!

Tips for Staying Safe Online

Slide1CoderDojo Athenry was one of the group of 12 dojos that were the first to adopt and align with the CoderDojo Foundation’s Recommended Practice. You can read more about it here:
https://coderdojo.org/news/2014/12/22/recommended-practice-pilot-complete/

Huge thanks to mentor Neil who led this effort!

At the start of our first session of 2015 on 10 January, all lead mentors gave a short presentation with 10 tips on staying safe online. You can see the first 5 above, the other 5 are below.

You can download the presentation in PowerPoint format here: 10 Tips for Staying Safe Online PPT CD Athenry Jan 2015

We also circulated a short information document to mentors, but anybody is welcome to read it: Online Safety for Mentors CD Athenry V1.1

Slide2

Week 1 2015 – Scratch Beginners

Hello everyone and a very Happy New Year to you all!

happynewyear

Thank you all for coming yesterday. To ease ourselves back in we worked on some code for storytelling/conversations. This can add another dimension to any game. It can set the scene or can help with interaction between characters. We used speech bubbles yesterday but you can just as easily record voices instead. It’s all about the timings, you need to get those correct so that each character gets to say their piece.

Storiestelling

Here are the notes from this weeks session in PDF: CDA-S4-Challenge08-Storiestelling.PDF

Next week we are going to take a look at the graphics package PAINT.net. It would be very helpful if most people had it downloaded and installed before next week. The website is http://www.getpaint.net.

Here is a link to download it Here

See you all next week!


Making a Rainbow in ScriptCraft – Part 2

rainbow

Welcome to Part 2 of “Making a Rainbow in ScriptCraft”. Take a look at Part 1 below if you haven’t already and them come back here. If you’re read Part 1, you can download the script by clicking here.

Approaches to Drawing the Rainbow

You might imagine that drawing a rainbow is just drawing a series of arcs, one inside the other. If you do that though, you’ll probably find that there are gaps between some of the arcs. Look at the diagram here:

arcs

The red circle fits perfectly inside the blue, but there are little gaps between the red and the green circles. Gaps won’t look brilliant in our rainbow so what can we do to avoid them?

What we can do is to scan across every single block that’s going to be in the rainbow and figure out what colour it should be based on how far it is from the centre. If we did that in the diagram above, the overall shape would be the same, but the little gaps would be red or green instead of empty. This is the approach our script takes.

If you’re interested, Walter Higgins uses a different technique in his built-in rainbow function. Run it and see: starting from the outside of the rainbow, he draws arcs a little thicker than he wants, and lets the ones inside them intersect a little bit. It’s more efficient (in terms of run speed) than my approach, but maybe not quite as flexible.

Array of Colours

At the top of the script, there is an array of colours. An array is a special type of variable that holds more than one value at a time.

// Colours for the rainbow
var colours = [blocks.wool.red, blocks.wool.orange, 
               blocks.wool.yellow, blocks.wool.lime, 
               blocks.wool.lightblue, blocks.wool.blue,
               blocks.wool.purple];

The first item in the array we can get with colours[0], the second with colours[1] and so on. Conveniently too, we can use colours.length in the code to know how many things are in the array without having to assume it’s always going to be seven. If you wanted to edit the script so it read:

// Colours for the rainbow
var colours = [blocks.iron, blocks.gold,
               blocks.diamond];

It would still work and give you a three bar rainbow made of iron, gold and diamonds. Cool? I think so. Hopefully this helps convince you of how convenient arrays can be.

Credit where it’s due: I borrowed the rainbow colours from Walter Higgins as he’d already gone to the trouble of figuring out which MineCraft colours were closest to the classical rainbow colours of red, orange, yellow, green, blue, indigo and violet. No point re-inventing the wheel! [Ok, I did come up with my own first and then discovered he’d done it better but whatever…]

Two Functions

The script contains two functions. The main function rainbowk and a second function called get_block. Why? The simple answer is, it’s a lot neater; easier to read and easier to understand. You never have to use more than one function, but if your code gets long and complicated you’ll eventually lose track of what is going on unless you break it up into simpler chunks.

The function rainbowk is the one we call from inside MineCraft and it’s the only one added to exports. It takes two arguments – the inner radius and the bar thickness. Inner radius decides how wide the inside of the rainbow is and bar thickness determines how wide each bar is. It scans over all blocks in the rainbow, one row at at time and from the ground up. At each block it calls get_block to figure out what block at that position should be.

The function get_block isn’t exported, so we couldn’t call it from inside MineCraft, but we can and do call it from inside rainbowk. It works out how far the block we are considering is from the centre of the rainbow, using the technique discussed in Part 1, and decides what the block type should be. The block type will either be one of those from the colors array if the location is inside the rainbow or blocks.air if outside the rainbow.

Mega-Rainbow

I showed the script to my nephew who attends CoderDojo Athenry in the Scratch Beginners group. He wanted to know what the “biggest” one he could make was. Well, there is no actual biggest but he decided to make a pretty huge one. He specified an inner radius of 50 blocks and a bar thickness of 12 blocks. For those wondering what the total width of that is, it’s this:

megarainbowdims

Two hundred and sixty eight blocks wide! It’s half as tall, so 134 blocks high. The total number of blocks inside the rainbow is 268 x 134 = 35912! It took about three quarters of an hour to build 🙂

megarainbow

Here it is utterly dominating a village! It was hard to get this much in the screenshot and keep a sense of scale 🙂

Thanks!

Thanks to everyone who’s read this post. Hopefully you’ll download the script and give it a try. I’ll be delighted to answer any questions on it at next Saturday’s session or indeed at any CoderDojo Athenry session in the new year.

Making a Rainbow in ScriptCraft – Part 1

rainbow

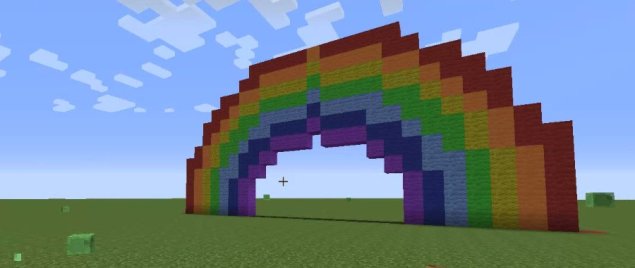
I decided for my first ScriptCraft project I would try to create a rainbow. There were two reasons for choosing this:

  • I thought it’d look nice
  • It would need a bit of maths, so it’s something you couldn’t easily build by-hand

I was a bit disheartened when I found that the creator of ScriptCraft, Walter Higgins, had included a rainbow as a standard function in ScriptCraft, but I persisted regardless and I’m glad I did.

There are, I think, three things that make this script interesting:

  • It’s got some useful maths in it
  • It’s got an array variable
  • It’s got a second function

So, I’ll have a quick chat about each of these, but because it’s fundamental to the rest. This post is all about the maths.

I can just about hear the groans now, but I promise, this is crazy useful and really not that hard.

Useful Maths – Calculating the Area of a Rectangle or Square

The area of a rectangle or square is just the width multiplied by the height. Take a look at the two shapes below. The rectangle is 2 high and 5 wide and contains 2 x 5 = 10 squares. It’s area is 10. The square is 5 high and 5 wide and it’s area is 5 x 5 = 25.

area

Count the little squares if in any doubt.

Useful Maths – Squares and Square Roots

In a square, width and height are the same so the square’s area is always the same number multiplied by itself. Above it was 5 x 5 = 25.

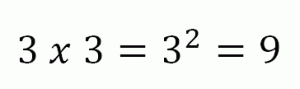
A number squared is simply the number multiplied by itself. The name makes sense when you see that it relates to the area of a square, as above.

Two squared is 2 x 2 = 4. Three squared is 3 x 3 = 9. A square is often written as the number with a superscript 2 after it. You can see that here:

squared

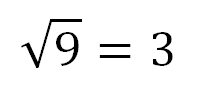
A square root is the reverse of a square. If 2 x 2 = 4, then the square root of 4 is 2. In the same way, the square root of 9 is 3. Every positive number has a square root, but most aren’t easy to guess like the two I’ve just shown. The square root of 2 is 1.414! A calculator or your computer program can always figure them out though. A square root is normally written as shown here:

squareroot

Useful Maths – Measuring Distance in 2D and 3D

Now that we know about squares and square roots, we can talk about calculating the distance between two points in 2D and 3D. This is something programmers need to do all the time. The technique that’s used is known as Pythagoras’ Theorem and it’s been round since ancient times.

The person who invented it (probably not Pythagoras, even though his name’s on it now) noticed that there was something interesting about triangles which have right-angles in them (a perfectly square corner). They noticed that if you squared the length of the two shorter sides and added them together that that was the same as the square of the length of the longest side. Notice that the longest side is always the one which is directly across from the right angle. This diagram shows everything I’ve just said visually, showing the squared side lengths as physical squares:

pt

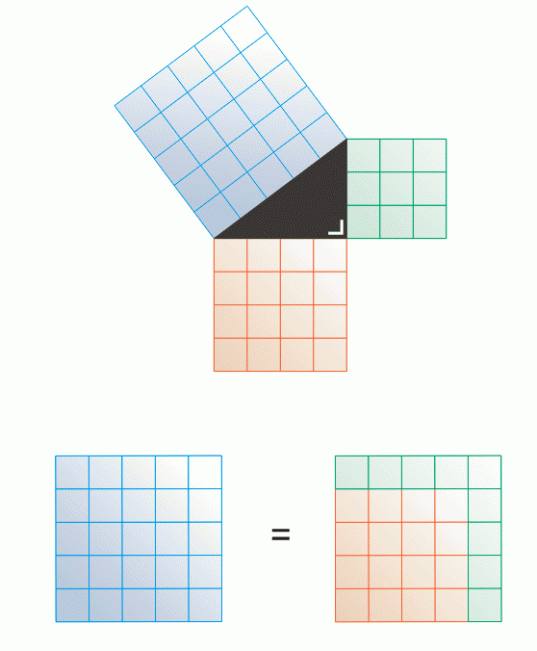
If you’re in doubt, all the little squares are exactly the same size, you can count them to make sure they’re the same.

You might not see it, but we now have everything we need to calculate distances in 2D. Consider two points, shown in red below, which are x units apart horizontally and y units apart vertically:

distance2D

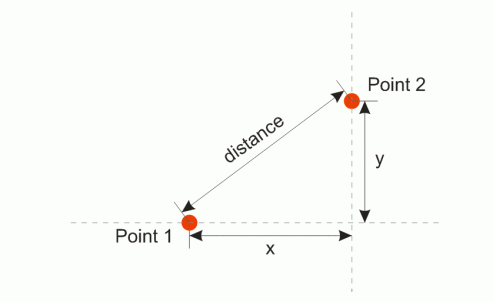
It’s a right-angle triangle! This means that we know that the distance is related to the length of x and y like this:

distanceeq

but we don’t want distance squared, we only want distance so we can reverse the squaring with a square root which gives:

distanceeq2

This is really easily extended to 3D too. If the points are at different Z positions and z is the difference between them in that direction the distance is:

distanceeq3

Which is almost exactly the same, but has the z bit added.

In JavaScript – Measuring Distance in 2D and 3D

So, what does this look like in JavaScript? A little different, but easy to understand.

JavaScript doesn’t have a short way to write “squared” so we just multiply the variable by itself to get the squared value.

When it comes to square roots, the built-in Math object has a function for calculating square roots called “sqrt”.

Lets see how this looks together:

var x = 4;
var y = 3;
var distance = Math.sqrt((x * x) + (y * y));

Hopefully you can relate this to what we’ve shown above. Even if you don’t get it, you can still copy and use this code yourself if you need it.

The extension to 3D is almost identical. You’re probably figured it out, but I’ll show it anyhow for completeness:

var x = 4;
var y = 3;
var z = 5;
var distance = Math.sqrt((x * x) + (y * y) + (z * z));

Closing

I’ll probably take one more post to finish this off, which could take a day or two to appear. The script will be attached to the last post, so stay tuned!

Python Games – Weeks 8: Adding audio and health bars

Apologies for the delay in posting the notes from yesterday. In the Python Games group we finally finished our Ocean Cleaner game which we are looking forward to demonstrating to everybody next Saturday.

ocean_game

In order to finish our game we had to learn about adding audio and health bars. The demo code we used is available on Dropbox here and our completed Ocean Cleaner game is available here. Here are my slides python session_8

Photos from MineVention

Thanks to the organisers of MineVention for making a limited number of tickets available to the Minecraft Modders group in CoderDojo Athenry to demo their mods. All of our modders did a great job of explaining what we do in CoderDojo Athenry to visitors, and demonstrating their Forge Java mods and their JavaScript constructions.

Well done to Eoin, Eli, John, James, Ruaidhri, Luke, Emmet, Oisin, Darragh, Sean and Aidan, and special thanks to mentors Martha, Kieran and Julie.

A real highlight was the 3D printed house that Cathal Egan had prepared, which was a printout of the Stone House that Oisin from CoderDojo Athenry had created:
https://cdathenry.wordpress.com/2014/11/30/combining-scriptcraft-and-printcraft-write-code-to-build-minecraft-structures-and-3d-print-them/

At the end of the day, Dan the Diamond Minecart was kind enough to visit our booth and see some of our mods. Here are a couple of photos of him looking at mods from our group.
luke-tdm
ru-tdm

Week 7 – Scratch Beginners – Christmas Scene-Animation

Hi everyone,

This session we got into the Christmas spirit and we created some animated Christmas Scenes.

CDA-S4-Week_07-ChristmasScene

Using costumes we could have the effect of movement, snow falling, dancing penguin, or flashing lights. We could also use the colour effect code to change colours.

Walking around the room I saw lots of great scenes, some dancing Santas, reindeer with noses that change colour and lots lots more.

Next week is our last week so we are going to have a “Show and Tell” and then some Pizza! If you would like to show us anything you have done so far this year, just let one of the mentors know on Saturday and we will get you up to show everyone. If you would rather not get up in front of the room that is fine, but I would love to see it so make sure to call me over to have a look.

NEXTWEEK

Looking forward to seeing you all there on Saturday. D’ont forget to get into the mood, wear something Christmasy..Jumper, Hat, Scarf, socks, earrings, whatever!

Here are the note from this weeks session. CDA-S4-Week_07-ChristmasScene.pdf

Combining ScriptCraft and PrintCraft: Write code to build Minecraft structures and 3D Print them

3DPrint2

I have bundled ScriptCraft and PrintCraft so that you can write JavaScript code to create objects in Minecraft and then generate 3D printable models with them.

https://www.dropbox.com/s/1adh02ri5w2bvff/printcraft_scriptcraft_1_6_4.zip?dl=0

The PrintCraft server is one created by Paul Harter of http://www.printcraft.org/, version 1.5.0 for CB 1.6.4. It has Paul’s default world with 36 building plots arranged in a clearing in the jungle.

The ScriptCraft plugin is created by Walter Higgins, available at http://scriptcraftjs.org/, version dated 2014-08-23.

How to install:

Just download the zip file from this link and unzip it: https://www.dropbox.com/s/1adh02ri5w2bvff/printcraft_scriptcraft_1_6_4.zip?dl=0

It is a Minecraft server that you run.

How to use:

  • Run the server with Run_windows.bat or the corresponding Linux/Mac files.
  • Make sure you are an admin: in the server window, type op <your_username>
  • In Minecraft, connect to the server by selecting Multiplayer – Direct connect and enter localhost
  • Go to one of the plots and press the button to Claim it.
  • Create an object with ScriptCraft code. For example, try /js stonehouse(), which was written by a member of CoderDojo Athenry.
  • Press the Print button to create a printable version of the object. You’ll get web link where you can download your model.

Notes:

  • Glass, doors, fences and other objects that are not basic blocks don’t render; you just get voids.
  • Many 3D printers are single-colour, so bear that in mind.
  • If you want to reset your world, copy the one in “BACKUP-world”.

The picture below shows the house created with /js stonehouse(). Follow this link to see its PrintCraft 3D model.

2014-11-29_21.54.40