Explorers Week 03 – Our first Game – Balloon Ninja!

Hi everyone,

Great to see you all yesterday and I hope you enjoyed creating your first game in scratch.

its important to take a moment to make a plan, in the long term it will save you time if you have a clear idea of what you want to create.

I didn’t make it easy on you and we went straight into learning about variables to create our score and lives.

I saw some fantastic games around the room with Dinosaurs and Doughnuts and Unicorns, much better ideas than I could ever come up with.

I gave you the option of whether you wanted to add a time or not. It is a piece of could yo can add to any of your games as it can add a sense of tension or urgency to a game.

Here are the notes from this week in PDF CDA-S8 Week_03_BallonNinja.PDF

Thanks again for coming and see you next week.

Martha

Julie, Iseult, Eoin and Ruaidhrí

Hackers – Starting Programming Arduino

arduino

In our first week in the Hackers group, we began with an intro to what we do, which is to help people work on their own projects. In the first few weeks, we will focus on learning some useful technologies that people can then start applying to their own work.

Everyone introduced themselves and talked about what projects, if any, they planned to work on, and the mentors suggested some possible technologies that may be useful.

We decided to start by learning how to program the Arduino, which is a microcontroller that runs one program at a time – as soon as it is powered up, it runs the code in a function called setup(), and then it keeps running code in a function called loop().

Arduino is programmed in a version of the C Programming Language, which is a very well-known language.

To write a new program for Arduino, you connect it to a computer and use the Arduino IDE (interactive development environment), which we downloaded here: https://www.arduino.cc/en/Main/Software

Arduino is mainly used to control hardware, and we will see how to do that in future weeks. For this week, we did not control external hardware, but just a built-in LED.

We began by following this tutorial to write code to make an LED blink: https://www.arduino.cc/en/tutorial/blink

Then we started expanding it …

  • We decided to flash an SOS message in Morse Code
  • We found out that a dash is 3 times as long as a dot, and the interval is the same length as a dot
  • We found out that you need a short delay at the end of each letter (3 dots long) and a longer one at the end of each word (7 dots long)
  • We made functions for dot(), dash(), and letters such as S and O
  • We looked up Morse Code for the other letters, and wrote functions for them
  • We added a variable so we could control the speed of the flashes

Here is one version of the final Arduino program. Note that it is incomplete, it just has a few of the letters of the alphabet.

// Code by Michael from CoderDojo Athenry.
// A program to display messages in Morse Code by flashing an LED.
// This is not complete - just some examples.

int interval = 300; // this controls the speed of messages in milliseconds

void setup() {
  // Set up the LED as an output pin. The built-in LED is represented by LED_BUILTIN.
  pinMode(LED_BUILTIN, OUTPUT);
}

void loop() {
  // Keep repeating our message over and over.
  A(); // Morse code for a letter
  B();
  S();
  endword(); // At the end of each word there is an extra delay
}

void dot() {
  digitalWrite(LED_BUILTIN, HIGH); // send 5 volts
  delay(interval);
  digitalWrite(LED_BUILTIN, LOW); // send 0 volts  
  delay(interval);
}

void dash() {
  digitalWrite(LED_BUILTIN, HIGH); // send 5 volts
  delay(3 * interval);
  digitalWrite(LED_BUILTIN, LOW); // send 0 volts 
  delay(interval);
}

void endword() {
  digitalWrite(LED_BUILTIN, LOW); // send 0 volts  
  delay(4 * interval);
}

void endletter() {
  digitalWrite(LED_BUILTIN, LOW); // send 0 volts  
  delay(2 * interval);
}

void A() {
  dot();
  dash();
  endletter(); 
}

void B() {
  dash();
  dot();
  dot();
  dot();
  endletter(); 
}

void S() {
  dot();
  dot();
  dot(); 
  endletter(); 
}

void O() {
  dash();
  dash();
  dash();  
  endletter(); 
}

Advancers – Spirals

This week Eoin led the Advancers group, we looked at drawing in Scratch, using the Pen blocks and some simple maths to draw some patterns.

As always, we started with a Plan:

A Plan

  1. A Button Sprite – to start the drawing.
  2. A Simple Sprite to do the drawing.
  3. Some maths to make it draw a Spiral

We started by drawing a square, to draw a square in Scratch we used the Pen down, Turn and Move blocks.

To get a spiral effect we had to make sure that we moved a little bit further each time we drew our square.

We also decided that we should be able to make spirals with different shape so we  needed some variables to help:

  • Shape – This would tell us how many sides the Spiral should have
    • We made this in to a Slider on the screen so it was adjustable.
    • Min value was 3 and Max value was 100
  • Degrees – This would tell us how much extra to turn, this made the patterns a lot more interesting.
    • Again, we made this one into a Slider so we could adjust it.
    • Min value was 0 and Max value was 360
  • Size – This was an internal variable, which we used to keep track of how many Steps to move each turn, we also added a little bit to it each turn to make the Spiral pattern.

The drawing Sprite

This was the Sprite that did all the work. To work out how far we should Turn each time, we divided 360 by the number of Sides, we then added the degrees value to get the strange effects working.

The code ended up looking like this:


The Button Sprite

We used this sprite to start drawing, we used a broadcast so out button sprite could “talk” to out drawing sprite.

Oliver will be back next Saturday.

See you all then Declan and Eoin

CoderDojo Athenry Information Session, Sept 2019

Thank you to everyone who came along for our information session yesterday Saturday 14-Sep-2019.info_session

Michael introduced us to the CoderDojo movement and then talked to us about CoderDojo Athenry and what we have planned for 2018/2019. Michael’s presentation is here:CoderDojoAthenry-InfoSession-2019-Sept .

Julie then spoke about our loaner laptops where we provide laptops for people who don’t have their own. Speak to Julie or any of the mentors (we’ll be wearing blue t-shirts) for more information.

Martha then spoke about Health & Safety and our shop, where we sell tea/coffee with biscuits for €2.00 or €1.50 if you bring your own cup, with all profits going towards equipment etc. for our CoderDojo. The H & S and Coffee Shop slides are here: HS-and-Coffee .

info_session1

This year, we have 4 different rooms with different topics in them, for different levels of experience and age.

Explorers- led by Martha for Beginners from around age seven. They use the Scratch programmimg language to build games, quizes and animations. Here are Martha’s slides: CDA-Explorers-S8-Information-Session .

Advancers- led by Oliver is for kids who have already been through Explorers. They tackle more complicated programming concepts, during the year the Avancers group will investigate various topics like gravity, music and even what happens when water boils using Scratch.

Modellers- led by Kieran is for older kids who have been through Explorers and Advancers. The Modellers group will concentrate on making 3D game resources using apps like Blender and Gimp. Here are Kieran’s slides: CoderDojoAthenry-Modellers-KickOff-Sept2019.

Hackers- led by Michael for older teenagers who have been through Creators and Bodgers. The Hackers group themselves usually decide what topics they will cover with many of them working on their own projects. Here are Michael’s slides: Hackers-Intro-Slides.

Kids are free to move between rooms until they find a topic that suits them.

To find our schedule for the 2019/2020 sessions click on the schedule button at the top of this page.

If you have any questions or if you need any help, please talk to me or any of the mentors.

See you all next Saturday.

Declan and the CoderDojo Mentors

CoderDojo Athenry Returns on 14 September 2019!

return

CoderDojo Athenry is starting back with an information session on 14 September 2019 in Clarin College Athenry (“the Tech”) at 12:00 noon. All new and existing members are welcome to come along to find out what we have planned for this season.

Regular weekly sessions will start the following week, 21 September 2019, 12-2pm in the same venue.

New members are always welcome. If you are aged between 7 and 17, just come along on the first day and fill out a registration form. Young people aged 12 and under have to be accompanied by a parent/guardian for the whole session.

And don’t forget, CoderDojo Athenry is run by volunteers and is completely free for participants — no membership fees, no weekly contributions. You should bring a laptop if you have one, but we have some loaner laptops if you don’t. There is more information on our About page.

We hope you can join us. You are welcome to invite your friends along too!

Congratulations to all our ninjas who received belts in Summer 2019!

On 2 May 2019, at our final CoderDojo Athenry session of the 2018-19 year, we awarded a total of 75 belts to our ninjas for their great individual achievements in acquiring and demonstrating coding and computing skills. And then we had a party with pizza!

Here is a link to our presentation from the day: CoderDojo Athenry Belts Day 2019

We are very grateful to Clarin College Athenry and the principal, Ciaran Folan, for their enabling CoderDojo Athenry by making the school and its wifi available to us.

We are also very grateful for the sponsorship and support we have received this year:

  • Galway Roscommon Education and Training Board, who provide us with an annual Youth Club Grant
  • Medtronic, employer of our mentor Declan Fox, who provide us with a grant to match Declan’s excellent volunteering
  • HP Enterprise, employer of our mentor Mark Davis, who provide loaner laptops that we make great use of
  • Boston Scientific, employer of our mentor Kevin Madden, who provide us with 3D printers.


Thanks also to everyone who supported us by buying tea or coffee!

Because of these supports, no child or parent/guardian ever has to pay to participate in CoderDojo Athenry.

And of course we must thank our mentors, who volunteer their time and expertise entirely without charge week after week, to make CoderDojo Athenry the success that it is.

Here is the full list of belts we awarded:

  • Explorers:    34
  • Advancers:  25
  • Bodgers:     8
  • Hackers:      5
  • Creators:     14
  • Black Belt:   2

Special mention must go to Eoghan McGuinness and Ruaidhri Madden, who received their black belt awards. Both have been in CoderDojo Athenry for several years, working their way up through the groups, and this year started Mentoring. Well done, Eoghan and Ruaidhri!

CoderDojo Athenry is now closed for the summer. See you all in September!

Creators: General Zod 3D!

This week in Creators we explored 3D and build an animation or two using it.  The final one was a “General Zod” simulation where we recreated a scene from a classic movie

Check it out here!

general-zod

This scene used the following elements:

  1. 3D Canvas! Our canvas was set up to use WEBGL – enabling this means you can use the 3D capabilities and shapes of p5
  2. Shapes – just the two shapes here:
    1. a “Box” which is your floating “prison”
    2. an “ellipsoid” which represents Krypton
  3. Lights!
    1. We looked at the different types of lights in WebGL (ambientLights, pointLights and directionLights) and for this scene I went with a few directionLights to light things from various directions
  4. Action!
    1. Positioning and moving the shapes is performed by transforms.  We moved the rather large planet to the bottom with translate and made the prison rotate and vanish off into space with a few rotate statements.
    2. Note that with 3D stuff, we have the use of a rotateX, rotateY, rotateZ since we can rotate in lots of ways!  I also added a rotation to Krypton above to make it more realistic.
  5. Texture!
    1. Krypton: We looked at adding textures which is an image that you paste onto the object.  The sphere above is textures with an image of Mars I found – not sure what Krypton is like I but I picture it as kind of orang-ish.
    2. Prison: For texturing the prison we did the same thing, but with a difference!  It still is using an image as the texture but it’s using the p5.dom library to control the web camera and take pictures from that every frame.  This allowed us to place ourselves “live” in the scene.

It is pretty amazing the animations and effects you can create with very little code using the p5 webGL library.  Happy coding!

Congratulations to our Ninjas at Coolest Projects 2019

Congratulations to everybody from CoderDojo Athenry who participated in the CoderDojo Coolest Projects International in the RDS Dublin on 04 May 2019.

We had three projects which all sparked a lot of interest with the public at the event. Adam presented his game “The MegaMaker”, David and Michael presented “FidoFinder” and “Go With The Flow” was presented by Mark.


Special congratulations to Adam who was runner up in the Games category and the Go With The Flow team represented by Mark who were runners up in the Hardware category.


Creators: Drumtown!

Today in Creators we played a bit more with sound and built a type of musical instrument using Javascript.  The project was called “Drum Town” because it was based on the idea of a music mad building and when you wake up one of the resident’s by clicking their window, they would play a particular sound every time some traffic cruised past.  Each floor consists of people with the same instrument.  What else would they do?

Play the finished Project by clicking here! – Make sure to TURN UP THE SOUND!!

drumtown

How did we build it?

The awesome thing at this stage is that the group has become so competent at javascript that as soon as we had the idea, some people put their heads down and started building without a whole lot of direction!!  I won’t go into the ins and outs here, but the code is up on our repository and you can go through it!

Interesting bits!

Some of the interesting bits of the project are:

  1. Classes:
    As usual we needed a few classes – this time we used classes for the Car and the Window.  The basic idea was to have a car moving at a constant speed left to right and to have windows that play a sound whenever the car goes past.
  2. Unicode Sprite Characters!
    We learned that now text is getting more and more graphical – we can see it on our phones with emoticons.  There are a large amount of emoticons in standard fonts and if you enable the windows keyboard (right-click taskbar and choose “Show Keyboard” you get on onscreen keyboard that can type all sorts of characters – we used these for our cars:  and could write crazy looking code like:  this.carList= [🚗, 🚚, 🚛, 🚕, 🚜]; .  This will make it REALLY easy for us to write games with nice looking costumes without messing with images.
  3. Sounds:
    I handed out some sounds for us but you can put whatever sounds you like in your own version.  I got my sounds from this website here which has TONS of free instrument sounds!  We named the sounds 0-6.wav to make it easier to use loops to reference them.

That’s it!  Take a read through the code, I finished it off a little before pushing (mainly added a title).  It would be great to make your own version with a different them and a different set of sounds perhaps.  Also – maybe this can give you ideas for other types of musical instrument that you can create, perhaps with a completely different model. Have fun with the emoticons too 📯🎷🎺🎸🎻!

Creators: Autonomous Agents!

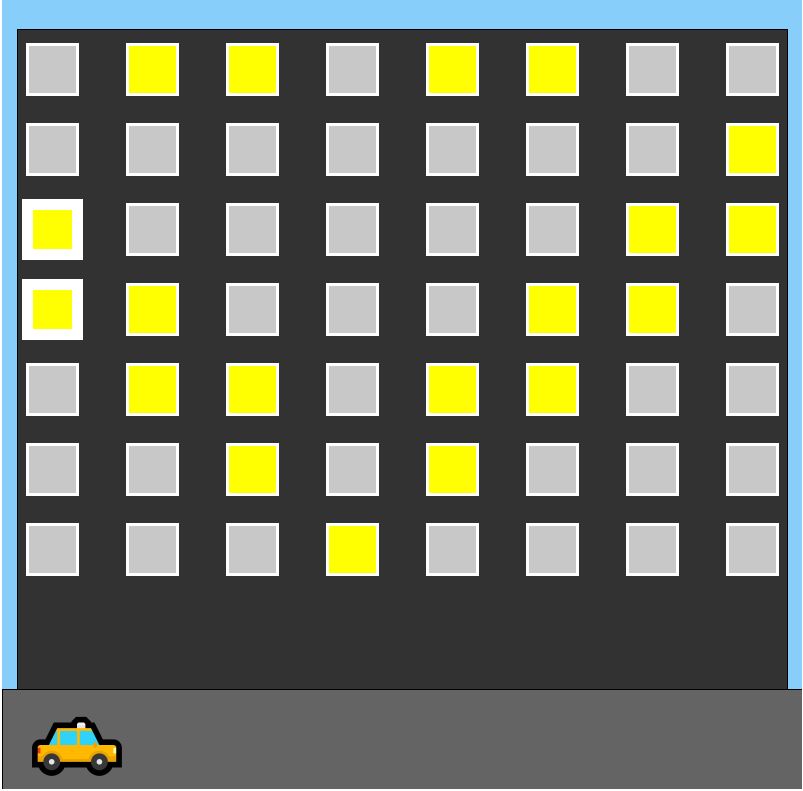
This week in Creators we did a very fun project – we learned how to simulate creatures with a kind of basic artificial intelligence and their own hopes, dreams and aspirations!  We made an app where a bunch of creatures desired to spell the word “Creators” and were also scared of the mouse.

Click on the image below to play with our completed animation.

creature-steering

All the code is on the creators github as usual! Pretty cool eh?  How did we get it working?

The evolution of Consciousness
At the start we chatted about an interesting channel on youtube called Kurzgesagt which contains short videos on all sorts of interesting topics.  A recent video I watched discussed the notion of consciousness and how it might have evolved and it inspired the project.  Though a lot is speculation about this topic, the video made a reasonable argument that consciousness evolved as a survival tool to allow simple creatures to seek energy (food) and flee from creatures that wanted to eat them.  Watch the video, it’s very good!

Though we aren’t quite at the stage where we are ready to code up conscious beings – it was interesting to think about how we might add needs and desires to a character, so that’s what we looked at!

Reynold’s Steering Behaviours for Autonomous Characters
Having decided that we wanted some creatures that moved to the beat of their own drum, we next needed to figure out how to implement it.  There are LOTS of pretty complicated strategies for simulating intelligence, but we looked at a brilliant research paper published in 1999 by a playstation programmer called Craig Reynolds called Steering Behaviours for Autonomous characters – read the full paper here.  In this paper, Reynolds describes a simple but fantastic way to model “autonomous” characters using forces.

steering2

An “Autonomous” character is one that controls or powers itself – i.e. there is no remote control here! There is a lot in Reynolds paper but the basic idea is to think of some “behaviours” that a creature might exhibit – these could be:

  • Flee: perhaps the creature might want to escape from someone?
  • Seek: perhaps the creature might want to get somewhere really quickly?
  • Arrive: perhaps a creature might want to get somewhere and stay there (i.e. slow down to “arrive” there.
  • Be close to other creatures: perhaps a creature might want to be close to creatures like them
  • etc – basically anything you can think of nearly!

In Reynold’s paper, creatures generally have a limited vision, and can have more than one behaviour happening at once – i.e. I really want to get food, but want to avoid the predator in the way.

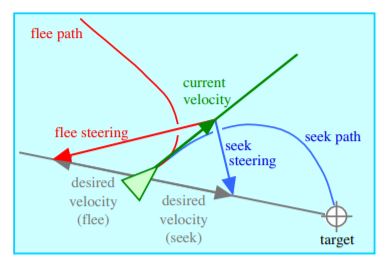
The simple but powerful that Reynolds came up with is the idea of using forces to describe these behaviours and letting newton sort it out.  To model a Reynolds behaviour, you:

  1. Determine your DESIRED velocity for this behaviour – this is a force describing how badly you want to escape the predator, or pursue the target, or avoid the obstacle, etc
  2. You STEERING force vector is worked out as:

steering = desired – velocity

With this simple looking formula, and behaviour rules you combine, you can create some great behaviours that can seem to have realistic looking intelligence behind them.

The Code
Because Reynolds uses force, we had an object which could be a good starting point developed way back in Week 8 – our fun with forces model was a perfect starting point since we already had a “Mover” object that had an applyForce function to allow you to add a force to it.

seek-fleeOur movers “seek” home and “flee” the mouse

All we needed to do was to add some “personality” to our Mover so that it decided itself where it wanted to move to.  These are called “behaviours” in Reynolds brilliant paper.  We decided that our first Mover would have a “timid, homebird” personality and it would have two desires: to get home (some location that is dear to it!), and to stay away from the mouse.  We decided that when it is “afraid” of the mouse we should add something visual to let us know it was afraid – we coloured it red.

The first and easiest code to add was the code to make the Mover want to go home:

 goHome(){
    // i want to go home
    let desired = p5.Vector.sub(this.home, this.position);
    desired = desired.limit(this.maxSpeed);
    let steering = p5.Vector.sub(desired, this.velocity);
    this.applyForce(steering);
}
This is a good example of the process – first we create a Vector that describes where we want to go (home – location), next we limit it to the maximum speed of the Mover.  Next we use the magic formula of Steering = Desired – Velocity to find what the steering force should be.  (This looked okay for us, but in Reynold’s paper he recommended a maximum steering force so it doesn’t steer too quickly – good idea but we didn’t bother with it!).  We called this “goHome” but Reynolds calls this the “Seek” behaviour.
 flee(){
     // i am scared of the mouse
     let mousePosition = createVector(mouseX, mouseY);
     let desired = p5.Vector.sub(this.position, mousePosition);
     let dist = desired.mag();
     if(dist < 100){
         desired = desired.limit(this.maxSpeed);
         let steering = p5.Vector.sub(desired, this.velocity);
         this.applyForce(steering.mult(10));
         this.isAfraid=true;
     } else {
         this.isAfraid = false;
     }
}
The next steering behaviour was fear of the mouse.  We added this as per the above “flee” method.  We imagined that our little creatures can see the mouse when it’s 100 pixels away, and if it is, then it’s afraid and a very strong “flee” force is present.  In the show method we decided to show the fear by turning it red (we should have drawn e.g. a scared face or something).
Finally, we add a function which calls the behaviours in turn:
applyBehaviours(){
    this.flee();
    this.goHome();
}
In each draw loop instance, we call the applyBehaviours, just like we call the “move” method and the “show” one.
That’s it!  That’s all it took to give our creatures the desired behaviours!
Drawing a message:
The code to draw a message came from a hidden feature of the font class in p5 – the ability to get points from text with textToPoints.  This allowed us to get a bunch of points to set as home which spelled a message.   Depending on your computer, it could run a little slow so you might want to just add every 2nd points (takes a while to paint on my phone, but looks quite good on my laptop!).
function preload(){
    font = loadFont("fonts/AvenirNextLTW01-Medium.ttf");
}

function setup() {
    createCanvas(innerWidth, innerHeight);
    textFont(font);
    points = font.textToPoints("Creators", 100, height/2, 300);
    
    for(let i=0; i< points.length; i++){
        let startPosition=createVector(points[i].x, points[i].y);
        movers.push(new Mover(random(10,30), startPosition));
    }
}