Unity – Amazing Racer

Screen Shot 2016-01-28 at 9.03.52 p.m..png

This week we worked on decorating our map with textures, trees and grass. We also worked on establishing a spawn point for our player and a trigger which would detect when our player had fallen in the water.

Some people have been having technical problems or have been lagging behind for one reason or another. We decided it would be a good idea if everyone had a copy of my project so that we could all move forward from the same point.

The first thing you will need to do is to:

Upgrade to Unity 5.3!

This is very important or you will have problems opening my project. When you start Unity it should prompt you if an upgrade is available. Failing that, you can use the “Check for Updates” option in the programs Help menu.

Once you have upgraded you can download my project from here:

Kieran’s Amazing Racer Project

Be warned, this file is quite large at almost 400MB. Please leave yourself enough time to download it, depending on your internet speed.

Extract the contents of this ZIP file into a directory on your machine. It won’t appear on the splash-screen list of recently opened projects when you open Unity – you’ll have to use the little Open button there to select the folder in question. Do also make sure you’re opened it at least once, as opening for the first time causes the assets to be reimported and this takes some time.

Please try to have Unity updated and the project copied to your machine before Saturday! Thanks and see you then.


Playing With Unity Physics and Wheel Colliders

Hi folks. This week we continued work on our Amazing Racer project. We explained what heightmaps are and we imported a standard heightmap into a terrain object. We also added water and trees to our game map.

Apart from that, I also showed two little fun experimental projects that I worked on over the Christmas break to test a couple of game ideas. I thought I’d upload them here so you can play with them yourselves; maybe even use them as the basis for a game idea?

PhysicsTest

The first project, called “Physics Test”, is just a Jenga-like tower of bricks, a ramp and a dropped sphere. The sphere and the bricks have custom physics materials to define their friction and bounciness. It can be downloaded from here.

WheelColliderTest

The second is called “Wheel Collider Test”. It uses Unity’s Wheel Collider on a simple vehicle made of a box and four cylinders. The whole thing is on a simple map made from a basic terrain with a flat interior and a raised edge (to keep the car in!). The awesome (cough) textures are from random Windows backgrounds. The Unity documentation for the WheelCollider can be found here. I note reading it that our project sets up the visual elements to represent the wheels differently to the method recommended in the documentation, but it seems to work OK. The project itself can be downloaded from here.

See you all next week!

Unity – Week 7

unityssample

This week we started with a very short demonstration of some additional C# concepts, building on what we’d done last week.

After that, we continued with Roll-A-Ball.

We quickly finished off our walls and moved on to the Pick Up objects.

Pick Up objects are small cubes that float over the paying surface and that rotate to catch the user’s attention.

We added one Pick Up object and made it rotate. After that, we made it a “prefab”. Setting a property on one prefab object will automatically replicate that setting to all other prefabs of the same type. We didn’t take advantage of that this week, but we will next week.

We duplicated our Pick Up object and arranged twelve of them around our playing surface.

Next Week

Next week we’ll hopefully have enough momentum to finish off Roll-A-Ball completely.

After that we will start on some terrain modelling basics.

To be ready for terrain modelling basics, please be sure to have imported the standard assets package into a new empty project in Unity. To do this, follow these steps:

  1. Open Unity and create an empty 3D project, call it “Amazing Racer”
  2. Under the Windows menu in Unity, open the “Assets Store”
  3. In the “Assets Store” look for the “Unity Essentials” category
  4. Under “Unity Essentials”, find “Standard Assets” and import them

This process takes quite a bit of bandwidth and time, so you will need to have this done before coming to Dojo next week.

See you all then!

Unity – Week 6

C#

This week we had a short session because of the fantastic demonstration that Colmac Robotics were kind enough to give us.

Following feedback from a few ninjas and ninja parents, I decided to do an impromptu session on the C# language. I had hoped that we’d perhaps just try to pick this up as we went along, learning through practical examples, but it was clear that the transition from visual languages to code-based languages was tough for some.

We used MonoDevelop to create a simple test application. Originally I had intended to use Visual Studio, but some people have had installation problems with it. I encourage everyone to re-install Unity at home when they have time, so that we can all standardise on Visual Studio in the near future.

Concept of Classes and Basic Structure of A C# File

I ran over these topics quickly again, but they were covered in last week’s post. Please do review it if you didn’t get a chance to read it before. It can be found here.

Simple Test Application

In our test application, apart from reinforcing the basic concepts mentioned above, we also touched on number of other concepts:

  • We looked how the class definitions in our files are blueprints for how the class is structured and operates. We never actually have a copy, more commonly known as an instance, of that class until we actually create one ourselves with the new keyword.
  • We discussed class constructors, the special method, with the same name as the class itself, that is called when we make an instance of that class.
  • We saw how Console.WriteLine() can output text to the Windows console.
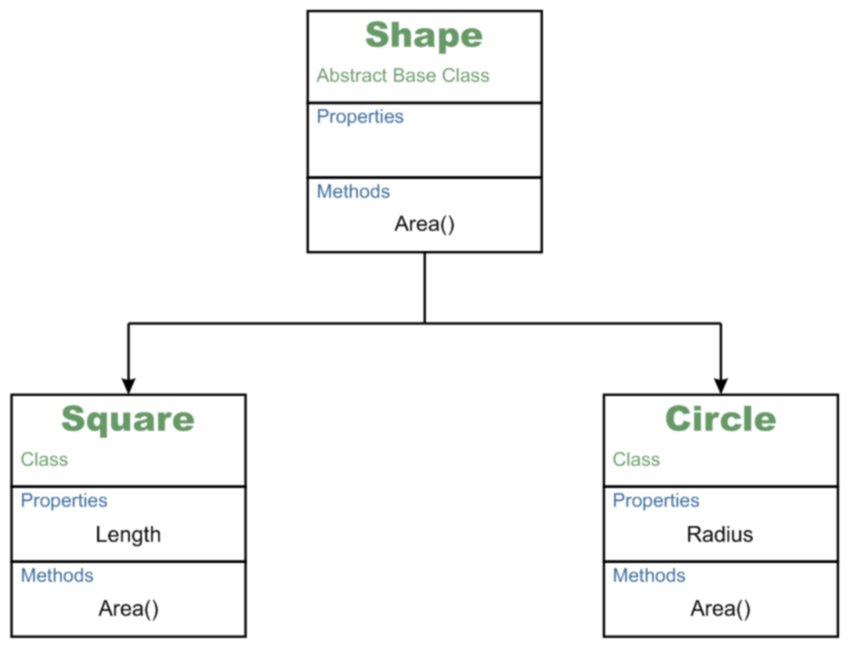
  • We created a class called Shape. We said it was abstract; which meant that we would never be making an instance of the Shape class itself. We would purely be using it as a base for other classes.
    • We said that Shape had a public method called Area(). We made its return type double, but we also marked it as abstract and provided no body for the method. This meant that we were saying all classes based on Shape would have to provide their own version of Area(), but that Shape itself had no definition for it.
  • We defined a class called Circle. We made it so that it was derived from Shape.
    • We gave it a property called Radius of type double and marked it public.
    • We used the override keyword to make our own Circle specific version of Area(); “override” meaning that we were over-riding or replacing the method definition from the base class (Shape).
    • We provided a means to set the Radius property through an optional argument to the constructor method Circle().
  • We defined a class called Square. We made it so that it was derived from Shape.
    • We gave it a property called Length of type double and marked it public.
    • We used the override keyword to make our own Square specific version of Area(); “override” meaning that we were over-riding or replacing the method definition from the base class (Shape).
    • We provided a means to set the Length property through an optional argument to the constructor method Length().
  • When writing our Circle.Area() and Square.Area() methods, we saw how the built-in Math object has lots of useful mathematical properties and methods. We used the property Math.PI and the method Math.Pow() (to raise a number to a given power) to perform our area calculations.

Inheritence

In the end we had a small sample program that could defined instances of circles and squares, calculate their areas and output the results to the console window (command prompt window).

On-line Resources for Learning C#

If you want to brush up on your C# skills, outside of our CoderDojo sessions, there are a number of useful on-line resources:

  • LearnCS.org: An on-line tutorial for C# which lets you build and test code right in a browser window
  • tutorialspoint.com: Another on-line tutorial for C# which also lets you build and test code right in a browser window
  • msdn.microsoft.com: Microsoft’s vast library of C# related resources including tutorials

Next Week

Next week, we’ll be taking a few minutes to close off this sample application, so that we can quickly illustrate a few outstanding points, and then return to roll-a-ball to, hopefully, close it out. See you next week!

Taster Session Week 4 – Unity 3D

UnityLogo

For our fourth taster session, on next Saturday 17th October, we’ll be giving an introduction to Unity. Unity is a cross-platform game engine which has been used to create many successful games.

In preparation for next week please:

  1. Go to the unity website: www.unity3D.com
  2. Click the “Get Unity 5” button
  3. Download and install the free “Personal Edition”
  4. Run Unity once and register an account – you will need your email address

We will be trying to build as much as possible of the “Roll-a-ball” demo that I showed in our introductory session. Ongoing participation in the Unity group will require a good understanding of advanced programming concepts, but for the taster session, we will try to keep that stuff to a minimum so everyone can follow along and have fun.

unityssample