Last week we completed our Breakout Game.
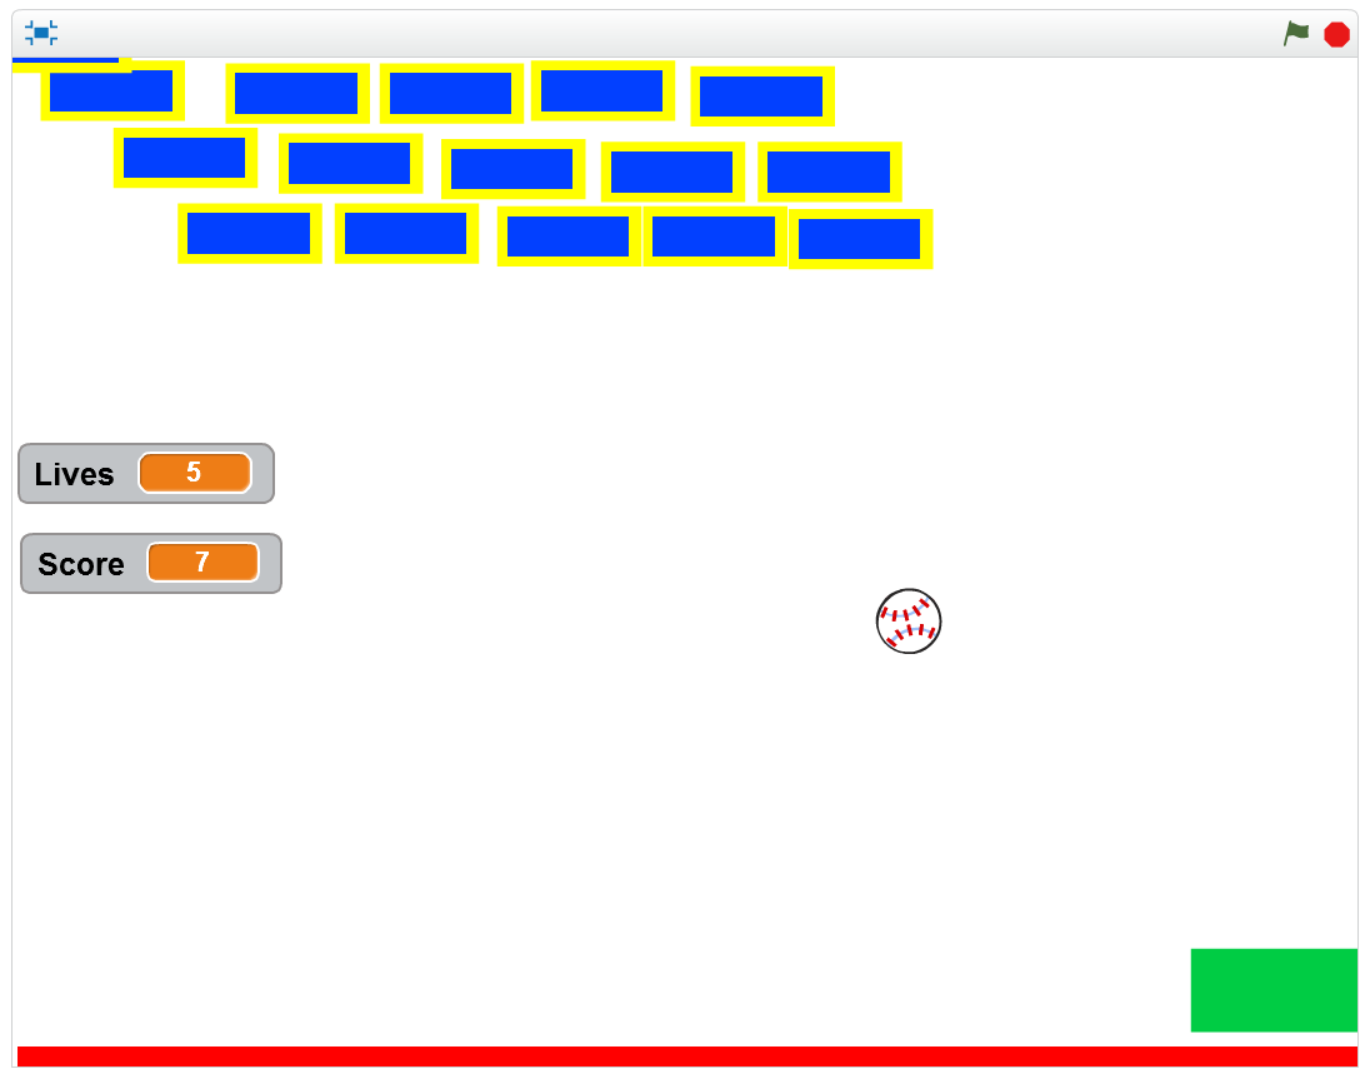
I have uploaded the finished game to the Scratch Website. Please be careful to download the file and not to write over the file on the website.
https://scratch.mit.edu/projects/132196577/#editor
Martha
Last week we completed our Breakout Game.
I have uploaded the finished game to the Scratch Website. Please be careful to download the file and not to write over the file on the website.
https://scratch.mit.edu/projects/132196577/#editor
Martha
This week we finished off texturing our bowling pin model in Blender and then imported it into Unity to use in our game.
UV Unwrap
We started by loading our existing bowling pin model with seams already marked.
The process of unwrapping a 3D model is similar to peeling an orange and pressing the skin flat. The seams we marked are like cuts in the orange’s skin. When we peel it, the pieces between the seams come out separated.
To unpeel the model we entered Edit Mode (TAB key), selected the entire model (A key) and chose UV Unwrap | Unwrap from the Mesh menu. Notice that we don’t see impact of this until we switch to the UV/Image Editor
Switching to UV/Image Editor
Our main panel is normally in 3D View mode. To start working with our texture we click on the icon to the left of the menu options and choose “UV/Image Editor”.
When we change mode we see a flat image with our model split apart and spread out into flat sections. Each of these sections represents a part of our model between a set of seams.
W
Moving Regions Around
Painting
Previewing
Saving Texture to File
Exporting Model from Blender
Importing Model into Unity
Replacing Our Existing Pin Prefab
Test


A great way to figure out how things work is to take them apart. In the Hackers group, we unscrewed, hammered, de-soldered and detached the parts from the insides of an old living-room DVD player, a computer CD player, and a speaker from a stereo, to see what we could find.
Group members de-soldered components such as switches and capacitors that we will use in new projects, extracted and examined motors from the CD/DVD players, and got a working speaker from its housing. They powered up the motors with DC batteries to see how they work, and hooked up the speaker to a phone headphone jack (whch worked but would need amplification).
CDs and DVDs are great because they include different high-quality motors for spinning the disc, moving the laser read head forward/backward, and ejecting the tray.
Hello everyone.
Good to see everyone there on Saturday. We made a game t similar to on old game called Breakout.

We used a number of important coding concepts again this week, loops and decisions, Variables, broadcasting, etc.

During class, we didn’t have time to add the Lives and the Scores but we will continue with the game on Saturday.
Here is a link to the notes: cda-s6-week_07-breakout.pdf
Martha

This week we did some basic modelling in Blender. Blender is a very powerful 3D graphics package that is free and open-source. It is supported across all major desktop platforms.
Blender is so large and fully featured that it can be quite intimidating to learn. Knowledge of a few shortcut keys for common operations can really improve the experience of working with the program. We were indebted to Giuliano D’Angelo’s wonderful Blender shortcut infographic for providing us with some quick reference in this regard:
http://www.giudansky.com/design/51-blender-map
Moving About and Zooming
The first thing we covered in Blender was moving about. Practically speaking, Blender requires a three button mouse to operate. In Blender the middle mouse button (MMB) is used to control the view. Used on its own, it tilts the camera. When used with the SHIFT key, it pans the camera instead. CTRL and the MMB are use to zoom, but this is also more often achieved by scrolling the mouse wheel.
Object Mode and Edit Mode
We used Blender in two modes: Object Mode and Edit Mode. The TAB key can be used to switch between these. In Object Mode we can create, select and reposition objects but we cannot do any detailed editing on them. In Edit Mode, we can do any detailed editing we require on the currently selected object. Note that selecting items in Blender is done with the right mouse button (RMB).
Hi everyone,
Good to see you back after the Halloween break.
Last Saturday we did a slightly different game to usual., There was no movement, no sensing when something happened. It was a Maths Game, a guessing game where the computer picks a random number and we had to guess the number.

We had to first make sure that a random number was picked using an Operator. Previously we have used a Variable to store a Score or Lives, but this time it was storing the random number and our guesses. Leaving them on screen as we were testing allowed us to understand more about the variable and what it does…it also made the testing a little easier.
Depending how any guesses we were given we repeated our code that number of times. As well as having to make decisions, i.e If_then, we also had to do a comparison before making the decision, to determine whether the guess was correct, too low or too high.

Some of you tried to add a timer and below is the code you will need if you didn’t get it to work. Take a look and add it to your own game/games.

Here is a link to last weeks notes. cda-s6-week_06-guessnumbers.pdf
See you next week!
Martha

On 15 Oct, we spent the session figuring out the basics of programming and electronics with an Arduino micro-controller. We had a couple of Arduino Unos (pictured above) and a Genuino 101.
We downloaded the Arduino IDE (integrated development environment) software here: https://www.arduino.cc/en/Main/Software
We then built a simple circuit to turn on an LED, using a breadboard:
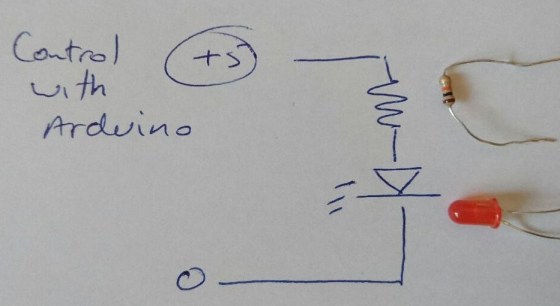
After connecting the 5V side of the circuit to Digital pin 2 on the Arduino, we started experimenting with writing code to control it, using the C-based language of the Arduino IDE:
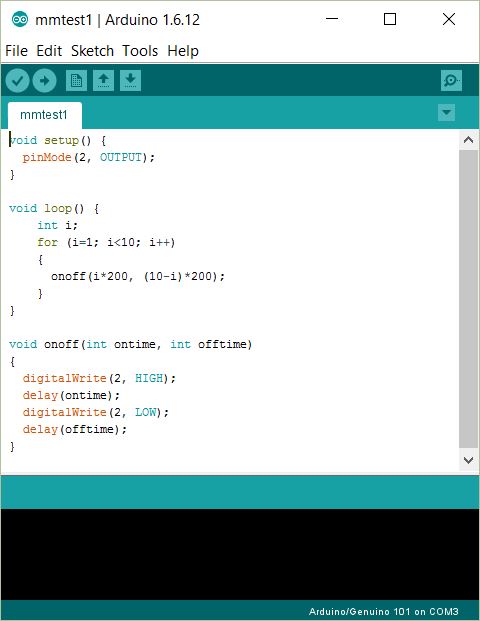
After that, group members started experimenting with more complex programs and hardware, such as pressure and temperature sensors, which they had working by the end of the 2-hour session. I was very impressed with the speed with which they made progress!
This week we worked on getting input from the user and making the game react to it.
InputManager
Unity has a build in system for handling user input. The InputManager can be found under the Edit|Project Settings|Input menu:

The Unity input system is based on the concept of “axes”. The game request if there is input on a specific axis, giving the axis name. What that means in terms of button presses, mouse or controller input depends on the settings in the InputManager. Axes have a value that ranges from -1.0f (full negative, if negative values are allowed) through 0.0f (no input) to 1.0f (full positive).

Pre-defined Input Axes
While the game programmer can define as many input axes themselves as they like, Unity come with many common ones built-in. The first two shown above, called “Horizontal” and “Vertical” are commonly used for movement. The third “Fire1” is usually used for shooting.
We redefined “Fire1” from it’s default key (Left Ctrl) to bind it to the space key instead.

Updating the Code to Detect “Fire1”
We originally had a force applied to our ball in the “PushSphere” script as soon as the game started. We modified the code so that in the Start() method all we did was to retrieve and store the Rigidbody component. In the Update() method (called every time the game draws) we ask if there’s been any input on “Fire1” and only if there has, do we apply a force to the ball:
 using UnityEngine;
 using System.Collections;

 public class PushSphere : MonoBehaviour
 {
   public float PushStrength = 1.0f;
   private Rigidbody rb;

   // Use this for initialization
   void Start ()
   {
     rb = GetComponent<Rigidbody> ();
   }

   // Update is called once per frame
   void Update ()
   {
     float fire = Input.GetAxis ("Fire1");

     if (fire > 0.0f)
     {
       rb.AddForce (Vector3.back * PushStrength);
     }
   }
 }
Before proceeding, we ran our game and tested to ensure it was working correctly.
Moving Our Aimer
The aimer was rotated using input from the horizontal axis. We added a script called AimerController to our Aimer game object. A public property called RotateSpeed gives us a way to tune the speed our our aimer. We don’t need anything in the Start() method, and it’s been removed here for clarity. The Update() method looks for input on the “Horizontal” axis (which maps to the left and right keys) and applies a rotation to the Aimer’s transform using the following logic:
amount to rotate = speed of rotation * user input * time
User input here will either be -1.0f, 0.0f or 0.0f. This equates to rotate in a negative direction (anti-clockwise), don’t rotate or rotate in a positive direction (clockwise).
 using UnityEngine;
 using System.Collections;

 public class AimerController : MonoBehaviour {

   public float RotateSpeed = 1.0f;

   // Update is called once per frame
   void Update () {
     float horiz = Input.GetAxis("Horizontal");

     transform.RotateAround (transform.position, Vector3.up,
                             RotateSpeed * horiz * Time.deltaTime);
   }
 }
Note that we’re rotating about the vertical axis and the rotation is centred around the aimer’s position.
Linking the Aimer and the Sphere’s Direction of Fire
To link the aimer’s with the sphere’s direction of fire, we needed to provide the sphere with a new public property which could store a reference to the Aimer’s game object:
public GameObject Aimer;
We then simply had to update the AddForce call, in the Update() method, to take the aimer’s direction into account:
rb.AddForce (Aimer.transform.forward * -1.0f * PushStrength);
Note that we had to also multiply by -1.0f as the ball was initially going opposite to the direction we wanted.
Prefabs
Prefabs are objects, or collections of objects that we want to re-use multiple times. To create a prefab, all we need to do is to drag an object from the Hierarchy to a project folder. We made a prefab of our pin by doing this. Note that prefabs show up blue in the hierarchy to mark them out. When the prefab is changed, all copies of it in the hierarchy are updated as well.
Automatic Creation of Game Objects at Run-Time
Once we created our pin prefab, we worked on adding pins automatically into the game a run-time.
We added a new empty game object and named it PinManager, we then added a component to it of the same name. This script was given a public property, of type GameObject, to store a reference to the prefab. In the Start() method, we use two loops to place nine pins automatically into the scene, using the Instantiate() method:
 using UnityEngine;
 using System.Collections;

 public class PinManager : MonoBehaviour
 {
   public GameObject PinPrefab;

   // Use this for initialization
   void Start ()
   {
     for (int x = -1; x <= 1; x++)
     {
       for (int z = -2; z <= 0; z++)
       {
         Vector3 pos = new Vector3(x * 2, 0.5f, z * 2);

         Instantiate (PinPrefab, pos, Quaternion.identity);
       }
     }
   }
 }
Note that there are several versions of the Instantiate() method. The version we’re using allows us to specify the position and rotation of the newly created object. A Quaternion is variable type that can store a rotation. Quaternion.identity simply means “no rotation”.
Testing
Project File
The latest project files can be downloaded from here.
This week we started our first game in earnest. Let’s talk about the design and the steps we took to begin implementing it.

Game Design
The game involves a simple play area with pins. The players tries to knock down the pins by controlling the direction and force at which the ball is projected. The number of pins knocked constitutes the score. The game shares element of classic games such as pinball, bowling and skittles, to name a few.
Setting up the play area
To establish the play area, we used a plane (for the ground) and four cubes stretched to size to provide the walls:
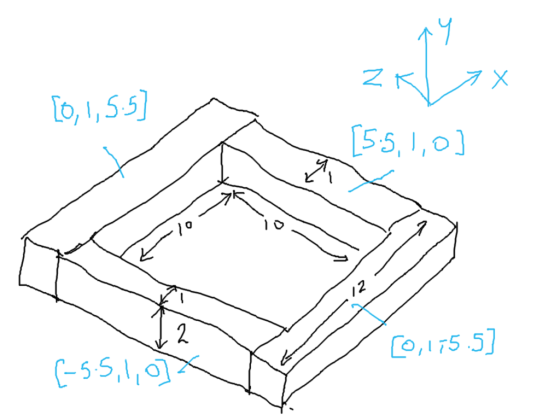
Because we don’t want gaps in our walls, we’ve been careful to be precise with the positions of everything.
Applying a Force to our Sphere
We added a sphere to our scene and made sure that it had a RigidBody body component. The RigidBody component makes it so that the physic engine takes care of the movement of the sphere.
To test adding a force to the sphere we added a temporary script to the sphere and had it add a force to the RigidBody as soon as the game starts.
Immediately it was clear that the force was too weak, so we added a property to the script which allowed us to scale the force. In testing 1000 proved to be a good value. Here is the script:
 using UnityEngine;
 using System.Collections;

 public class PushSphere : MonoBehaviour
 {
   public float PushStrength = 1.0f;

   // Use this for initialization
   void Start ()
   {
     Rigidbody rb;
     rb = GetComponent<Rigidbody> ();
     rb.AddForce (Vector3.back * PushStrength);
   }

   // Update is called once per frame
   void Update ()
   {
   }
 }
We also experimented with creating a physic material and assigning it to the sphere. Different levels of friction and bounciness give different behaviours.
Testing With a Single Pin
To test the sphere colliding with a pin we added a single cylinder to the scene. Like the sphere, we made sure it had a RigidBody component attached to it. When the game started the ball shot forward and knocked the pin, as we’d hoped.
Aimer
To aim our sphere and control the strength of our shot, we created an aimer. The aimer is composed of an empty object containing two cylinders, one pointing forwards and one pointing crossways.
We didn’t want the aimer cylinders interacting with anything so we made sure to remove the colliders from the cylinders.
We also wanted the aimer to be partially transparent so we created a new material, setting the Rendering Mode to “Transparent”, choosing a colour from the Albedo colour picker and setting the Alpha value to a value less than 255.

Project
Updated project files for this week’s project can be found here. This requires Unity Version 5.4.1f1 or later.
Hello Everyone
Great to see so many of you there on Saturday, 77 Ninjas!. Hope you had a good time. And a special welcome to our new Ninjas.
This week we created a Ghostcatcher game. We used the paint editor in Scratch for the first time. As I said on Saturday, It makes things easier if you think in shapes.

Using the code we have learned so far, we moved the Ghostcatcher with the mouse and the Ghosts randomly. We also added some sound.

We are going to continue on next week and improve this game, adding some Variables and some levels.
Here are this weeks notes in PDF. cda-s6-week_04-ghostcatcher.pdf
