Beginners scratch week 6 – Pen Commands

Since we had a terrific guest speaker today, there wasn’t enough time to rework our paddle ball game to the famous breakout game, so I picked out the quick (but really neat) drawing game! The .pdf of the slides can be found here:CDA-S5-Challenge_08-Pen Command-CDA-S5-Pen Commands CDA-S5-Pen Commands-code

In order to make it easier to change the values that control the angles of the drawing and the length of the sides, we created variables that we could change via sliders on the STAGE (right click on the variable on the stage after you create it and a menu pops up giving you some options, including a slider option). CDA-S5-Pen Commands-slider variablesReplace the handwritten numbers in the TURN and the MOVE motion commands with the variables for speed and degrees. When you touch the green flag and start the movement of your sprite, you can slide the sliders to get the perfect (or craziest) drawing! Duplicate your sprite and get several sprites drawing at once.

One extra bit that we didn’t get to is to use buttons to start and stop our drawing. Create two new button sprites and script them to send a broadcast when clicked. CDA-S5-Pen Commands-buttons

Just edit the script in the drawing sprite by putting the WHEN I RECEIVE event command at the top of the drawing script and select the START broadcast. Add another bit to the drawing sprite to STOP ALL when it receives the STOP broadcast from the Stop button.


Next week we will do the breakout game and we will plan the animation project for the following week.

Don’t forget to upload your projects to the website: scratch.mit.edu! Put it on your own login and share it or put it on ours: cdathenry1516.

All the best,

Julie


Scratch Advanced – Gravity

Gravity

For the last two weeks we have been learning about Gravity and building a lunar module project to simulate how gravity works in the real world.

What is Gravity?

Gravity is what holds us down on Earth, if we jump up in the air, gravity will pull us back down.

If you want to break free of the Earths gravity you have to travel very fast and reach “escape velocity” this is about 25,000 mph.

The space station, even though it is travelling at 17,150 mph (that’s about 5 miles per second!)  has not escaped the Earths gravity, while it is trying to travel away from the Earth at 17.150 mph gravity is pulling it back down, this makes it travel around the Earth in an Orbit.

So we set out to build a Gravity simulation game.

In order to make it a little easier we decided to use the Moon as our base as the gravity is less and there is no atmosphere to slow us down when we are moving.

Some of the rules that we had to code for were:

  1. Our spaceship should not move if it is on the Ground.
  2. The higher it gets the faster it should move – Less Gravity.
  3. If it starts moving left or right, it should stay moving until it is stopped – No Atmosphere.

The Sprite needed 4 Costumes:

  1. Landed – This is the default costume where nothing is happening.
  2. Up – This costume has a flame coming out the bottom.
  3. Left – This costume has a flame coming out the right hand side.
  4. Right – This costume has a flame coming out the left hand side.

Costumes1234

Costume2Costume3Costume4


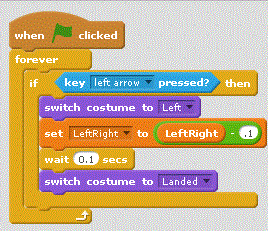
Once we had the sprite built we started on the code. We started with the left and right code first, basically when you clicked on either the left or the right button, we would change the costume and also increase or decrease a variable to indicate how far we should move along the X axis (this is the one that goes from left to right).

We used a variable for the LeftRight movement to make it simpler. This ended with some code that looked like this:

LeftCodeAnd for the Right Arrow Right

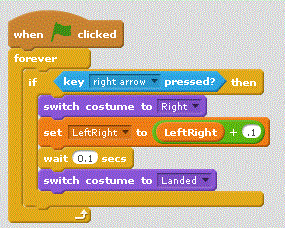
We put a small delay in as well, this gave the effect of the thrusting going on and off which looked more realistic.

The left right movement was taken care of by a separate piece of code that just keep moving the Sprite.

Main2

This also had a little bit of code to stop everything if we touched a particular colour, this was the colour of my landing pad.

For the Up Code we did something similar, but had to add in the movement in as well.

UpCode

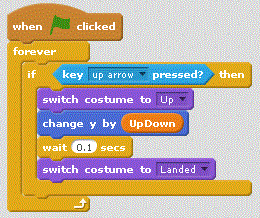
To calculate the Up/Down movement was a little more complicated as we needed to adjust how much we moved up depending on how high we were, basically the Y value. Scratch doesn’t help here as the Y value goes from -180 to 0 and then on to +180, we needed it to always be positive, so we had to use a variable and add 180 to it.

The other thing we had to do was find a number that when we divided by the Y value it gave us a reasonable value to move the Sprite by, through trial and error this came out at 200.

Which ended up with some code like this:

Main1
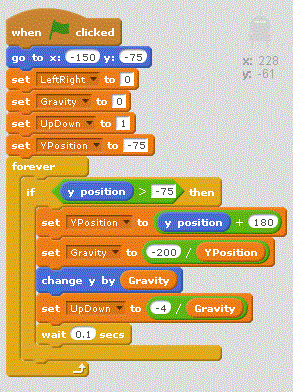
This code also has all of the initialisation code, where we set all the variables we are using to their initial values. Notice that the UpDown default is 1, this is to ensure that the first time that you press the Up key that the spacecraft actually moves.

And if you want all of the code, here it is

AllCode

And finally this is what my Project looked like in the end
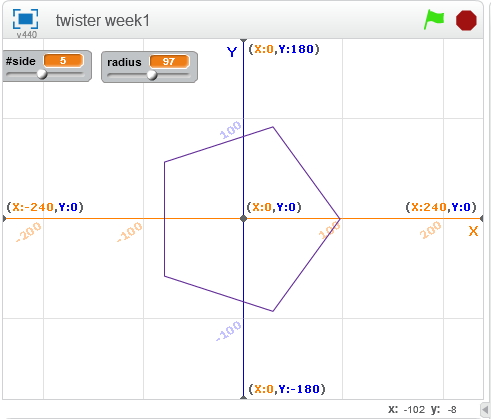
FullProject

AppInventor Week 4: Favourite Browser

This we will create our first app. The app will make it easy for you to open your favourite web sites.

Getting Started designing the GUI

Drag and Drop a “HorizontalArrangement” component on to the designer screen

  • Rename the “HorizontalArrangement” to “hsaButtons”
  • Set the “Width” property of the “HorizontalArrangement” to “Fill parent”

Drag and Drop three “Button” components into the “HorizontalArrangement”

  • Rename the three “Button” components to “btnGoogle”, “btnYouTube” and “btnCoderDojo”
  • Change the “Text” property for each of the three Button components to “Google”, “YouTube” and “CoderDojo”
  • Set the “Width” property of each “Button” to “Fill parent”

Drag and Drop a “WebViewer” component on to the designer screen

  • Rename the “WebViewer” component to “wbvBrowser”

Getting Started writing the code

  1. Click on the “Blocks” button
  2. In the script designer click on the “Button” Block “btnGoogle”
  3. Select the “when btnGoogle.Click” script from the pop-out list
  4. In the script designer click on the “WebViewer” Block “wbvBrowser”
  5. Select the “call wbvBrowser.GoToLink” script from the pop-out list
  6. In the script designer click on the “Text” Block, select the emptry String Block
  7. Copy and Paste the url http://www.google.ie into the “Text” block

Test the app

Duplicate the script above for the other two buttons.

App Inventor Notes Week 4 – FavouriteBrowser

ModderDojo Topic 4: Moving from Scratch to JavaScript

GeneralFeaturesOfProgrammingLanguages

Note: some individual topics are short: we got most of the way through the first 3 in our taster session. See this post: https://cdathenry.wordpress.com/2015/09/27/minecraft-modding-taster-session-week-1/

JavaScript is a well-established programming language, mainly used in web development. ScriptCraft is a Minecraft mod that allows you to write JavaScript code for building structures in Minecraft and writing new Minecraft mods. (So it’s a mod for creating other mods.)

Steps 1-3: Install ScriptCraft, Learn how to Connect to a Server, and Create a First Mod

We covered these steps in the first two weeks:

  1. Getting Started with ScriptCraft and JavaScript
  2. How to Connect to Each Other’s Servers
  3. Creating our First ScriptCraft Mods

To try out ScriptCraft, look back at the introductory posts here: https://cdathenry.wordpress.com/2015/09/27/minecraft-modding-taster-session-week-1/

Step 4: Comparing JavaScript to Scratch

Some people criticise Scratch as being “childish”, but I don’t agree. While it is designed so that even 8 year olds can use it, it is still has all of the key features of ‘adult’ programming languages, as listed in the image at the top of this post.

(Technically, any programming language with variables, decision and loops is Turing Complete.)

This means that, if you already know how to write a Scratch programs that use these features, you will be able to apply that knowledge to any other language, such as JavaScript. The syntax of JavaScript is different, but it uses the same computational thinking.

Variables-Operators

Loops

Decisions

Notes:

  • Even though they have basic ideas in common, every programming language has its own specific commands that relate to its purpose: Scratch is focused on 2D games and animations, while ScriptCraft is focused on operating inside Minecraft, and JavaScript generally is used for interactive websites.
  • the echo command that features in these slides is not a standard JavaScript command, it is just used in ScriptCraft to display things on your screen in Minecraft.  Everything else is standard JavaScript.

Scratch Beginners Week 5 – Paddle Ball Game

We had another week of fantastic attendance at Coder Dojo Athenry Beginners Scratch session. Thanks all for coming. To see the PDF of this weeks notes click here: CDA-S5-Challenge_05_Paddle_Ball. This week we reiterated a lot of the basic programming ideas that we have been working on since September. We planned our game – Paddle Ball – by defining it’s rules and designing it’s look. The coders were invited to use whatever sprites they liked-some had dragons catching swords and others trampolines catching kids! Most stuck to the basic layout seen here:

Season 5 Paddle ball - game design

First, we designed the paddle and made it follow our mouse, but only in the x-direction.

CDA-S5-Challenge_05_Paddle_Ball_move paddle

Secondly, we drew or imported the ball from our library and caused it to fall. We had to set it’s initial position just after the green flag was pressed in order that the game would restart properly each time and we had to set it’s initial direction to down, otherwise the ball might just bounce from side to side instead of up and down!! In order to do this, we placed a ‘point in direction’ block under the ‘go to’ block in the image below and set it to 180 (or down).

CDA-S5-Challenge_05_Paddle_Ball_make ball fall

Now that we have each sprite moving, we must get them to respond to touching each other and get a score variable set up. When the ball hits the paddle, the ball will broadcast a message to the program and the ball will change the score by 1.

CDA-S5-Challenge_05_Paddle_Ball_ball hit paddleCDA-S5-Challenge_05_Paddle_Ball_bc change score

To end our program I decided that when the ball hit a line I drew at the bottom of the STAGE. The command of ‘wait until’ was used with ‘touching colour’ to ‘stop all’. The coders were encouraged to continue the game instead by setting up a ‘lives’ variable and merely subtracting from that variable when the ball touches the line and ending the game when ‘lives = 0’.

CDA-S5-Challenge_05_Paddle_Ball_end gameNext week we will quickly re-make the basic paddle ball game but add a twist to it by making blocks that disappear when hit and add to the user’s score. It is based on the old Breakout game. The following week we will be doing animation. I will be bringing some plasticine to use to make sprites but the coders are welcome to bring miniature figurines such as Polly pockets or lego, etc… All parents should come equipped with a phone/camera and download cables that can take pictures to record the action! This will take several weeks to complete.

Thanks to Martha Fahy for the fantastic game idea and notes!

Julie


Scratch Beginners Week 4 – A Better Ghost Catcher Game

This week we improved on Martha’s original Ghost Catcher game! The notes can be found on this website as CDA-S5-Challenge_04-BetterGhostCatcher.

We animated our ghosts by creating a simple change costume script that runs forever,Season 5 Better ghostcatcher- animate ghost - costume

Season 5 Better ghostcatcher- animate ghost - Code

We made our ghosts broadcast a message when they are caught to make ghostcatcher (aka Bob) change his costume (Hint!: First, we made a new costume for Ghostcatcher Bob to make his mouth look closed!),

Season 5 Better ghostcatcher- broadcasts

Season 5 Better ghostcatcher- broadcasts- make ghostcatcher react

We also got Ghostcatcher Bob to broadcast a message that makes the stage change it’s background to each time a level is changed.

Season 5 Better ghostcatcher- broadcasts - use score var to chg background color

If you have any questions about all the variables, ghostscaught and speed, that you saw in my version of the program, please review the notes on this website for the previous week: CDA-S5-Week_03-Ghostcatcher.pdf. Check out the last few slides.

Thanks to Martha Fahy for all her notes so that we could really make huge progress with our Ghost Catcher game!

Have a very Happy Halloween and we will see ye all back on Saturday November 7th at 12.00!

Julie OBeirn

Scratch Advanced: Week 3 Top Down Game Engine Part 1

A “Game Engine” is a piece of code you can use to build different types of games.  This week we looked at doing a top down scrolling game engine.  It’s still pretty basic at the moment but it’s enough to get started on some projects of your own.   What can you build with it?

Top Down Scrolling Game Part 1 Notes

screenshot-week1

Download the code for part 1 here.

Scratch Advanced: Twister Part 2

There was a huge group for today’s class where we took the Shape block from last week and built an amazing Twister project out of it.

We learnt:

  • more about angles and Sine and Cos
  • some basics of creating 3D illusions on a computer screen

week2

Twister Notes Week Two.

We didn’t get it quite finished, but managed to get to some 3D. Follow the notes to get to the end and check out this sample project that has all the pieces from the doc and a few extra features in. It’s addictive playing with the twister!

Download the completed project here!

Scratch Advanced: Twister Part 1

In Scratch advanced this week we learned some cool math formulas that are really handy for doing interesting stuff in programming.

week1

The things we went through!

  • We revised X and Y and reminded ourselves how it works
  • We drew a house using X and Y
  • We learnt about circles and radius
  • We learnt about the math formulas Sin and Cos and how they can be used to get X and Y positions on a circle
  • We learnt about Custom Blocks in Scratch
  • We wrote our own Custom Block that could draw a shape of any size and number of sides, using Sin and Cos to figure out the points!
  • We used that Custom block to make lots of neat patterns (some by accident!)

The notes are attached in PDF and if you follow them you will have a project ready to go for this Saturday – we are going to take that custom block and do some really cool things with it.    Don’t worry if you don’t have the time to do it or can’t follow the notes though – we’ll have this shared out so you can just take off where we finished!

Twister Notes Week1

Download the Scratch Code here!

Week 9 2015 – Scratch Beginners – Piano

Hello everyone,

Thank you all for coming yesterday on such a lovely day.

Thank you to Sean Shanley for demoing a 2D plotter that is controlled by Arduino, with 3D printed parts, and programmed with a Scratch variant called mblock.

The Arduino kits are available to buy on Amazon and the website where you can get all the ideas and instructions is called Instructables.

This week we did a simple Piano.

piano

We only had to draw two keys, and then could duplicate these and change the names. The same applied to the code. The code is the same for each key apart from one small change so the note is the appropriate for the key.

Piano2

Piano3

See you all next week, our last session before we have a one week break for the bank holiday and then we will be back working on individual projects, getting ready for our final day and the day we will award the belts.

belts


Here are notes from this week in PDF CDA-S4-Challenge-PrepareForBelts and Piano.pdf

Martha