Creators – Projects

material-design-joystick-wallpaper-flat-video-game-1486908

This week we spoke about possible projects. We also looked at games that you like so that we could draw inspiration from them.

When it comes to projects, there are a few questions you need to ask yourself:

What is the type of game you want to make?

Take a look here for an exhaustive list of game genres: https://en.wikipedia.org/wiki/List_of_video_game_genres

What is the setting for your game? Do you have a character in mind?

These choices will determine the look and tone of your game and are good things to decide early on.

What do I already know that will help create my game?

From what we’ve seen already this year, what things will your game need that you already know how to do?

What do I not yet know how to do?

There are things you might like to be able to do that you’re not sure about how to achieve; these are things to raise with your mentor. He’ll focus on these in the next few weeks. Also; check the Asset Store. There are many free things there that might help you complete your game. If you’d ultimately like to do everything yourself, look at these as items as placeholders to get the basic game working that you might eventually replace.

Finally remember:

BE REALISTIC IN YOUR AMBITION

You will find it hard to get time to work on your project and it’s your first project on your own in most cases. The most important things are to show something that is yours and something that is fun. Showing something that is overly complex but that is not fun is not as good.

Get your thinking caps on!

Creators – Simple AI Navigation

Apologies for the late post. This week we looked at simple AI navigation.

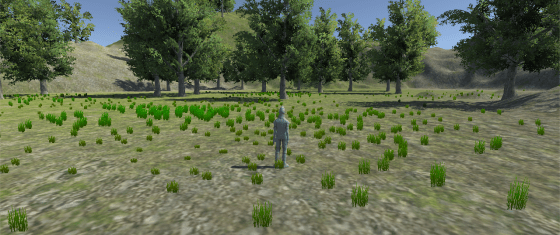
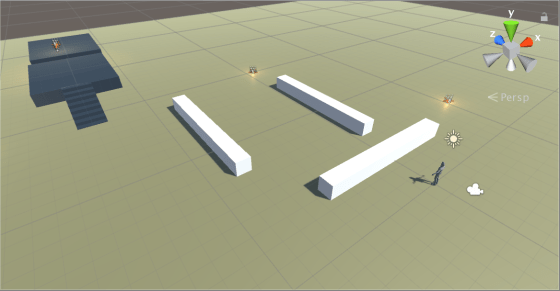
The basis of navigation in Unity is the NavMesh. A NavMesh is a simplified view of the game world that marks out all the areas that AI characters can move through. The pictures below show the same scene with the NavMesh made visible in the second:

navmeshoff

navmesh-on

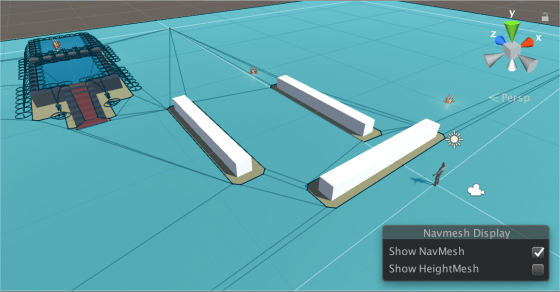
The blue areas are the NavMesh and are the areas that AI characters can move in. The holes made by the walls are apparent as is the  “ramp” on the steps and the circle/arrow combinations where characters can jump down from or across obstacles.

Making a NavMesh


The first step in making a NavMesh is marking pieces of the scene as “walkable” and “not walkable”. Open the Navigation panel from the Window menu. When ever this panel is selected, the NavMesh will be displayed in the Scene View, by default.

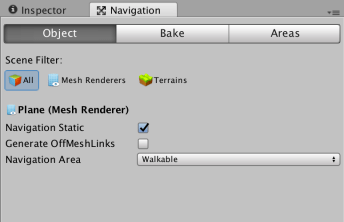
The Navigation panel has three buttons across the top. Select “Object” and select objects in the Hierarchy that you want to be part of the NavMesh. Select the floor or ground object, select the “Navigation Static” option and set “Navigation Area” to “Walkable”:

screen-shot-2017-02-17-at-11-40-46

Then select each wall/obstacle and again select “Navigation Static” but this time set “Navigation Area” to “Not Walkable”.

Press the “Bake” button in the bottom of the  panel to create the NavMesh.

Adding a Character

We use the AIThirdPersonController prefab from the Unity Standard Assets to test our NavMesh. Adding it to our scene, we find that it has a “AI Character Control” script that takes a “Target” parameter.

Screen Shot 2017-02-17 at 11.44.50.png

Just drag any game object (even an empty one) from the Hierarchy here to tell the character to move to it.

Sample Project

The sample project can be found here. This is in Unity 5.5, so ensure you’ve upgraded to this version before trying to open it. The sample project also contains some logic to reroute the character between an array of targets, alternating when the spacebar is pressed. It also has had some “Off Mesh Links” generated. These allow the character to drop from the elevated platform and to “jump” (more accurately float really with this character) between them.


Week 4 2017 – Explorers – Piano

Hello everyone,

Thank you all for coming yesterday on such a lovely day.

This week we did a simple Piano.

piano

We only had to draw two keys, and then could duplicate these and change the names. The same applied to the code. The code is the same for each key apart from one small change so the note is the appropriate for the key.

REMEMBER! You need to make four changes each time you duplicate:

Change the name of the spite to the next Note

Change the name of the TWO costumes

Change the NOTE played

Piano2

Piano3

Remember, no sessions for the next two weeks. Have a nice break and for anyone with confirmations to attend next week I hope the weather is extra nice for you.

See you back on the 4th of March

Here are notes from this week in PDF cda-s6-week-4-17-piano.pdf

Martha

Javascript Intro

Today the Bodgers and Creators were on a hiatus so Mark took a few folks and covered some web development – with a particular focus on Javascript.

We reviewed:

  • How the internet works and how web pages get from the internet to your computer using DNS and HTTP.
  • Talked a bit about the two main kinds of code that our browsers understand:
    • HTML which is great for documents and static content
    • Javascript which is great for dynamic content like animations and games

We then spent the rest of the time playing with Javascript, using the p5.js framework to do some graphical stuff.  We learned about:

  • Functions which is where code is written
    • We wrote two functions: setup() and draw()
    • We called several functions which were written in the p5 framework such as ellipse(..), rect(…), random(..)
  • Variables which is where data is stored.  We learned that in javascript, unlike c# or java, all variables are declared with the “var” keyword.
  • Decision statement which is used to decide between options – in javascript the “if” statement is used for this purpose

We built quite a few cool things to draw interesting patterns and shapes and some of you came up with some mad patterns.  The one we ended up with is shown below.  Have fun playing with javascript and I’ll be really interested to see what you come up with!  Also try to think of ideas and if you come up with something interesting we can have some fun trying to build it!

http://codepen.io/markdav/pen/yVyozw

Explorers Week 2- 2017, Paint.net

Hello everyone,

Today we took a look at Paint.net, which is a drawing program. I quickly went through the menus but the best way to learn a program like this is to use it and experiment with it.

PAINTNET

The main reason we looked at it this week was because we will need it next week as we begin our modelling and stop/motion animation. After we take our photos we will be able to “clean them up before we bring them into Scratch as our Sprites.

snake

Next week, if the Moms and Dads could bring along a camera or phone along with the lead to attach these to your laptop.

And of course most important of all bring your imagination!

Here the full notes from todays session in PDF form. cda-s6-week-2-17-learnaboutpainting.pdf

Creators – Unity Terrain

Screen Shot 2017-01-31 at 22.17.05.png

This week we looked at the Environment asset pack and the creation of terrains.

Terrains are, at their core, nothing more than a grayscale image (shades of black & white) where the colour values are interpreted as representing heights. Black is is interpreted as zero height, white is interpreted as maximum height (as defined in the terrain’s properties) and every shade of grey in-between represents an intermediate value. The terrain editing tools provides brushes in a variety of shapes to raise or lower the terrain as desired.

Terrains in Unity don’t just allow us to define their heights. They also allow the painting of the terrain with a combination of different textures. In the Environment asset pack there are a selection of useful textures for painting a natural looking environment. These are a grass texture, several rocky textures and a sand texture.

Screen Shot 2017-01-31 at 22.18.36.png

Trees and grass are also enclosed in the Environment asset pack. These are also painted onto the texture with a brush, or in the case of trees, autofilled to a requested total number.

Once we had our terrain built, we added a character controller from the Controllers asset pack to enable us to walk around in it. We finished the session experimenting with the water prefabs that come with the Environment pack.

Please note that I won’t be at Dojo next Saturday (4th Feb 2017). Nonetheless, you are welcome to attend and join another group for the day if you wish to do so.

Platformer Engine Week 2

This week we did a little code to finish our engine and spent the rest of the time working on our own platformer games using it.  The code changes we made to last week’s game engine were:

Hit Boxes:

Fixed the platformer so that our character doesn’t get snagged on edges by its whiskers.  This we did by learning about hitboxes. The hitbox is just a costume which is rectangular in shape.  Before we do our animation, we switch to the hitbox costume and after we switch back to the costume we want.

hitbox

Head Bumping:

Fixed the platformer so that we can bump our heads against the platforms without popping up.  This was by adding a couple of lines to the “stay above ground block” sprite to move down if we are touching the ground while moving upwards.

The entire code for the platformer is below:

platform_code

DOWNLOAD THE FULL PLATFORM ENGINE CODE HERE!!!

Example Game: Mentor Dash

Finally Mark showed an example game pulling all the elements in together – “Mentor Dash”.  It has the same code as we covered, but adds a bit of animation, level changes, sound and some sillyness.

mentor_dash

DOWNLOAD MENTOR DASH HERE

There were lots of brilliant ideas from the ninjas on their own games .. looking forward to seeing what you can do!

Creators – Unity Standard Assets

This week, in a fun and pretty free-form session, we looked at the Unity standard assets packs to get an appreciations of the wealth of valuable content they contain. 
We looked first at the Characters asset pack and tried the first-person, third-person and car controllers. 

We also used the Prototyping pack to place some basic house shapes and other basic level layout in our scene. 

Finally we played around with some of the effects in the Particles pack to see what was available there. 

Next week we will continue with another a session in a similar vein and explore the Environment assets pack and the creation of terrains to model exterior spaces. 

All ninjas are encouraged this week to play around with the standard assets, time permitting, and we may look next week at anything you’ve managed to create.