Notes for Week 7:
Copies of files can be found on our Github.
It was time this week to finish up Roll-A-Ball. After the session, I did some additional tweaking. There are changes to the materials and camera position. I also added a splash screen, background sound, a font resource and a sound effect when a pickup is collected. Each level has an associated target time and you advance to the next level depending on whether you beat that time. There are four levels in total. At the end, depending on how you did, you get “You won” or “Game over” message and the option to restart. Here it is in action:
Collision
Although the pickups were technically just over the ground, and not intersecting it, we found previously that for many of us, when we ran, several of the pickups detected contact with the ground and deleted it. We “fixed” that by temporarily lifting the CollisionShape3D in the pickup up by 0.01m, but we returned to this to correct it.
Every node that collides with another, in our specific case Area3D and RigidBody3D, derives from the CollisionObject3D node and has a Layer and Mask property:

Layer is the collision layer that this node is in. Note that something can be in more than one layer.
Mask is the collision layer that we watch for collisions with. Anything not in these nominated layers will be ignored.
All we had to do to fix this, was to set the Mask for the Pickup to 2, and the Layer for the Player to 2. Now the pickup ignores all collisions except with the player (everything else, including the ground, being in Layer 1 by default).
Dynamic Level Loading
We wanted the GameManager to be able to load levels automatically. First we created our level, by adding a Node3D called “Level 1” to our Main scene and dragging all pickups into it. We then right-clicked and chose “Save Branch as Scene…” to make it a scene of its own. We then deleted the instance of the level from the scene, since we were going to have the Game Manager create it.
We added a new variable to Game Manager:
@export var level : PackedScene
PackedScene is the type used for a scene saved to disk. We were then able to assign our level scene to this variable in the inspector.
Next we had to add some code to get this level created. We added these lines at the bottom of the GameManager’s _ready() function:
var current_level = level.instantiate()
add_child(current_level)
This takes the level from the disk and actually creates nodes from it (instantiate()). We save that to a variable current_level and the use add_child() to actually add this to the current scene. When we ran, all was as normal, but looking at the remote tree, we could see that Level 1 was now a child of Game Manager.
We then created a few extra levels and tried loading them instead, by selecting them in the inspector.
Handing Multiple Levels Automatically
We then went back and decided to add support for multiple levels, having the game change to the next level automatically. We added these variables to the game_manager.gd script:
@export var levels : Array[PackedScene]

var current_level : Node3D
var current_level_index : int = -1
An Array, as you might remember from the first few weeks, is a variable that can store multiple values like a list. We then removed the last two lines from _ready() and created this function instead:
func load_next_level() -> void:
	if (current_level != null):
		current_level.queue_free()

	current_level_index += 1
	current_level = level[current_level_index].instantiate() as Level
	add_child(current_level)
This function:
Note that it doesn’t know when to stop yet and will keep trying to load even when there’s no levels left.
Finally we had to call this function from somewhere. All that was needed was to edit _process() as follows:
func _process(delta: float) -> void:
	pickups_count_label.text = "Remaining Pickups: " + str(pickup_count)

	if (pickup_count == 0):
		load_next_level()
If we’re at the start of the game, when the pickup_count is also zero, or we’ve just collected all the pickups i a level, the game will call load_next_level() and load a level.
We tested this and it worked.
Reseting the Player
We wanted to reset the player. This means returning it to its starting position and clearing any linear and angular velocity from the RigidBody3D. For a RigidBody3D, all changes to physics variables should happen in _physics_process().
To make this work, we first added three variables to player.gd:
var initial_pos : Vector3
var initial_rot : Vector3

var reset_requested : bool = false
The first two are to remember the initial position and rotation of the player and the third is a switch we can toggle to true when we want to trigger a reset.
To remember the initial position and rotation, we just needed to add these two lines to _ready():
	initial_pos = position
	initial_rot = rotation
Then in _physics_process() we change it to read as follows:
func _physics_process(delta : float) -> void:
	if (reset_requested):
		position = initial_pos
		rotation = initial_rot
		linear_velocity = Vector3.ZERO
		angular_velocity = Vector3.ZERO
		reset_requested = false
	else:
		var input = Input.get_vector("Up", "Down", "Left", "Right")
		apply_torque(power * delta * Vector3(input.x, 0, -input.y))
If reset_required is true, then we put the ball position and rotation back to their original values and set both linear_velocity and angular_velocity to zero. Finally we set reset_requested back to false so that we won’t run this code again until it’s needed.
To actually trigger this, in game_manager.gd, we added a variable for the player:
@onready var player: RigidBody3D = $"../Player"
And we updated _process() to also reset the player:
func _process(delta: float) -> void:
	pickups_count_label.text = "Remaining Pickups: " + str(pickup_count)

	if (pickup_count == 0):
		load_next_level()
		player.reset_requested = true
Handing Running out of Levels
To handle running out of levels, we updated our load_next_level() function in game_manager.gd to check that there actually was another level to load and to return false if there wasn’t. We changed the return type to -> bool first:
func load_next_level() -> bool:
	if (current_level != null):
		current_level.queue_free()

	current_level_index += 1
	if (current_level_index >= len(level)):
		return false

	current_level = level[current_level_index].instantiate() as Level
	time_remaining = current_level.target_seconds
	add_child(current_level)

	return true
This uses the len() function to check the size of the level array and if there isn’t another level to load return false.
Now the game doesn’t crash when it runs out of levels. Finally we added this logic to game_manager.gd’s _process() to hide the player once we run out of levels:
func _process(delta: float) -> void:
	pickups_count_label.text = "Remaining Pickups: " + str(pickup_count)

	if (pickup_count == 0):
		if (load_next_level() == false):
			player.hide()
Getting the Code
All our code for this year is available on our GitHub.
This week we continued our Prototype 2 project.
The first change we made was have it so that the pizza slices only emanated from the player when the space bar was pressed. We removed the temporary SpawnOnInterval component from the Player as this just spawned pizza slices continuously. We edited PlayerController.cs and added a new public property:
public GameObject projectilePrefab;
This has a type of GameObject which means it can store a reference to an object in the scene, or to a prefab, which is what we want. In the Inspector, we assigned our pizza slice prefab to this property.
In the Update() function in PlayerController.cs we added the following at the end of the function (just above the final curly brace that marks the end of the function):
        if (Input.GetKeyDown(KeyCode.Space))
        {
            // Launch a projectile from the player
            Instantiate(projectilePrefab, transform.position, transform.rotation);
        }
This checks to see if the space bar is pressed and, if it is, then it creates an “instance” (copy) of the pizza slice and places it at the player’s location with the player’s rotation.
Since the pizza slice already knows how to fly forwards, once it’s created it will automatically fly up the screen.
We have three animals in our scene. We checked to make sure that they had been rotated 180 degrees, so that the were pointing down the screen. We dragged each one from the Heirarchy to our Prefabs folder in turn, and then removed them from the scene.
In the prefabs folder, we selected them one at a time and added the MoveForwards.cs script in the Inspector, adjusting the speed from the default of 40 to a more sedate 5.
To test this, we ran the game with the Scene and Game views side-by-side. We could drag and drop animal prefabs into the Scene view and watch them run down the screen. Note that because we added them in run-mode, once the game was stopped, they were not left permanently in the scene.
At the moment, any pizza slices and animals added to the scene are there for ever, long after they’ve moved off screen. In any game keeping stuff around that we don’t need any more is wasteful and might mean the game became ever slower as we continued to play it.
We create a new script in our Scripts folder called DestroyOutOfBounds.cs. We give it one private property:
private float topBound = 30;
This represents how far up something can travel in the game before we should delete it. Given our current game camera, up on the screen is equivalent to the global Z axis.
In Update() we add the following code:
        if (transform.position.z > topBound)
        {
            Destroy(gameObject);
        }
What does this say? It says: if we have moved such that our position in Z is greater than 30 (topBound) we should call Destroy(gameObject). The property “gameObject” hold a reference to the item in the scene that this component is attached to. Destroy() removes it from the scene.
We attach this new script to our pizza slice prefab and test it. Now pizza slices don’t stay in the scene forever, when they move to the top of the screen, they are removed.
What about the animals? We can use this same script for them as well. We add another private property:
private float lowerBound = -10;
This represents how far down the screen things can move before they’re removed.
We change Update() so that it now looks like this:
        if (transform.position.z > topBound)
        {
            Destroy(gameObject);
        }
        else if (transform.position.z < lowerBound)
        {
            Destroy(gameObject);
        }
We have the earlier check for things going out the top, but now we have else if and another check for things going out the bottom. Note that with else if the second thing won’t be checked if the first thing turns our to be true, only when it isn’t.
Adding this now to our animal prefabs as well, we can see that when we drag them into the scene during runtime, they only last until the bottom of the screen.
We added a new empty object to the scene and called it “Spawn Manager”. We then created a new script file called SpawnManager.cs and attached it to this object.
In SpawnManager.cs we added a new property:
public GameObject[] animalPrefabs;
This property has the type GameObject, so it can store references to items in the scene, or prefabs. Note the square brackets after the type. This means this isn’t a normal property that stores a single value, this is an array and it can hold multiple values all at the same time. Looking at it in the Inspector, we find we can set its size to three and add all our animal prefabs to it:

We add a second property called animalIndex that will allow us to select which individual prefab we’re talking about at any one time:
public int animalIndex;
We can then add this code to Update():
if (Input.GetKeyDown(KeyCode.S))
{
  Instantiate( animalPrefabs[animalIndex],
                     new Vector3(0, 0, 20),
                     animalPrefabs[animalIndex].transform.rotation );
}
Every time we press the S key, an animal is spawned at the position of (0, 0, 20) (i.e. centre-top of the screen). By changing the value of animalIndex in the inspector between 0, 1 and 2 we can see different animals get spawned.
We enhanced our SpawnManager.cs by randomising both the which animal is spawned and where it’s spawned. At the top of the class, we delete the animalIndex property and add these private properties instead:
    private float spawnRangeX = 20;
    private float spawnPosZ = 20;
The first we’ll use to determine the position of the animal horizontally, a random number between the left and right sides of the screen. The second will be the animals vertical position, and this will always be the same.
Inside Update() we change it to look like this:
int animalIndex = Random.Range(0, animalPrefabs.Length);
Vector3 spawnPos = new Vector3(Random.Range(-spawnRangeX, spawnRangeX),
                                       0, spawnPosZ);

if (Input.GetKeyDown(KeyCode.S))
{
  Instantiate( animalPrefabs[animalIndex],
                     spawnPos,
                     animalPrefabs[animalIndex].transform.rotation );
}
Now we’re setting animalIndex automatically every time to a random integer between 0 and up-to, but not including, animalPrefabs.Length. By using animalPrefabs.Length we can ensure this code works, regardless of how many animal prefabs we add to SpawnManager.
The position we’re also creating as a variable called spawnPos. The X value is random float value between -spawnRangeX and spawnRangeX. Y is aways zero and Z is always spawnPosZ. Note that down in Instantiate() we’re now using spawnPos and not the former new Vector3(0, 0, 20).
The final change is automatic spawning. We move all the spawning code to a new function called “SpawnRandomAnimal”, where the check for the key press has been removed:
void SpawnRandomAnimal()
{
    int animalIndex = Random.Range(0, animalPrefabs.Length);
    Vector3 spawnPos = new Vector3(Random.Range(-spawnRangeX, spawnRangeX),
                                   0, spawnPosZ);

    Instantiate(animalPrefabs[animalIndex],
                spawnPos,
                animalPrefabs[animalIndex].transform.rotation);
}
Now all we need is to call this automatically. We create a new pair of private properties:
    private float spawnDelay = 2;
    private float spawnInterval = 1.5f;
and add this to the Start() function:
InvokeRepeating("SpawnRandomAnimal", spawnDelay, spawnInterval);
This function will wait spawnDelay seconds, then call the named function for the first time. It will then call it repeatedly after that every spawnInterval seconds.
Now when we run, animals getting created constantly at random! No more need to press S.
The code for this week’s project is on our GitHub, as always. To download our stuff from GitHub, you can just click on the green button and choose “Download ZIP”
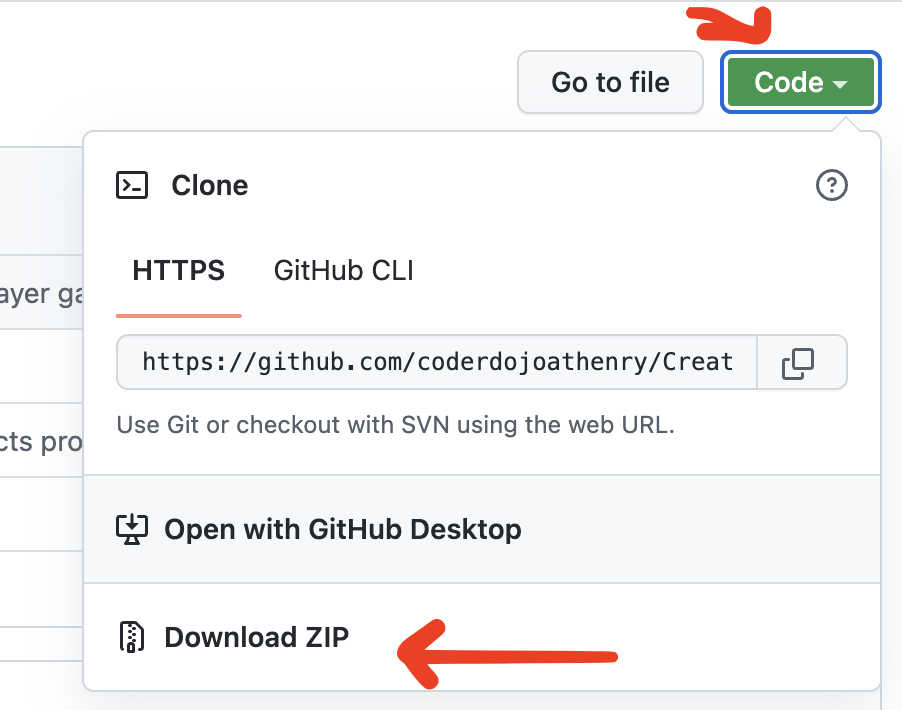
Note that this ZIP file will contain all our projects for the year!
This week we took the coin that we created last week and turned it into a pile of a couple of hundred coins.
Here’s a link to the folder where we store all our files . You’ll find a new file in there called dubloon_wip2.blend, containing everything we did this week.
Hello everyone
Nice big room last week as we had Advancers and Explorers in the one room. As I said on Saturday, we will continue to combine the both groups for the next two weeks.
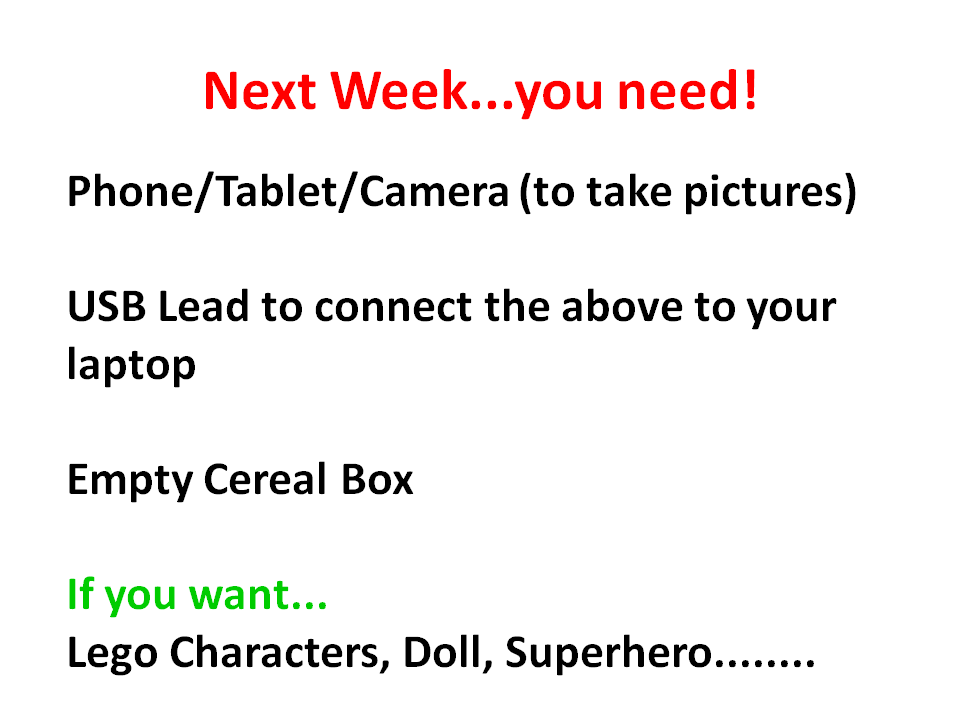
We are starting Stop/Start Animation this coming week and if you could bring some or all of the following it would be helpful.
PDF notes of the session can be found here CDA-S7-Week_07-TruchetTiles.pdf
See you next week,
Martha
Julie, Ruaidhrí and Eoin McG
Hi everyone,
Thank you all for coming on Saturday. A lot of us had to fit into the Advancers Room but we managed. We should be back to our own room next. Thanks to Oliver and his crew for moving to another room for us.
This week we did a new game, How fast can you Type? This week we used Backgrounds as Sprites. Just to mix it up!

We used a variable as our Timer, as we did with our Maths Guessing Game!


Full notes from today are here in PDF CDA-S7-Week 7-How fast can you Type.pdf
And my own game from today is up on the scratch.mit.edu website.
See you all next week.
Martha
Julie and Ruaidhrí

This week we looked at two very useful concepts in JavaScript, Arrays (we’ve also called them lists) and Classes (we’ve also called them objects). They are both things that allow one variable to store more than one value at at time. This can often be very convenient and has the potential to save us a lot of typing! Who doesn’t like that?
Arrays
A plain variable in JavaScript can store a single value, we’ve seen that loads of times:
let a = 5;
let b = 7;
let c = a + b; // will be 5 + 7 = 12
An array variable in JavaScript can store more than one value, just by putting them in square brackets and separating them with commas:
let a = [5, 7]
let c = a[0] + a[1]; // This is the same as above!
The code here does the exactly the same thing as the block above it. See that a now has two values in it and we use a[0] to get the first value and a[1] to get the second. This technique isn’t super useful when we only have two values, but the more we have to store, the more useful this gets. Imagine if we had 10 values, how much shorter would the array version be?
You can also create an empty array and put values in it later:
let a = [];
a.push(5);
a.push(7);
In the code above we create an empty array (nothing between the square brackets) and then use the push() function to add two values into it.
Concept of Classes
A class is a programming concept that lets you define objects which contain both Properties and Methods. Properties are values associated with the object. Methods are actions that we can ask the object to perform.
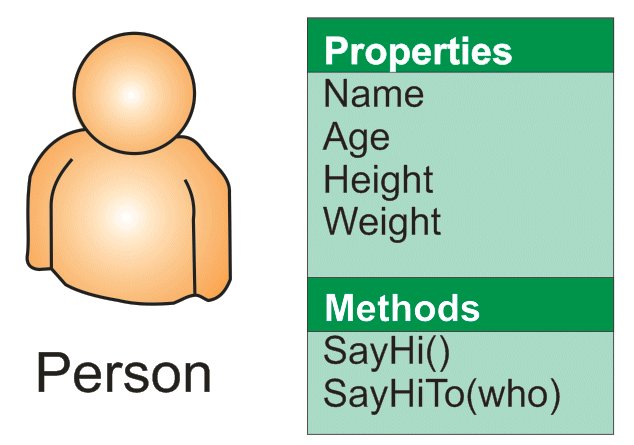
Think of yourself as a Person object and imagine some of the Properties and Methods you might have.
Your Properties might include Name, Age, Height, Weight, etc. A simple Method you might have could be SayHi(). That would make you say “Hi, it’s <Name>!”.
A method might have arguments, so it could be SayHiTo(“Dave”) which would make you say “Hi Dave!”.
Classes in JavaScript
Making classes in JavaScript is pretty easy. Let’s look at the Person class we showed above:
class Person{
  constructor(name, age, height, weight){
   this.Name = name;
   this.Age = age;
   this.Height = height;
   this.Weight = weight;
  }

  SayHi(){
    Console.Log("Hi, it's " + this.Name + "!");
  }

  SayHi(who){
     Console.Log("Hi " + who + "!" );
  }
}
We say “class“, the name of the class and a pair of curly brackets. Inside these brackets we have three functions (but notice we don’t have to say “function“).
Let’s look at the first of these, called constructor(). This is where we set the class properties. Note that we must put “this.” before properties to distinguish them.
The second two functions, SayHi() and SayHiTo() aren’t too usual, again note that we must use “this.Name” to get the value of the name property.
Download
This week we created a class to represent a bouncing ball and we saw how easy it was, once we’d created the class, to make several of them, all bouncing around simultaneously. This would have taken us a lot more code to do if we hadn’t made a class. As always, the files can be downloaded from our Github page.
Hello everyone,
Thank you all for coming again this week and I hope you enjoyed the Halloween break.
This week we did a simple Piano.

We only had to draw two keys, and then could duplicate these and change the names. The same applied to the code. The code is the same for each key apart from one small change so the note is the appropriate for the key.
REMEMBER! You need to make four changes each time you duplicate:
Change the name of the spite to the next Note
Change the name of the TWO costumes
Change the NOTE played


Here are notes from this week in PDF CDA-S6-Week_07-Piano.pdf
Martha
This week we worked on random pin placement for our game. We updated the existing PinManager component to randomly (as opposed to regularly) place a number of pins into the scene.
Arrays
An array is a way for a variable to hold more than one value. It’s a a very useful concept in programming; complex programs would be practically impossible without them. In C# arrays are declared as follows:
     int[] nums = new int[4];
     bool[,] grid = new bool[rows, cols];
The first line creates a one-dimensional array called nums which has four entries: nums[0], nums[1], nums[2] and nums[3].
The second line creates a two-dimensional array called grid. Note the size in this case depends on the values of the variables rows and cols. The first entry is grid[0,0] and the last is grid[rows – 1, cols – 1]. The total number of locations in this array is rows * cols.
***Next week we will be doing Animation! Please bring any miniature figures that you might want to use to create a short story through stop motion photography. We will also need some way to take photos and download the images to the computer – so parents need to remember a camera and download cables. I will bring a big load of modelling clay.***
Breakout is a variation of our previous game, Paddleball. We create a new scoring experience for our gamers by introducing blocks at the top of our screen that they get points for hitting.

Everyone already knew how to import or create the first two sprites – the paddle and the ball and most coders remembered from paddleball how to get the paddle to forever follow the mouse in only the x-direction. 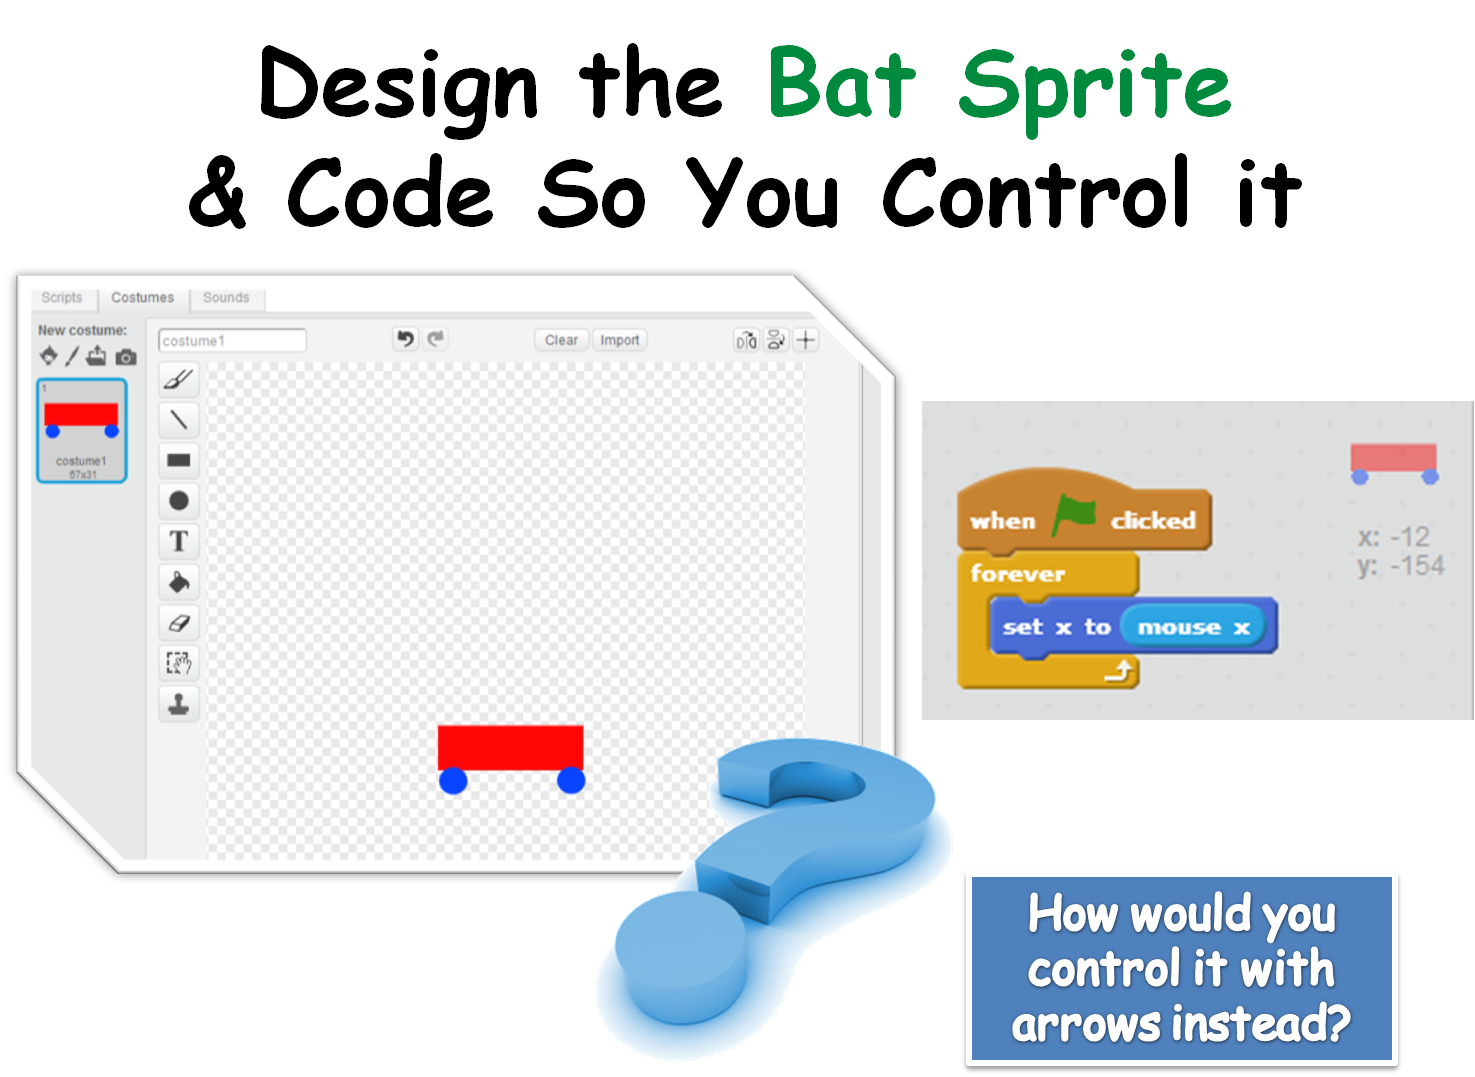
The code to move the ball was essentially the same as in the paddle ball game with a small change to broadcast the starting position to itself.
We then created two variables, one for the score which will go up when the ball hits a block sprite(can you copy this code from the Paddleball game code and use it in the ball sprite?) and one for lives which will go down every time the ball touches the end line we added under the paddle on the Backdrop. Can you figure out where to put the code to reduce lives by one when the ball touches a certain colour?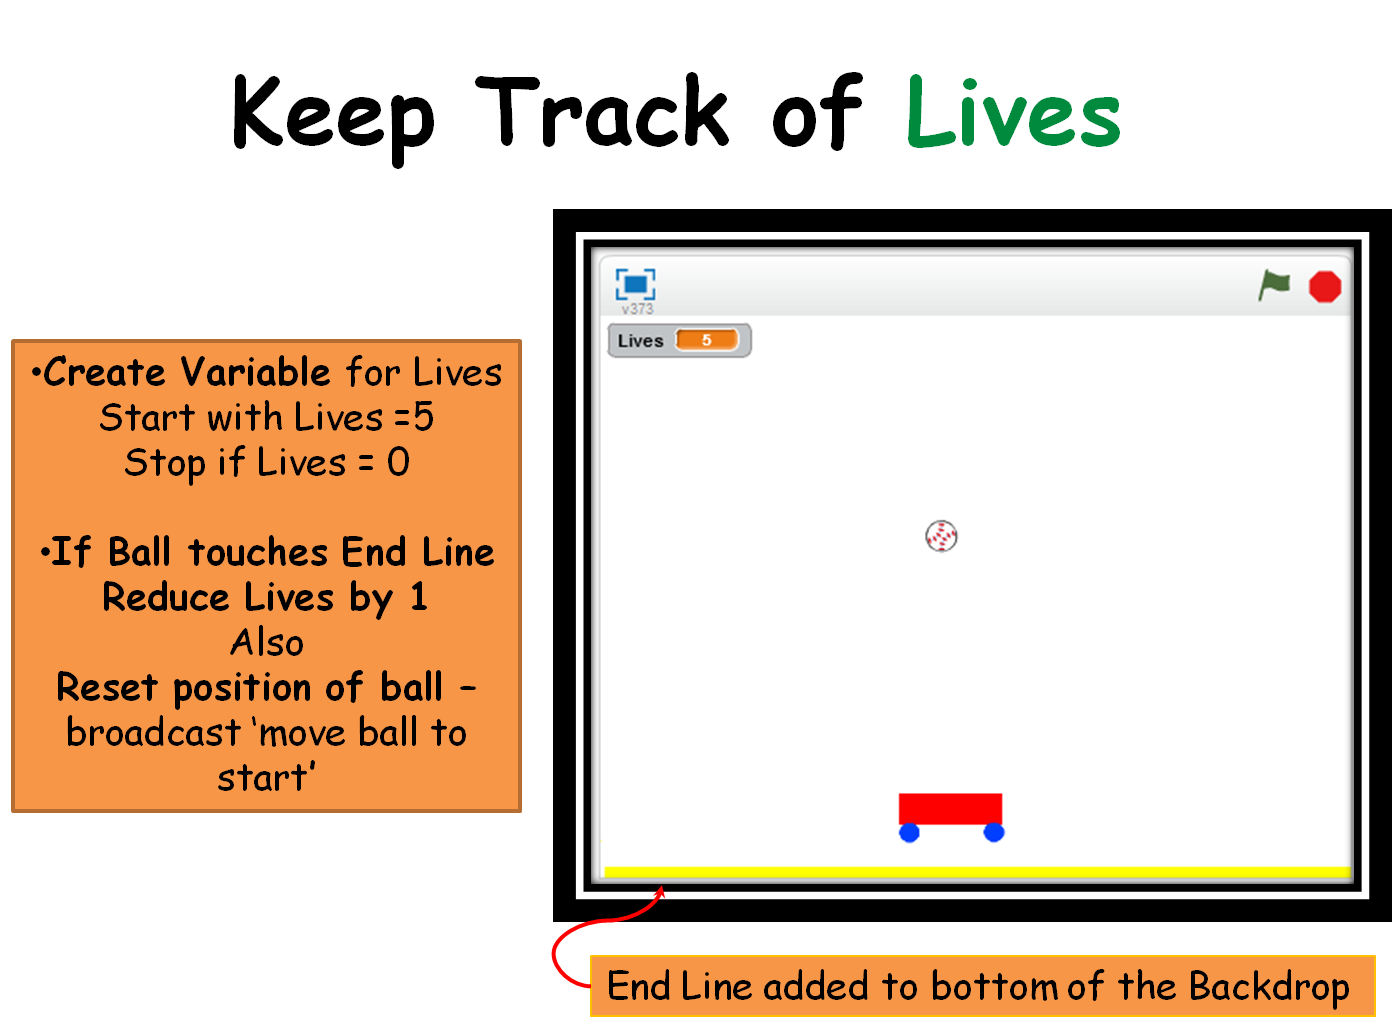
Lastly, we created the block sprites and coded for them to fade away when they touched the ball. We use the EFFECT block of code in LOOKS.
The complete set of notes in .PDF format can be opened here:CDA-S5-Challenge_08_Breakout. You can play with my completed game on the http://scratch.mit.edu webpage. If you sign in as cdathenry1516 and use the password: cdathenry, you will be able to play all our games. If you have your own sign in name, just search for cdathenry1516 and you can see and play them all as well. Please put yours up there as well!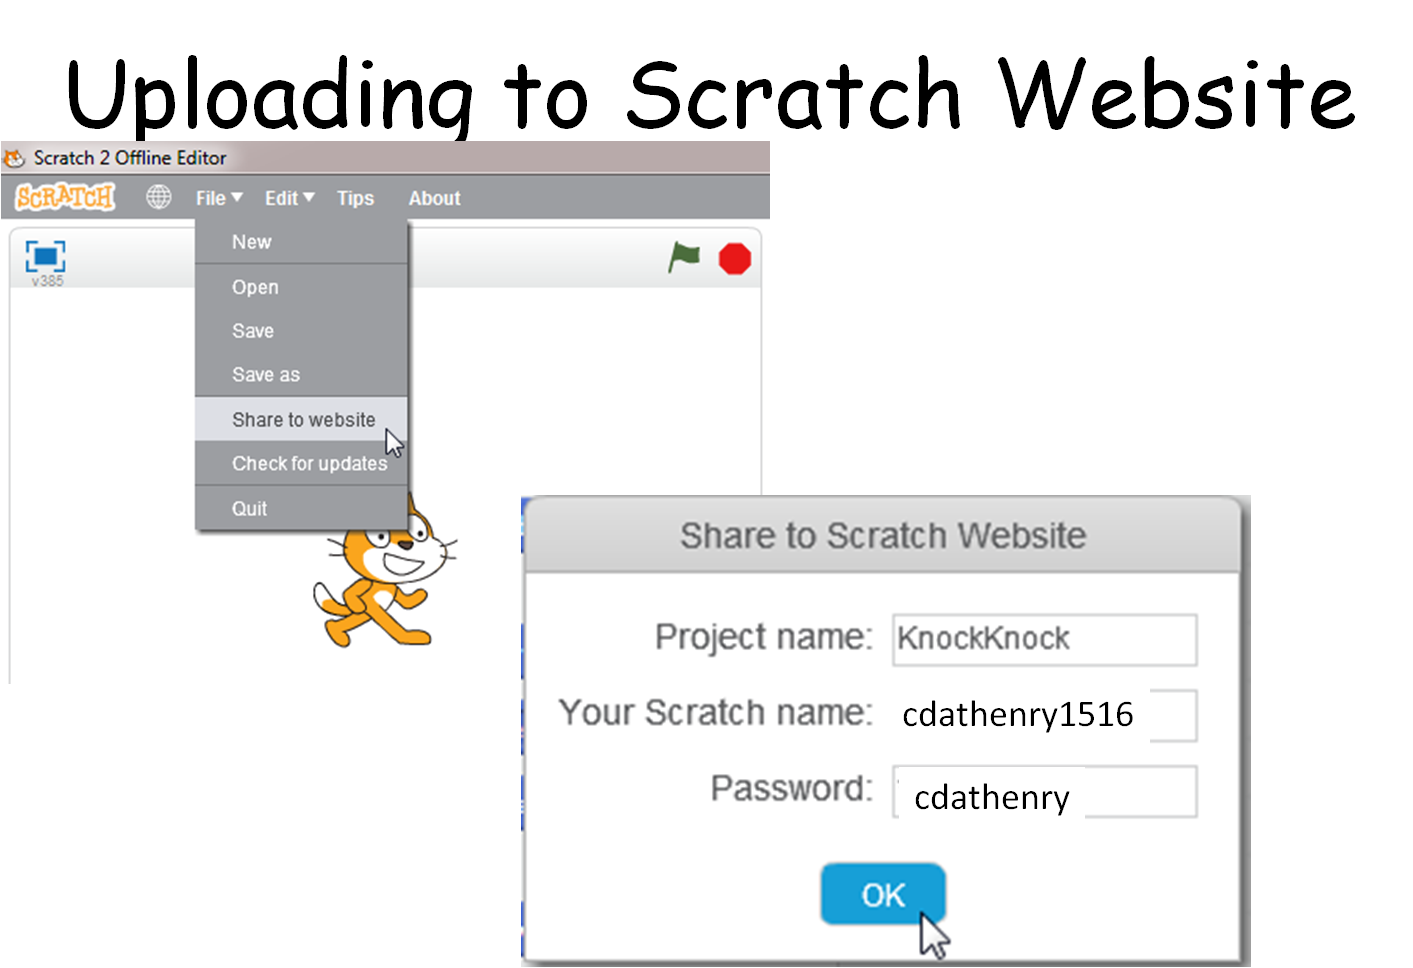
See you all next week!
Julie
