This week I thought we might dip our toe into the Blender physics engine, specifically rigid-body physics.
In Blender you might use the physics system for animations, for setting up a complex still scene in a natural way or just, as we are going to do, for the fun of it.
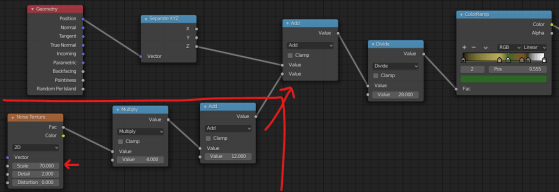
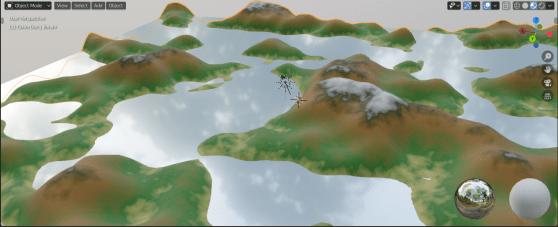
After I posted the video, I modified the material a bit and I like the result more than the version in the video. If you want to try, modify the terrain material so it looks like this instead:
It varies the texture a lot more and looks very nice, especially on the snowy peaks.
Hi folks, thanks a million to those who watched last week. This week we do something simple and fun: some low-poly trees that will look great added to any low-poly outdoor scene.
This technique uses extrusion and the skin modifier to build the trunk. The canopy is made of ico spheres that we’ve distorted.
I thought it would be nice if we could finish out our animated tank, notwithstanding that we’re all self-isolating at the moment. To that end, I’ve recorded a litte video to show the last bit of the animated tank model, the bit that actually includes the animation!
I hope this video will be of some use to at least a few of you. If you watch it, please do let me know with a YouTube comment or a comment here so I can decide if I should make a few more like this. Happy to do it if someone’s watching!
We created a set of wheels from a cylinder which we then scaled, duplicated and used inset and extrude to provide a little detail on each wheel.
We then created a bezier curve to define the shape of the track across then wheels. Bezier curves are an easy way to defined a smooth shape. They have a number of points through which the curve passes. Each point has a pair of handles. The rotation of these handles defines the angle at which the curve passes through the point. The distance between the handles defines how tightly the curve bends as it approaches the point.
Once we finished the apple, we started to talk about animation. To illustrate this, we started building a little multi-object tank model that we can later animate. Here are the instructions on starting the tank model:
This week we had a 3D printer in the room, so our plans to stencil paint the apple took a back seat until next week. Instead we printed a dice model and then looked at how to build that model.
The printer we used is a Prusa i3 Mk 2.5. To print a model you import it into a program called a slicer which converts it from a polygon based model into instructions for the printer in how to lay down a series of layers of plastic to build the same approximate shape.
The model we printed was a dice. To do this we used ‘hard surface modelling’ techniques, specifically the use of boolean operators. Boolean operators allow you to take two shapes and make a composite shape that is:
Difference: The first shape with the second cut-out
Union: A shape which is the two shape fused together
Intersect: A shape which is only where the two original shapes overlapped
This technique is powerful, but it results in many N-gons (polygons with more than four sides). N-gons are bad in many circumstances. For example severe distortion may result if :
If we try to apply smooth shading
If we try to apply a subsurface modifier
We later try to distort the mesh, as with an animation
If we export the model for use in other 3D packages
If none of those apply, hard surface modelling can have its uses.