Advancers – Gravity

Introduction

This week we decided to create a Lunar Lander game that demonstrated the effects of Gravity.

The Plan

As always we started with a plan:

  1. A Spaceship Sprite with 4 Costumes
    1. No power
    2. Up Rocket firing
    3. Left Rocket firing
    4. Right Rocket firing
  2. Buttons to control the Space Ship
  3. Stage which should be a picture of the moon.
  4. A landing pad to land on – just draw on the Stage
  5. Code to control the Space Ship
    1. 3 Variables, to store Gravity, Power and LeftRight information.

Space Ship Sprite

This what mine looked like:

SpaceShipSprite

Space Ship Sprite


The Left and Right costumes can be confusing, to move left, the flame needs to come out of the right, and to move right the flame needs to come out of the left hand side.


Stage

My Stage looked like this:

Stage


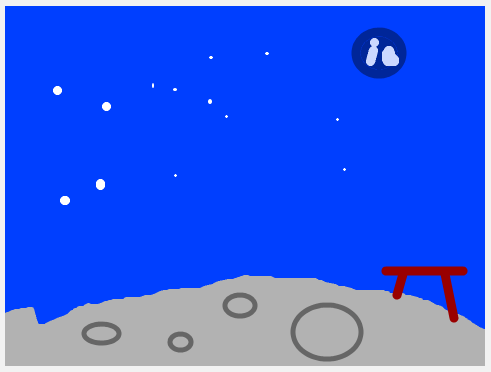
One thing to remember is to have the landing pad in a different colour.

Buttons and Code

I’ll put these 2 parts of the plan together as it makes more sense.

We decided to use 3 different buttons to control the Space Ship

  1. Up Arrow – This would fire the rocket at the bottom of the Space Ship
  2. Left Arrow – This would fire the rocket on the right side of the Space Ship
  3. Right Arrow – This would fire the rocket on the left side of the Space Ship

And now the code.

We needed code for each of the buttons, code to move the Space Ship and code to know when we have landed. This meant we had lots of small pieces of code all running together in Green Flags with forever loops.

We also decided that we would need 3 variables to store information so we could work out how far to move the Space Ship.

  1. Gravity – This would change as the Space Ship got higher, just as real gravity does.
  2. Power – This would change when the Up arrow was pressed and also when nothing was happening
  3. LeftRight – This would change when the left or right arrows were pressed

And don’t forget if we have variables, we should set them to starting values when the Green Flag is clicked.

Initialise


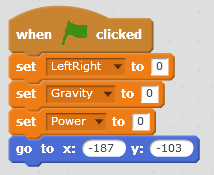
This also has the code that puts the Space Ship in to a starting position. Note the Y value as this is used later in the code to see if we are on the ground or not.


For example, when the one of the left or right arrow keys was pressed we would change the Costume and change the LeftRight variable.

RightArrow


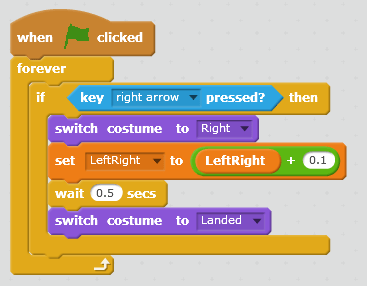
We did the same for the left arrow. Note that we just add (or subtract for the left arrow) a small amount from the LeftRight variable.

The delay is to make sure that the variable is not updated too fast if the arrow button is held down.


For the Up arrow we have to change a different variable

UpArrow


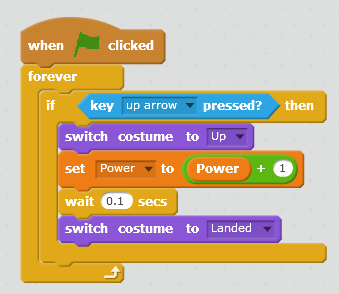
Note the wait is much shorter, this is to match the wait in the forever loop that moves the Sprite.

We also change the Power variable by a large amount as this helps with the calculations.


Once we had the buttons working we could move on to the Code that moved the Sprite.

The Left or Right movements were easy, that would just be the amount in the LeftRight variable.

The Up or Down movements were a little trickier as we had to account for Gravity as well. So we just used the Y position of the Sprite and added 180 (to make it a positive number). This meant that Gravity changed as the Sprite moved up or down, which is exactly how Gravity works in real life.

This is how the code ended up

MainForeverLoop


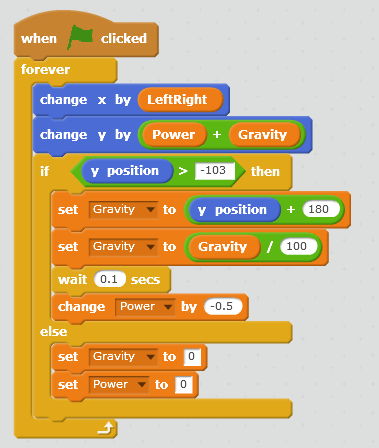
We move first and then check how high we are.

If we are above the ground, we know this by checking that we are above the starting position of the Sprite, then we adjust Gravity and adjust the Power down.

Note the wait is the same as the Up Arrow code.

Also, if we are on the ground, we set Gravity and Power to 0.


There was one final piece of code that we didn’t do but I have added here, this was to check if we had landed and if we had, display a message and end.

It was just another Green Flag with a Forever loop and we kept checking to see if we were touching the colour of the landing pad.

Landing


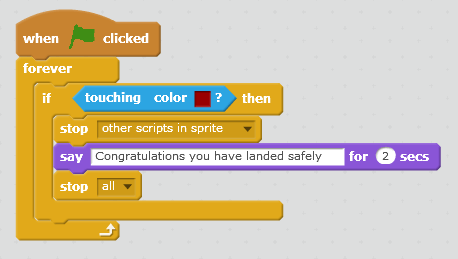
Not much here, but might be better if there was a wait as well.


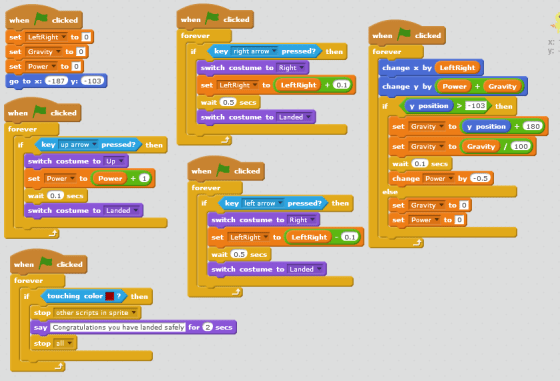
Finally, if you want to see all the code in one go, here it is

AllCode

Notes:

The project that we built is available on the Scratch Web Site:

User Name : cdadvancers1819
Password : advancers

Project : Class-Gravity

Remember, you can put your own projects up there as well if you want.

CoderDojo Athenry Information Session, Sept 2018

Slide2

Thanks to everybody who came along for our information session last Saturday the 15th September 2018.

Michael introduced us to the CoderDojo movement and spoke about CoderDojo Athenry and what we have planned for 2018/2019. His slides are here: CoderDojoAthenry-InfoSession-2018-Sept (PDF).

Martha then spoke about our shop, where we sell tea/coffee with biscuits for €2.00 or €1.50 if you bring your own cup, with all profits going towards equipment etc. for our CoderDojo.

Julie then talked about our loaner laptops where we provide laptops for people who don’t have their own. Speak to Julie or any of the mentors for more information.

Slide13

This year, we have 5 different rooms with different topics in them, for different levels of experience and age.

Explorers- led by Martha for Beginners from around age seven. Here are Martha’s slides CDA-WeeK_01_Information Session.

Advancers- led by Oliver for kids who have already been through Explorers. Here are Oliver’s slides Advancers2018.

Creators- led by Kieran and Mark for older kids who have been through Explorers and Advancers or have other coding experience. Here are Kieran and Mark’s slides Creators-2018-Intro.

Bodgers- Led by Declan also for older kids who have also been through Explorers and Advancers or have other coding experience. Here are Declan’s slides bodgers_introduction.

Hackers- led by Michael for older teenagers who have been through Creators and Bodgers. Here are Michael’s slides Hackers-Intro

You can find more on the About page of this website: https://coderdojoathenry.org/about/  and our schedule for 2018/2019 at https://coderdojoathenry.org/schedule/

We look forward to you joining us!

Deadline for Registering for Coolest Projects 2018 is 25 March

Coolest-Projects-large.png

25 March 2018 is the deadline if you would like to enter Coolest Projects, which will take place in Dublin on 26 May. You can find out information and register here: http://coolestprojects.org/

We have had lots of great participation from CoderDojo Athenry at Coolest Projects in the past few years, from our youngest members to our oldest, in all of our groups. People who enter find it a fun and rewarding day.

Here is a presentation from 2 years ago about entering:

https://coderdojoathenry.org/2016/03/03/information-about-coolest-projects-2016/

Congratulations to all our ninjas who received belts in Summer 2017!

This slideshow requires JavaScript.

On 27 May 2017, at our final CoderDojo Athenry session of the 2016-17 year, we awarded a total of 93 belts to our ninjas for their great individual achievements in acquiring and demonstrating coding and computing skills. And then we had a party with pizza!

Here is a link to our presentation from the day: CoderDojo Athenry Belts Day 2017

We are very grateful to Clarin College Athenry and the principal, Ciaran Folan, for their enabling CoderDojo Athenry by making the school and its wifi available to us.

We are also very grateful for the sponsorship and support we have received this year:

  • Galway Roscommon Education and Training Board, who provide us with an annual Youth Club Grant
  • Medtronic, employer of our mentor Declan Fox, who provide us with a grant to match Declan’s excellent volunteering
  • HP Enterprise, employer of our mentor Mark Davis, who provide loaner laptops that we make great use of
  • Boston Scientific, employer of our mentor Kevin Madden, who provided us with a set of 3D printers this year, which allowed a great new learning experience

Because of these supports, no child or parent/guardian ever has to pay to participate in CoderDojo Athenry.

This year also, mentor Martha Fahy introduced a new idea, “Java Dojo”, where parents can buy a cup of tea/coffee, providing additional funds. With these, we have been able to buy a speaker system, electronics needed by some of our groups, and our own 3D printer! Thank you, our CoderDojo ninja sidekicks!

And of course we must thank our mentors, who volunteer their time and expertise entirely without charge week after week, to make CoderDojo Athenry the success that it is.

Here is the full list of belts we awarded:

  • Explorers:    44     (39 Yellow & 5 White)
  • Advancers:  18
  • Bodgers:     17
  • Hackers:      8
  • Creators:     5
  • Black Belt:   1

Special mention must go to Eoin Clarke, who received our first ever black belt award. Eoin has been in CoderDojo Athenry for several years, working his way up through the groups, and this year took on the role of Mentor. Well done, Eoin!

Above are some photos of the belts awarded. You can find more on our Facebook page: https://www.facebook.com/CoderDojoAthenry/posts/1465673366786859

CoderDojo Athenry is now closed for the summer. See you all in September!

Platformer Engine Week 2

This week we did a little code to finish our engine and spent the rest of the time working on our own platformer games using it.  The code changes we made to last week’s game engine were:

Hit Boxes:

Fixed the platformer so that our character doesn’t get snagged on edges by its whiskers.  This we did by learning about hitboxes. The hitbox is just a costume which is rectangular in shape.  Before we do our animation, we switch to the hitbox costume and after we switch back to the costume we want.

hitbox

Head Bumping:

Fixed the platformer so that we can bump our heads against the platforms without popping up.  This was by adding a couple of lines to the “stay above ground block” sprite to move down if we are touching the ground while moving upwards.

The entire code for the platformer is below:

platform_code

DOWNLOAD THE FULL PLATFORM ENGINE CODE HERE!!!

Example Game: Mentor Dash

Finally Mark showed an example game pulling all the elements in together – “Mentor Dash”.  It has the same code as we covered, but adds a bit of animation, level changes, sound and some sillyness.

mentor_dash

DOWNLOAD MENTOR DASH HERE

There were lots of brilliant ideas from the ninjas on their own games .. looking forward to seeing what you can do!

Advancers: Scratch Platform Engine – Week 1

This week was quite busy in the Advancers group.

Talk on Coolest Projects

  • Oliver gave a talk on the “Coolest projects” and many of us are planning on targetting it this year –
    • the deadlines are Mid-March for submission of ideas and Mid-June to attend the event itself!
    • Mark and Oliver are going to dedicate the last 30 min of each week to helping people with their projects.

Platform Engine

We started a platform Engine and got most of the code done – next week we’ll finish up the engine (not much code, honest!) and see what it would take to make it into games.  A Platform Engine is something that’s useful in lots of types of games or interactive adventures – be they mario-style or escape-room style, etc.  Once we have this platform engine done, we can easily apply it to other cases.  Think about ideas for platformers for your coolest project!

platform_week1

Things we got working:

  1. Gravity so the player falls
  2. Stopping when we hit the ground
  3. Not falling “into” the ground
  4. Walking along bumpy ground
  5. Not walking over bumps that are too high (like walls)
  6. Jumping

Things we didn’t get working (yet):

  1. “popping” up over walls
  2. Animating our walk
  3. Snagging on edges
  4. Scores, lives, etc.

Next week we can look at the above to see how we might do it, and also what it might take to make it look pretty, add a loading screen, etc.

The full code for today is below (click to view large):

Code from Week 1

Code from Week 1

We will finish this next week and make a game out of it!  You can download the project from here

Advancers – Text based coding with p5.js

This week we tried something different with some text based coding.  We learned that for text basoslcyofed coding, we need a good text editor.  The text editor we picked was called “Atom” as it’s a free, powerful text editor that works on Mac, Linux and Windows.

Unfortunately.. with some network and pc problems.. it took longer than I hoped to get things installed on people’s PCs, but even then we managed to make a great start on some code and actually built some quite cool stuff.

For anyone that missed last week.. it would be great if you could run through the steps below and we will be ready for the next stage!

Continue reading

Image editing with the Advancers

wilber-bigThis week at Advancers, we took some time out from programming to review image editing, and play around using the highest quality free image editor in the world, the GNU Image Manipulation Program, also known as “The Gimp“.

Mastering Gimp, or a tool like it, is essential to be able to produce the images you will need for high quality games.  It’s also very useful for touching up photographs, chopping people’s heads off and sticking them on others, etc!

After taking some time to get it installed on most people’s laptops, we reviewed the most important parts of this incredibly powerful program:

  1. Installation of Gimp
  2. The basics of how to open and create a new image file
  3. The Gimp toolbox, how to change colors and use the brushes to paint.
  4. Layers and how they can make your life so much easier when it comes to image editing
  5. Selections, what they are used for and how to use them

Installing Gimp

On windows or Mac, GIMP can be installed by browsing to https://www.gimp.org/ and selecting “Download”.  On linux it can be installed from the app store/package manager on your distribution.  Note: some people last week had Chromebooks and I mistakenly told them that gimp wasn’t available on those devices – I since checked and it is available, though as it’s a web-app it is not as good as a locally installed version – check out this video for instructions on installation: https://www.youtube.com/watch?v=NtdcukXILJg .  It is also not quite free too since you need to pay to save your files.  Click read more for more details!

Continue reading