ModderDojo Topic 5: Time to Get Constructive!

2013-12-07_12.25.59

This week builds on ModderDojo Topic 4, when we learned a bit about the basics of ScriptCraft and saw how it handles loops, decisions and variables compared to Scratch: https://cdathenry.wordpress.com/2015/11/11/modderdojo-topic-4-moving-from-scratch-to-javascript/

This week, our goal is to build a first structure mod in ScriptCraft. Ideally you should work in pairs. This to achieve this goal will involve:

During the session, I will ask people to load their mods onto my computer, demo them to the group, and explain how their code works. To get things started, at we can take a look at some mods from last year and how they work: https://cdathenry.wordpress.com/2013/11/10/modderdojo-athenry-our-scriptcraftjs-minecraft-mods/

Practical notes:

  • Read the ScriptCraftJS API reference to see what commands you can use for your structures: https://github.com/walterhiggins/ScriptCraft/blob/master/docs/YoungPersonsGuideToProgrammingMinecraft.md#building-stuff-in-minecraft
  • During development and testing, you can end up with lots of incomplete structures that slow down your CanaryMod server. A simple fix is to delete your world:
    • Stop your CanaryMod server
    • Open the CanaryMod folder on your computer: in it you will see a folder called worlds, and inside it one called default, and inside that default_NORMAL.  Delete default_NORMAL and all of its contents.
    • While you are at it, edit your world’s properties for when it is re-created: you can do this by opening canarymod – config – worlds – default – default_NORMAL.cfg. To make your new world superflat, write world-type=FLAT and you could also change other properties such as spawn-monsters=false
    • Restart CanaryMod to create a new, empty world
    • Re-run your scripts to recreate structures that you want

AppInventor Week 4: Favourite Browser

This we will create our first app. The app will make it easy for you to open your favourite web sites.

Getting Started designing the GUI

Drag and Drop a “HorizontalArrangement” component on to the designer screen

  • Rename the “HorizontalArrangement” to “hsaButtons”
  • Set the “Width” property of the “HorizontalArrangement” to “Fill parent”

Drag and Drop three “Button” components into the “HorizontalArrangement”

  • Rename the three “Button” components to “btnGoogle”, “btnYouTube” and “btnCoderDojo”
  • Change the “Text” property for each of the three Button components to “Google”, “YouTube” and “CoderDojo”
  • Set the “Width” property of each “Button” to “Fill parent”

Drag and Drop a “WebViewer” component on to the designer screen

  • Rename the “WebViewer” component to “wbvBrowser”

Getting Started writing the code

  1. Click on the “Blocks” button
  2. In the script designer click on the “Button” Block “btnGoogle”
  3. Select the “when btnGoogle.Click” script from the pop-out list
  4. In the script designer click on the “WebViewer” Block “wbvBrowser”
  5. Select the “call wbvBrowser.GoToLink” script from the pop-out list
  6. In the script designer click on the “Text” Block, select the emptry String Block
  7. Copy and Paste the url http://www.google.ie into the “Text” block

Test the app

Duplicate the script above for the other two buttons.

App Inventor Notes Week 4 – FavouriteBrowser

ModderDojo Topic 4: Moving from Scratch to JavaScript

GeneralFeaturesOfProgrammingLanguages

Note: some individual topics are short: we got most of the way through the first 3 in our taster session. See this post: https://cdathenry.wordpress.com/2015/09/27/minecraft-modding-taster-session-week-1/

JavaScript is a well-established programming language, mainly used in web development. ScriptCraft is a Minecraft mod that allows you to write JavaScript code for building structures in Minecraft and writing new Minecraft mods. (So it’s a mod for creating other mods.)

Steps 1-3: Install ScriptCraft, Learn how to Connect to a Server, and Create a First Mod

We covered these steps in the first two weeks:

  1. Getting Started with ScriptCraft and JavaScript
  2. How to Connect to Each Other’s Servers
  3. Creating our First ScriptCraft Mods

To try out ScriptCraft, look back at the introductory posts here: https://cdathenry.wordpress.com/2015/09/27/minecraft-modding-taster-session-week-1/

Step 4: Comparing JavaScript to Scratch

Some people criticise Scratch as being “childish”, but I don’t agree. While it is designed so that even 8 year olds can use it, it is still has all of the key features of ‘adult’ programming languages, as listed in the image at the top of this post.

(Technically, any programming language with variables, decision and loops is Turing Complete.)

This means that, if you already know how to write a Scratch programs that use these features, you will be able to apply that knowledge to any other language, such as JavaScript. The syntax of JavaScript is different, but it uses the same computational thinking.

Variables-Operators

Loops

Decisions

Notes:

  • Even though they have basic ideas in common, every programming language has its own specific commands that relate to its purpose: Scratch is focused on 2D games and animations, while ScriptCraft is focused on operating inside Minecraft, and JavaScript generally is used for interactive websites.
  • the echo command that features in these slides is not a standard JavaScript command, it is just used in ScriptCraft to display things on your screen in Minecraft.  Everything else is standard JavaScript.

Scratch Beginners Week 5 – Paddle Ball Game

We had another week of fantastic attendance at Coder Dojo Athenry Beginners Scratch session. Thanks all for coming. To see the PDF of this weeks notes click here: CDA-S5-Challenge_05_Paddle_Ball. This week we reiterated a lot of the basic programming ideas that we have been working on since September. We planned our game – Paddle Ball – by defining it’s rules and designing it’s look. The coders were invited to use whatever sprites they liked-some had dragons catching swords and others trampolines catching kids! Most stuck to the basic layout seen here:

Season 5 Paddle ball - game design

First, we designed the paddle and made it follow our mouse, but only in the x-direction.

CDA-S5-Challenge_05_Paddle_Ball_move paddle

Secondly, we drew or imported the ball from our library and caused it to fall. We had to set it’s initial position just after the green flag was pressed in order that the game would restart properly each time and we had to set it’s initial direction to down, otherwise the ball might just bounce from side to side instead of up and down!! In order to do this, we placed a ‘point in direction’ block under the ‘go to’ block in the image below and set it to 180 (or down).

CDA-S5-Challenge_05_Paddle_Ball_make ball fall

Now that we have each sprite moving, we must get them to respond to touching each other and get a score variable set up. When the ball hits the paddle, the ball will broadcast a message to the program and the ball will change the score by 1.

CDA-S5-Challenge_05_Paddle_Ball_ball hit paddleCDA-S5-Challenge_05_Paddle_Ball_bc change score

To end our program I decided that when the ball hit a line I drew at the bottom of the STAGE. The command of ‘wait until’ was used with ‘touching colour’ to ‘stop all’. The coders were encouraged to continue the game instead by setting up a ‘lives’ variable and merely subtracting from that variable when the ball touches the line and ending the game when ‘lives = 0’.

CDA-S5-Challenge_05_Paddle_Ball_end gameNext week we will quickly re-make the basic paddle ball game but add a twist to it by making blocks that disappear when hit and add to the user’s score. It is based on the old Breakout game. The following week we will be doing animation. I will be bringing some plasticine to use to make sprites but the coders are welcome to bring miniature figurines such as Polly pockets or lego, etc… All parents should come equipped with a phone/camera and download cables that can take pictures to record the action! This will take several weeks to complete.

Thanks to Martha Fahy for the fantastic game idea and notes!

Julie


Week 5 – Unity

UnityLogo

This week we returned to the Roll-A-Ball game that we had shown in the introductory session. Because people were at different levels of completion with this, we started from the beginning again, but we put some detail around things that we’d glossed over the first time around.

Concept of Classes

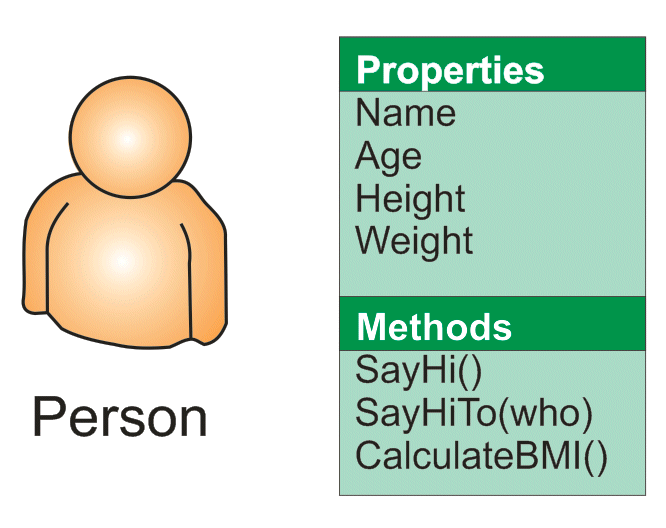
A class is a programming concept that allows you to define objects which contain both Properties and Methods. Properties are what they sound like; a value associated with object that we can get or set. Methods are actions, in the form of a function, that we can ask the object to perform.

SampleObject

If you think of yourself as a Person object then you could imagine some of the Properties and Methods you might have.

For Properties you might have things like NameAge, HeightWeight, etc. An example of a Method you might have could be SayHi() [notice the round brackets after the name marking this as a method]. That would make you say “Hi!”. A method might have arguments, so it could be SayHiTo(“Dave”) which would make you say “Hi Dave!”.

A method could equally calculate a value. An example might be CalculateBMI() which would calculate your Body Mass Index (BMI) value based on your Height and Weight properties.

Another nice thing about classes are that we can create specialised versions of them. They get all the Properties and Methods of the base class, plus all the new Properties and Methods that we defined for the derived ones. In this example, we might want to declare SchoolChild and Worker as new classes, both based on Person. SchoolChild might have additional properties such as School and Class while Worker would have WorkPlace and JobTitle. They would still share Name/Age/Height/Weight, etc.

Classes in Unity

Unity has a base class called MonoBehaviour and when we define behaviour for a game object, we do this by deriving a specialised class of our own design based on MonoBehaviour.

There are four Methods that MonoBehaviour has that we have looked at so far:

  • Start()
  • Update()
  • FixedUpdate()
  • LateUpdate()

We have provided custom versions of these in our own classes to define the behaviour that we want. This behaviour is also known as “overriding” as we are overriding the base behaviour of these Methods (which is to do nothing).

  • Start() is called when our game object is created. We can so things here that we need to do once when the game object is created.
  • Update() is called every time the scene is drawn. It’s a good place to do any updates that impact how the scene looks. However, it’s not called at a constant rate and that makes it unsuitable for some jobs.
  • FixedUpdate() is called every time the internal game timer for physics calculations fires. This is guaranteed to be at a regular interval. Any physics based calculations where time is a component should therefore should be done within FixedUpdate() rather than Update().
  • LateUpdate() is called after all game objects have had their Update() functions called. Use this when we need to be sure that another object has definitely been updated before we do something based on that object’s Properties.

Vectors & Physics

If I tell you that someone is moving at 5kph and ask you were they’ll be in 10mins, you won’t be able to answer that question. If I tell you that they’re moving 5kph due North, then you will. That combination of a quantity and a direction is called a vector.

vectors_basic
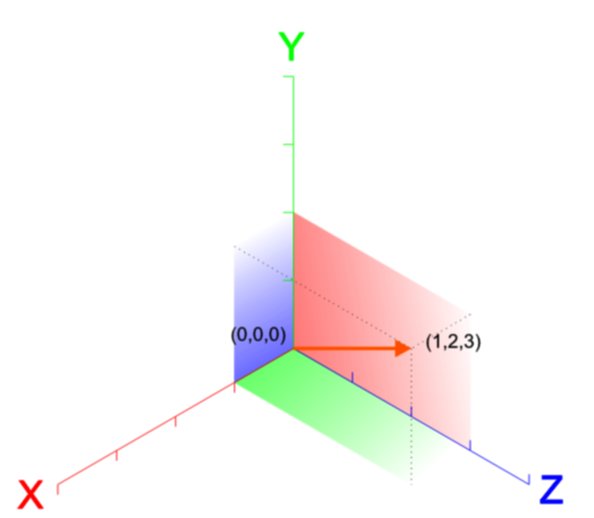
A vector in 3D space is usually represented as three numbers, written as (X, Y, Z). Let’s see what the vector (1, 2, 3) looks like.

We’re familiar enough with using vectors like this to indicate a position, but what about representing a velocity or a force? The direction is apparent, but what about the quantity? Well the quantity is simply the length of the vector. This is calculated using Pythagoras’ theorem:

distanceeq3

So we can calculate the quantity or magnitude of the vector (1, 2, 3) as approximately 3.74.

Note too that if our vector (1, 2, 3) represents a force then a vector (2, 4, 6) also representing a force, would be a force in the same direction but twice as strong. You can see that each part of the vector has simply been multiplied by two.

Basic Structure of a C# File

When we derive custom behaviours for our game objects, Unity is kind enough to provide us with a basic file containing a class definition containing empty methods for Start() and Update()monobehaviour

It’s tricky making the transition from a visual language like Scratch to a language like C# where you have to type code. A few simple rules may help:

  • Lines starting in two forward slashes (//) are comment lines. They have no effect on the program; they’re there for you to read. You can delete or change them as you need.
  • Semicolons (a dot over a comma) mark the end of statements. They’re easy to forget at first so you need to be careful.
  • You need spaces and newlines to separate things, but this does not have to be precise. Two spaces are equivalent to one. Because a statement doesn’t end until a semicolon, you can split if across several lines and it will still be fine. Hard to read though.
  • Braces (or curly brackets) enclose things and they must always be in pairs (open/close). In the sample code the braces are such that the methods Start() and Update() are inside of (and belong to) the class NewBehaviourScript because they are inside its braces. Similarly any lines we add inside Start() will belong to that method because they are inside its braces.
  • Neat formatting really helps keep your code readable and helps you quickly find mistakes. Try to mimic how code is formatted in the examples, especially the practice of “indenting” lines; placing spaces at the start of the line to make it clear what it is inside of.

Next Week

Next week we will continue to develop Roll-A-Ball and hopefully get it finished up.