No notes this week. As we had a very small attendance, we just took a quick look at Blender as nobody who attended had used it before.
We’ll resume Gem Search next session. See you there!
No notes this week. As we had a very small attendance, we just took a quick look at Blender as nobody who attended had used it before.
We’ll resume Gem Search next session. See you there!

This week we imported some assets for our gems, distributed random gems around the environment and created a digging action and effect.
To avoid the tedious work of getting up all the gem definitions, I created an asset pack on our Teams site containing:
To avoid clashes, we deleted our existing gem definitions and GemDefinitions.cs script before importing the asset pack.
We wanted to create a prefab which represented a random gem. First though, we need to get the gem definitions into memory. We create new class called GemManager.cs and attach it to a new object in the scene, also called ‘Gem Manager’. GemManager.cs has an array for storing all the gem definitions and a single function to return one at random:
using System.Collections;
using System.Collections.Generic;
using UnityEngine;

public class GemManager : MonoBehaviour
{
    public GemDefinition[] GemDefinitions;

    public GemDefinition RandomDefinition()
    {
        int index = Random.Range(0, GemDefinitions.Length);
        return GemDefinitions[index];
    }
}
In the scene we set the size of the array to 15 and added all our gem definitions to it.
We then created our RandomGem.cs:
using System.Collections;
using System.Collections.Generic;
using UnityEngine;

public class RandomGem : MonoBehaviour
{
    public GemDefinition GemDefinition;

    // Start is called before the first frame update
    void Start()
    {
        GemManager gm = FindObjectOfType<GemManager>();

        if (gm != null)
        {
            GemDefinition = gm.RandomDefinition();
        }
    }

    private void OnDrawGizmos()
    {
        Gizmos.color = Color.white;
        Gizmos.DrawWireSphere(transform.position, 0.5f);
    }
}
This class looks for a GemManager in the scene when it starts and, assuming it does, it asks it for a random gem definition and stores that in its GemDefinition property. We also added an OnDrawGizmos() so we could see, in the Scene View, where the gems have been scattered.
All we needed to do was to set Item in the to new random gem prefab and removing ActivateNearest(), as RandomGem doesn’t have Activate()/Deactivate() functions, which our lamp post did.
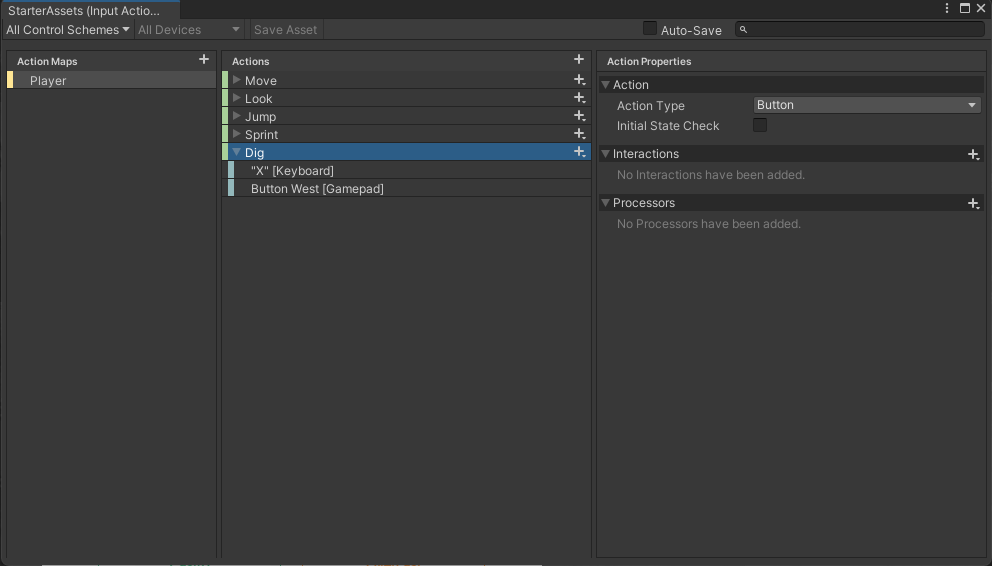
To see the existing user actions that had been defined, we navigated to the Player Capsule object and looked at the PlayerInput component. It references an asset called StarterAsset which, when we double-click on it, opens a new editor window. We use the “+” button next to Actions to defined a new action called “Dig”. Next to “Dig” we use the “+” to defined two new bindings; one to the ‘X’ key on the keyboard and one to the “Button West” button on the gamepad.
To respond to this new action, we create a new script called PlayerDig.cs, containing a function called OnDig(), and attached it to the “Player Capsule” game object – it has to be on the same game object as the PlayerInput component. Here’s the code:
using System.Collections;
using System.Collections.Generic;
using UnityEngine;

public class PlayerDig : MonoBehaviour
{
    public void OnDig()
    {
        Debug.Log("Player hit dig");
    }
}
In Play mode, we can see now that every time we hit the “X” key the message “Player hit dig” is written to the console.
On our Teams site there is a small image file called “dustmote_alpha.png”. We added it to our project in the ‘Sprites’ folder. Selecting it, we updated the properties in the inspector and selected “Alpha is transparency” (to indicate that the image has transparent portions) and hit the “Apply” button to save the change.
We created a new material, in our “Materials” folder, called “Dust Mote”. We needed to change the rendering mode to “Cutout” and assign our “dustmote_alpha.png” image to the texture box for the Albedo channnel:

We then created a new prefab with a particle effect on it. The settings are too numerous to list here, but you should examine it in the project if interested. Our material above provides the appearance of the particles.
We also added an audio source to this prefab and downloaded a digging sound effect from our Teams site to attach to it.
Finally we developed a small class called SelfDestruct.cs and attached it to the prefab:
using System.Collections;
using System.Collections.Generic;
using UnityEngine;

public class SelfDestruct : MonoBehaviour
{
    public float SelfDestructInSeconds;

    // Start is called before the first frame update
    void Start()
    {
        Destroy(gameObject, SelfDestructInSeconds);
    }
}
This little component means that we can create the dust effect and it will clean itself up after the sound and the particle effect have finished (about 3 seconds).
The code for this week’s project is on our GitHub, as always.
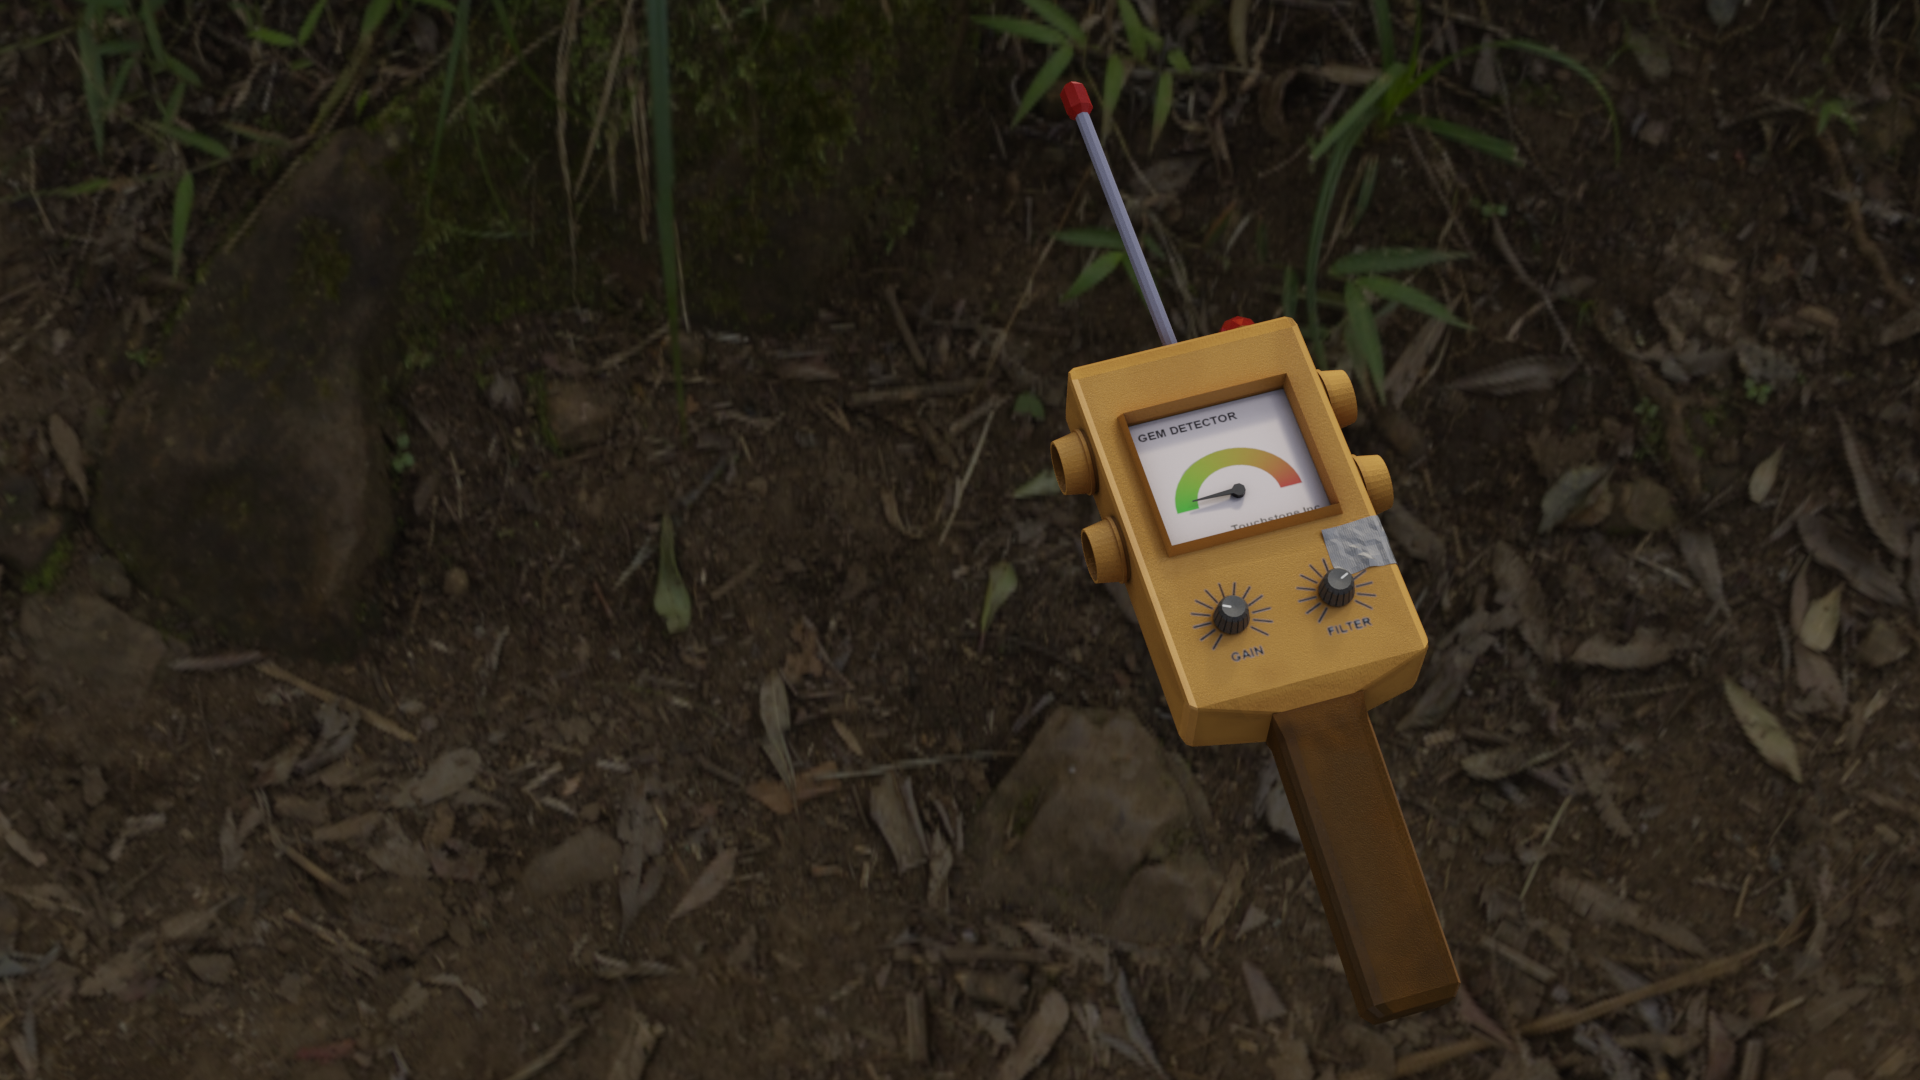
We downloaded the Gem Detector FBX from from our Teams channel and imported it into Unity, in a new folder called ‘Models’. In the Inspector, we used the “Extract Textures” and “Extract Materials” options to take the textures and materials stored inside the FBX and place them into our project as items we could edit. When extracting the textures, Unity warned that two were Normal Maps and offered to mark them as such for us, which we accepted.
A normal map is just a texture file. It is used to cheaply, from the point of view of rendering time, provide fine detail in models. The little video below illustrates this. There are two square plates, side-by-side.
The plate on the left has been modelled to have a circular feature that rises up in a lip and then back down again. It uses many vertices and polygons to model this.
The plate on the right is just a single quad, but it has a normal map applied to it. How was this normal map created? It was “baked” from the plate on the left. This plate is always flat, but it reacts to light as if it isn’t.
See how they both behave very similarly when a light is passed over them. It isn’t until the camera tilts down to a very low angle that the illusion breaks and the plate on the right starts to look a little odd. The video shows the wireframes at the end so you can see the difference in the two plates from a geometry standpoint.
To light up the detector, we need two elements. A point light to cast light on the rest of the model and an emissive material we can switch to to make the glass cover on the bulb look lit-up.
With our extracted materials and textures, we now had a material called ‘Light Cover’ in our ‘Models’ folder. This is used for the lamp cover at the top of the sensor. It’s supposed to be transparent, so we selected that material and in the Inspector changed the Rendering Mode setting from Opaque to Transparent and we then opened the Albedo colour and reduced the A value (which stands for Alpha and is the degree of transparency) down to about 175.
We then duplicated this material and renamed this copy as ‘Light Cover (On)’. We edited this one to enable emission by clicking on the Emission check box, then opening the Emission Colour dialog and setting the colour to a red colour and finally pressing +2 at the bottom of that dialog once to brighten the colour.
Then we added a new object, a point light, as a child of the “Light Cover” object in the detector and manoeuvred it into position.
Finally, we downloaded a sound file, of a beep sound, from our Teams channel to an ‘Audio’ folder in our project and set it as the AudioClip for an AudioSource component, with Play On Wake disabled, attached to our Light Cover object.
Here is the code for turning on and off the light and swapping the material on the light cover:
using System.Collections;
using System.Collections.Generic;
using UnityEngine;

public class SensorLight : MonoBehaviour
{
  public Material MaterialOff;
  public Material MaterialOn;

  private bool _isOn = false;
  private MeshRenderer _mr;
  private AudioSource _as;
  private Light _bulb;

  // Start is called before the first frame update
  void Start()
  {
    _mr = GetComponent<MeshRenderer>();
    _as = GetComponent<AudioSource>();
    _bulb = GetComponentInChildren<Light>();
  }

  // Update is called once per frame
  void Update()
  {
    if (_isOn)
    {
      _mr.material = MaterialOn;
      _bulb.enabled = true;
    }
    else
    {
      _mr.material = MaterialOff;
      _bulb.enabled = false;
    }
  }

  public void TurnOn()
  {
    _as.Play();
    _isOn = true;
  }

  public void TurnOff()
  {
    _isOn = false;
  }
}
Note that it uses GetComponent<T>() and GetComponentInChildren<T>() to find the different components we need to interact with, rather than having them as public property we’d have to set manually. This approach can be a little easier to maintain.
We downloaded a finished version of the Gem Sensor ProximitySensor.cs script from our Teams channel. Very much based on last week’s code, but with the addition of logic to work out the flashing light’s timing.
The final thing was a very simple class to tie the ProximitySensor and the ItemScatterer together:
using System.Collections;
using System.Collections.Generic;
using UnityEngine;

public class LinkScatterToSensor : MonoBehaviour
{
    public ItemScatterer ItemScatter;
    public ProximitySensor ProximitySensor;

    // Update is called once per frame
    void Update()
    {
        if (ItemScatter.nearestItem != null)
        {
            ProximitySensor.Target = ItemScatter.nearestItem.transform;
        }

    }
}
The code for this week’s project is on our GitHub, as always.

In the Hackers group at CoderDojo Athenry, we have a small team of experienced young people who are in secondary school and have worked their way up through the other groups, developing their coding skills. This year, we are embarking … Continue reading

This week we worked on our gem detector. We want a signal that behaves like this:
To develop the sensor, we created a new test scene. It consists of a flat plane, a tall and narrow cube to represent our target (signal source) and the prefab containing the first person character controller.

We also added a new script ProximitySensor.cs to our Scripts folder and attached it to an empty object in our new scene as “Proximity Sensor”.
We added a few Text – TextMeshPro objects to our scene. Adding the first one automatically added a Canvas object as well. In the scene view. the UI elements look enormous, but in the game view, they just overlay the game image.
All of our positions in Unity are stored as Vector3 objects. If you subtract one Vector3 from another the result is also a Vector3 that contains the differences between the two positions. Unity can give us the length of this (or any) Vector3 through it’s magnitude property. The code below shows this calculation and us setting the value of the UI Text element so we can see it:
float distance = (Player.position - Target.position).magnitude;
DistanceTxt.text = "Distance: " + distance.ToString();
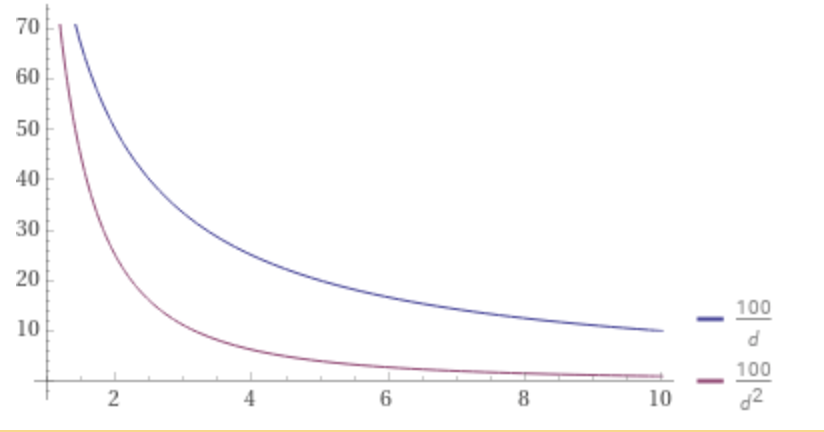
We want a scheme were by the signal falls off quickly with distance. We start with a nominal strongest signal value of 100. If we divide this by distance it falls off, but not that strongly, as shown in the blue line below. If instead we divide it by distance squared (meaning the distance multiplied by itself) the impact of distance is much more dramatic and the value falls off to a small value much more quickly. This is the red line.
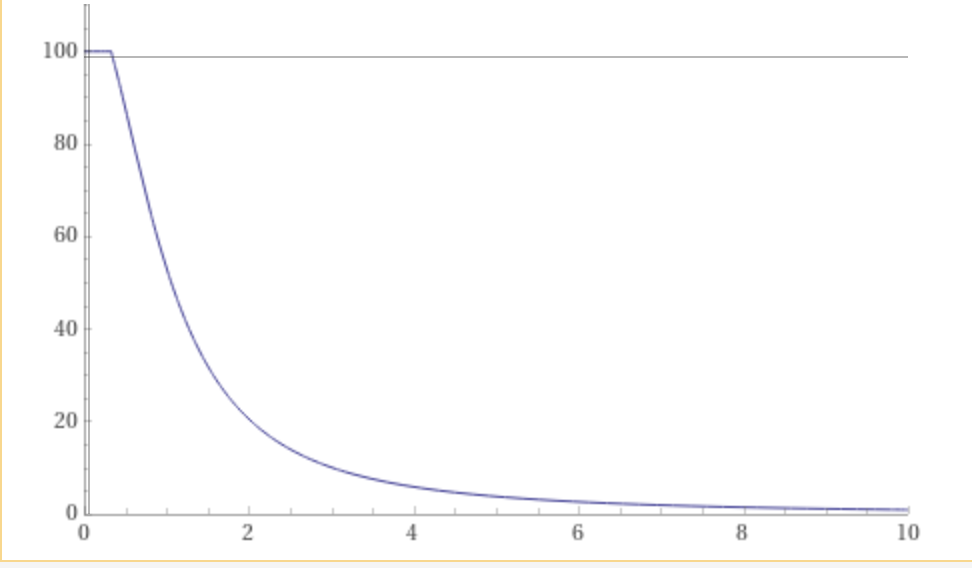
The problem with this scheme is that once distance goes less than 1, the resulting value is greater than 100 and when we get to zero, the value hits infinity (anything divided by zero is infinity).
We can simply solve this infinity problem by adding one to d2. This means that the smallest value it can have is 1, not zero and the highest value the signal strength can get to is 100.

This seems perfect, but actually in testing its clear we can never practically get to zero distance, so we never get to full signal strength. The final modification is not to add one to d2 but to add something a bit smaller. We’re going to use 0.9. Now the signal strength will go as high as 100/0.9 = 111.11 so we just use logic that says if it’s greater than 100, then make it 100. Here’s what that looks like (noting the flat section at the start):
Here’s what the code matching this looks like:
float signalStrength = MaxSignalStrength / ((distance * distance) + 0.9f);
signalStrength = Mathf.Min(signalStrength, MaxSignalStrength);
SignalStrengthTxt.text = "Signal Strength: " + signalStrength.ToString();
A Vector3 that has a length of one is called a “unit vector”. Vector3.normalised gives us back a version of that Vector3 that points in the same direction as the original by always has a length of one.
If we have two Vector3s that have a length of one, we can use the Vector3.Dot() function to determine to what degree they’re pointing in the same direction. Vector3.Dot() also called a Dot Product. When we pass Vector3.Dot() two unit vectors it will return a value between -1 and 1. If the two vectors are pointing in the exact same direction, it will be 1 and if they’re pointing in opposite directions it will be -1. If it’s zero it means that they are perpendicular to each other and don’t point in the same direction at all. Any positive value in-between means they’re pointing in the same direction somewhat.
We can work out the Vector3 from the Player to the Target and the Player’s Forward vector and compare them using Vector3.Dot(). We will make it so that all negative values go to zero. The resulting value is one that gets close to 1 when the player is pointing directly at the target. Here’s the code:
Vector3 playerToTarget = (Target.position - Player.position).normalized;
float pointingTowards = Vector3.Dot(playerToTarget, Player.forward);
pointingTowards = Mathf.Max(pointingTowards, 0.0f);
To combine these calculations, we just multiply them. Now we have a measure that reacts to both distance and direction. Here’s that code:
float adjustedSignalStrength = signalStrength * pointingTowards;
The code for this week’s project is on our GitHub, as always.

Programming and Spirals This week we combined 2 Scratch Projects: Introduction We did a lot of jumping around, from one project to the other, as we had to make changes to both projects to get everything working. Once everything was … Continue reading

This week we continued the second week of our Gem Search project. We completed the ItemScatterer component by:
We then finally tested it by adding an ActivateNearest() function to light up the nearest lamp post and give us a visual validation that things are working.
Our function to distribute the items comes in has five main pieces to it:
The top-left-back corner, which we’re calling start, is calculated using the position of the ItemScatterer and the size that’s been specified:
        Vector3 start = new Vector3(transform.position.x - size.x / 2.0f,
                                    transform.position.y + size.y / 2.0f,
                                    transform.position.z - size.z / 2.0f);
The transform.position of ItemScatterer is going to be in the centre of its box. To get to the left and the back we take off half the box’s size in the X and Z directions respectively. To get to the top of the box, we add half the box’s size in the Y direction.
The pair of loops look like this:
for (float xOffset = 0.0f; xOffset < size.x; xOffset += spacing)
{
    for (float zOffset = 0.0f; zOffset < size.z; zOffset += spacing)
    {
        ....
    }
}
The first loop, or outer loop, takes a variable called xOffset, initially zero, and keeps increasing it by spacing (default of 3) until it’s bigger than size.x. The represents us moving from the left to the right of the ItemScatterer.
The second loop, or inner loop, takes a variable called zOffset, initially zero, and keeps increasing it by spacing (default of 3) until it’s bigger than size.z. The represents us moving from the back to the front of the ItemScatterer.
The other important thing to note is that because the second loop is inside the first, for every step we make in X, we cover all positions in Z. Here’s what this looks like:

The calculation if the current position is relatively straightforward, the offsets in the X and Z directions are our loop variables and already calculate and we’re not changing the value of Y at all:
Vector3 thisPos = start + new Vector3(xOffset, 0.0f, zOffset);
We already have our probability property for us to specify the chances of a location having an item. We compare this to Random.value, which is a random value between 0 and 1. If Random.Value is less than probability, then we’ll place something:
 // Check probability
 if (Random.value < probability)
 {
    // Place an item
 }
We have already placed our rocks and terrain into a layer named “Ground”. We only want to place our items on this layer. We can make sure that we only check this layer by using a LayerMask in our call to Physics.Raycast(). We add a new pubic string property to our class called groundLayerName and give it the default “Ground”:
public string groundLayerName = "Ground";
In our Distribute() function then, at the top before the loops, we can create the LayerMask:
LayerMask lm = LayerMask.GetMask(groundLayerName);
We also need to create a RayCastHit variable. This is somewhere that Physics.RayCast() can fill in details about what it hit. The complete code looks like this:
 // Check for ground
 RaycastHit hit = new RaycastHit();
 if (Physics.Raycast(thisPos, Vector3.down, out hit, size.y, lm))
 {
     Instantiate(item, hit.point, Quaternion.identity, transform);
 }
Physics.Raycast() returns a bool value (either true or false) and the if statement determines whether or not to Instantiate an item depending on whether or not ground was hit. The version of Physics.Raycast() we’re using takes the following inputs:
The Instantiate is very standard, but we’ve also supplied our own transform as the parent transform. This means when the items are created, they are beneath ItemScatterer in the Heirarchy.

For a human to scan a classroom and determine which desk is closest is something we do very quickly and intuitively, but a computer program generally has to take a more methodical approach. We look at each desk in turn and calculate how far away it is from us. If this is the first desk, or it’s closer than the previous desk we thought was the closest, we remember this desk and distance is is from is. We keep doing this until there are no more desks to compare against.
Here’s what the code to do this looks like:
   public Transform player;Q
   public GameObject nearestItem;


    private void FindNearest()
    {
        GameObject foundNearest = null;
        float nearestDist = 0.0f;

        for (int childIndex = 0; childIndex < transform.childCount; childIndex++)
        {
            Transform thisChildTransform = transform.GetChild(childIndex);
            float thisDistToPlayer = (player.position - thisChildTransform.position).magnitude;

            if (foundNearest == null || thisDistToPlayer < nearestDist)
            {
                foundNearest = thisChildTransform.gameObject;
                nearestDist = thisDistToPlayer;
            }
        }

        nearestItem = foundNearest;
    }
We have two new public properties, one to hold the Transform of the player so we can know their position, and the other which will get assigned the nearestItem to the player every time it’s calculated. We call this FindNearest() function from Update() so that it gets run every frame.
Since we Instantiated our items as children of ItemScatterer, we can use transform.childCount and transform.GetChild(n) to know how many children we have and to get each one in turn, respectively.
Subtracting one Vector3 from another Vector3 returns a third Vector3 containing the displacement between them. Getting the magnitude of this returns the actual distance.
Finally our check:
if (foundNearest == null || thisDistToPlayer < nearestDist)
Says if we’ve never assigned a value to foundNearest, which will true the first time, OR (that is what the double-bars || means) the distance we just calculated is smaller than the previously smallest distance we knew about, then make this item the nearest item and remember its distance.
The code for this week’s project is on our GitHub, as always.
This week we started a new game called Gem Search. Here are some of the key design points:
We started first by creating a new project called “Gem Search”, using the 3D core template.
We took two free assets from the Unity Asset store as a basis for our game:
We logged into the Asset Store using the same login we use for Unity, searched for the above assets and on the web page for each one, chose “Add to my assets”.
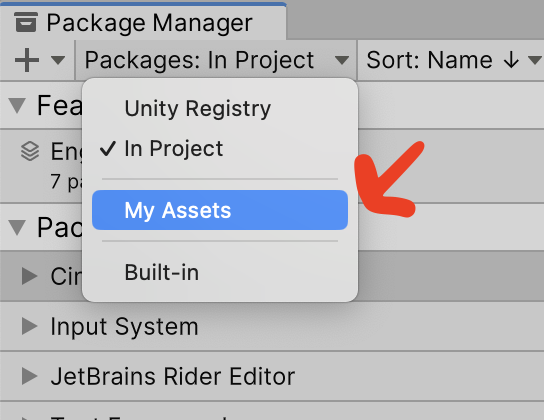
After that, we returned to Unity and opened the Package Manager from the Window menu. In the package manager we changed the option from “Packages: In Project” to “My Assets”.
Our two packages from the Asset Store were then visible. We downloaded and imported them both. For the Starter Assets – First Person Character Controller package, there was an import warning about switching to the new input system, which we accepted.
We then spent a little time examining the assets we’d acquired; both asset packs have demo scenes in them.
We opened the LowPoly Environment Pack\Demo\Demo 3 scene and, after creating a Scenes folder at the top-level of our project, saved a a copy of this scene there as “Main”.
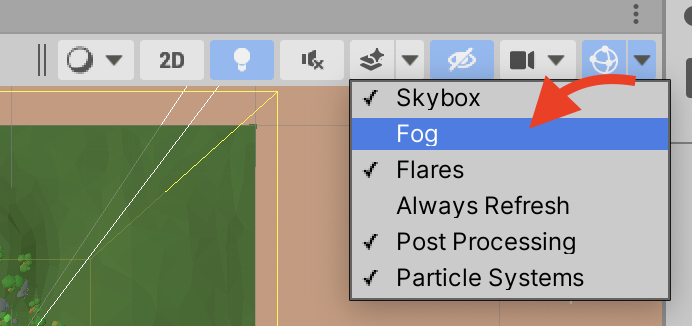
We then did a few adjustments. First we deleted the existing Main Camera. Immediately the fog in the scene was apparent (settings on the camera was suppressing it). We looked at where the fog settings were specified (select Window | Rendering | Lighting and then look on the Environment tab of this panel) and saw how it was causing a problem for the Scene View if we were zoomed out far enough to see the entire scene. We disabled the fog in the Scene View (it will still be visible in the game) from this drop down:
We noted that the entire terrain was offset by -2.6m vertically and rotated by 100% around the vertical. It woulds suit us better if it was square to the world and at (0, 0, 0). The difficulty was the if we moved or rotated the terrain, nothing would move with it and all the trees, bushes, rocks, etc. would end up misplaced. The solution that we followed was as follows:
Now the environment is still organised as before, but everything is neat and square.
The ground isn’t level and we are going to be looking for the height of the ground at any point we want to position a gem using the something called Physics.Raycast(). A ray-cast shoots an invisible ray looking to see if it hits a collider of any sort. We can control many things about this operation including:
All GameObjects start out in the “Default” layer, but it’s often handy to put things in specific layers when we want to be specific about them. This is one of those times. With any GameObject selected, we can add a layer by clicking the Layer drop-down at the upper right of the Inspector and choosing “Add Layer”. We took the first non-assigned Layer and called it “Ground”.

We then filtered the hierarchy to isolate those GameObjects with a MeshCollider by typing “t:MeshCollider” in the box at the top of the hierarchy. This showed that terrain and the rocks were the only ones; this is exactly what we want. We used Shift to select all of them and then changed them to layer “Ground”. We then cleared the box at the top of the Hierarchy to remove the filter.
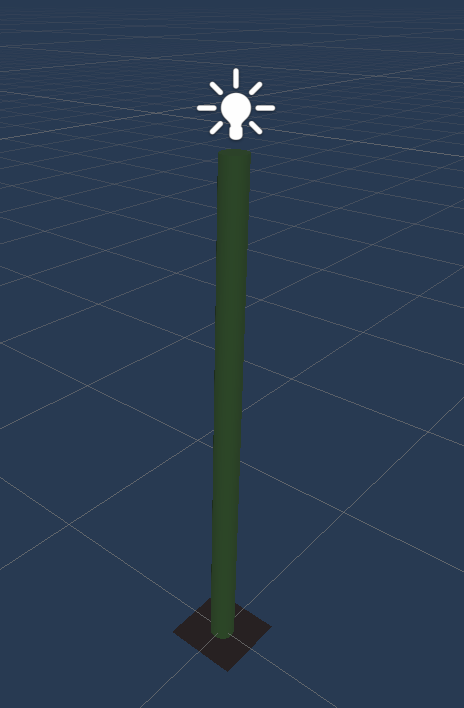
We made a Prefabs folder at the top-level of the project, right-clicked and choose Create | Prefab. We renamed this prefab Lamp Post and combined a plane, a cylinder and a lamp, using some materials that came from the LowPoly Environment Pack, into a simple lamp-like shape 2m tall:
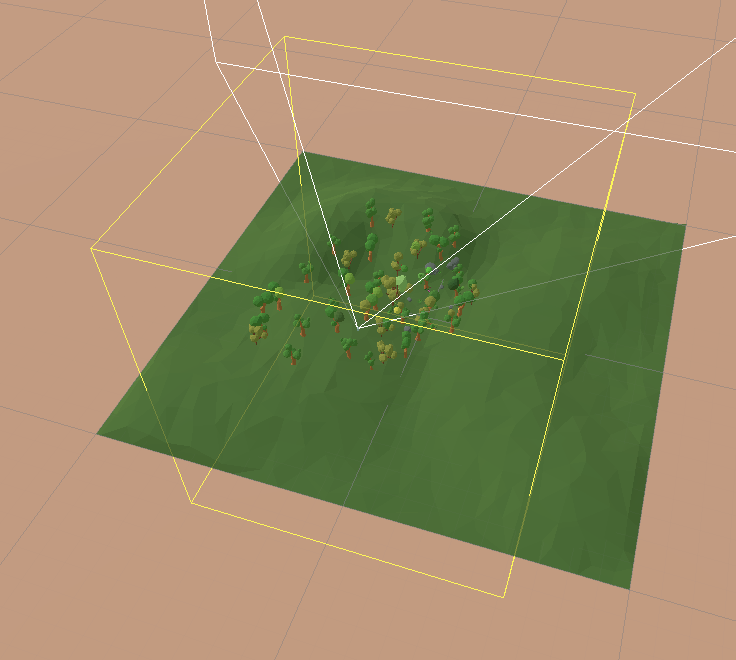
We set out to create something that could scatter gems across our ground surface, comprised of the terrain and the rocks.
We made a scripts folder and created as new C# script there called ItemScatterer.cs.
Editing this we added a single property to start:
public Vector3 size;
This is to represent the size of the area over which we’ll be scattering our gems. It would be nice to be able to see this area. Unity allows you to draw Gizmos which show up in the Scene View (but never in the game). We add the following code:
    private void OnDrawGizmos()
    {
        Gizmos.color = Color.yellow;
        Gizmos.DrawWireCube(transform.position, size);
    }
This is going to draw a yellow wireframe box at the position of the GameObject this component is attached to at the requested size.
We add an empty to our game, and call it “Item Scatterer”. We then attach our latest script to it. Setting the size to something like (150, 150, 150) we can see a large yellow box outlining our area. I move the area slightly to centre it closer to where the most trees are on the environment.
We progressed the scatter code a little, but I’ll cover it fully in next weeks notes.
The code for this week’s project is on our GitHub, as always.

