We are very excited to announce that Brenda and John Romero, who between them have been involved in developing exceptional games such as Doom, Quake, Tom Clancy’s Ghost Recon, and Dungeons & Dragons, will be at CoderDojo Athenry on Saturday 9 April 2016. They will be speaking to us about their extensive experience as leading game developers. They will be joined by their 11-year old son Donovan, who has also started developing games.
Brenda and John have recently moved to Galway from the West Coast USA, and are currently in the process of establishing a game studio, called Romero Games, in Galway. Their brief biographies are below.
Regular attendees at CoderDojo Athenry are welcome to bring a friend if they wish. These talks should be really fascinating for our budding coders and game designers in CoderDojo Athenry, and inspirational for boys and girls alike!
PS: Huge credit to Kieran (lead mentor of the Unity stream) for organising this!
Brenda Romero
Brenda is a game designer, artist, academic, and Fulbright Fellow. She has been in the games industry since the early 1980s. Her credits include such notable games series as Tom Clancy’s Ghost Recon, Wizardary and Dungeons & Dragons. She’s previously sat on board of the International Game Developers Association (IGDA) and chaired several Special Interest Groups (SIGs) including one representing Women in Games.
John Romero
John is best known as the founder of Id software. An exceptional programmer and game designer, he is the inventor of the “deathmatch”. His best known games include such timeless classics as Commander Keen, Wolfenstein 3D, Doom and Quake each of which broke new ground, both in technical and gameplay terms and even spawned new genres.
Additional
John and Brenda are currently in the process of establishing a game studio, called Romero Games, in Galway. Their son Donovan, also visiting us, is writing a game with the help of his Dad and friends and will hopefully be demonstrating it on the day.
It is also possible to do the same thing in Scriptcraft. Here is the code for a dirt to diamonds recipe in Scriptcraft:
Note: write the code in a file called something like “recipe1.js” and put it in the same folder as your other Scriptcraft mod (a sub-folder of scriptcraft – plugins). Note that this is the entire code – it does NOT go inside a function definition.
[code language="javascript"]
// Scriptcraft recipe for dirt to diamonds
var recipes = require('recipes');
var items = require('items');

// Here is the recipe: result from ingredients in a shape.
var dirt2diamond = {result: items.diamondBlock(10),
                    ingredients: {D: items.dirt(1)},
                    shape: [ ' D ',
                             'D D',
                             ' D ' ]};

// add the recipe to  the server
recipes.add(dirt2diamond);
[/code]
The code is reasonably easy to understand, I think. The result is a stack of 10 diamondBlock items, there is a single ingredient which is a dirt block that we indicate with a variable ‘D’, and they are arranged in a diamond shape. I have put in extra line breaks to make the shape clearer, but this is not necessary.
You can have more than one ingredient. Here is another example:
[code language="javascript"]
// A second recipe:
// diamond block made with a diagonal line of 2 dirt , 1 cobblestone, and 2 dirt
var recipe2 = {result: items.diamondBlock(1),
               ingredients: {D: items.dirt(2), C: items.cobblestone(1)},
               shape: [ 'D  ', ' C ', '  D' ]};
// add the recipe to  the server
recipes.add(recipe2);
[/code]
Sorry for the delay in posting, I’ve been very busy over the last couple of weeks.
Up until now we’ve mainly looked at what we can do with the GPIO Pins on the Raspberry Pi but over the last two weeks we looked at how we might make information from our scripts available to the world outside.
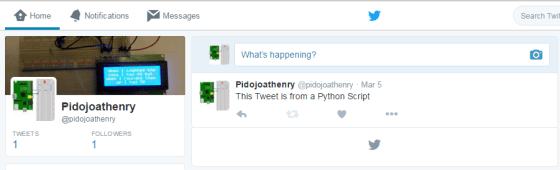
Two weeks ago (Sat 5th Mar.) we looked at how we might use the internet to share data. Although the Pi is capable of running a web server and we could build a few web pages fairly quickly there are easier ways of getting information to the public. We can use Twitter to broadcast information and we can use Email for more targeted sharing.
The tutorials in my notes Email and Twitter will show you how to set up the Email and Twitter modules for Python on the Raspberry Pi and you can see our code here.
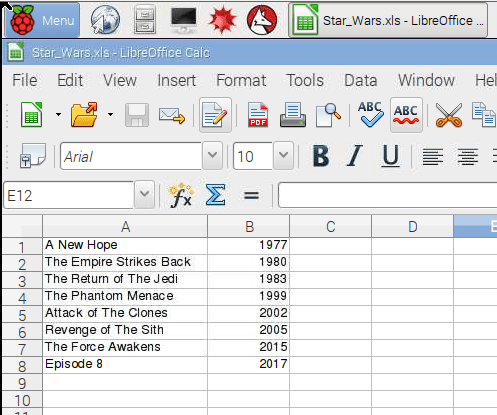
Last Week (Sat 12th Mar.) we learned how to share data using a Spreadsheet. The tutorial in my notes spreadsheets will show you how to install the XLWT(Excel Write) Library for Python and you can use our code here to create the spreadsheet shown below.
Hey folks, we had a quite complicated session this week which discussed a lot of new concepts.
We talked about the difference between perspective cameras and orthogonal cameras. With perspective cameras, as shown in the first image above, things appear smaller the further they are from the camera. With an orthogonal camera, as shown above in the second image, they appear the same size, regardless of how far they are from the camera.
The screen, and by extension, the camera which draws into that screen has an aspect ratio. This is defined as the width divided by the height. For example, a standard 1080p HD screen of has 1920 x 1024 pixels. This is an aspect ratio of 1.875. Our aspect ratio depends on how we’ve sized our game panel.
The camera in the tanks game is an orthogonal camera and the amount it can see is determined by it’s size. Whatever the camera’s size is, twice that distance in world units will be shown vertically by the camera. Our camera’s size is 5 so that means we can see 10 world distance units vertically and (10 x aspect ratio) distance units horizontally.
The code we showed the last day tries to position the camera at the average position between the tanks and size it so that both tanks fit in at the same time.
One unusual thing that it does is to ensure smooth movement of the camera by not jumping it instantly to the place we want it to be, or the size we want it to be, but rather using the Vector3.SmoothDamp() method. This method allows us to specify two vectors, one representing the current value and the second representing value we’d like to get to, and returns a vectors that is someway from the first to the second such that it gives a smooth, as opposed to sudden or jerky, movement:
I’ve completed the health bar, as promised, and we won’t be doing that at Dojo. Just download the up-to-date project file from here, and we will start with it next week.
Remember to be working on your own projects! See you next week.
This week I decided to make a game that gives the user choices. In order to decorate the egg, we give the user a few choices of colours and stickers to put on the Easter Egg and the user must click on the colour and sticker they like. We had to import sprite images from the internet, draw some of our own sprites from scratch and get sprites from the library. In the beginning after the green flag is clicked, I used the SAY block to give instructions that disappeared after 10 seconds.
We found an EGG, CHICK and BUNNY cartoon image on the internet and saved them to an image file on our desktop. I clicked the Add Sprite From File and found these images on my desktop and added them as new SPRITES. I then cleaned up the background of these sprites and made it transparent.
I drew a Spot SPRITE that I moved over on top of my egg to make it look good and I drew a Stripe SPRITE that roughly fell on top of the egg. You can move, shrink and grow each of these sprites so that they look OK on the egg. Now we have to get the BUTTON SPRITES on the side and the PAINT BALL SPRITES on the bottom. I started with one button that I found in the library and imported it. I changed it’s colour and wrote the word SPOTS on it in it’s costume editor using the T button. Here are what my sprites looked like:
The basic idea is that the BUTTON SPRITES (on the side) and the PAINT SPRITES (on the bottom) send a BROADCAST when CLICKED.Here is the script for the SPOTS BUTTON. That’s all there is.
And the STICKER SPRITES (the chick, bunny, spots and stripes) respond to each BUTTON broadcast by SHOWing or HIDEing. As each sticker called that one SHOWS and the others all HIDE. Here, this is the script for the SPOTS SPRITE. See how there is only one SHOW block under the WHEN I RECEIVE SPOTS sprite. This SPOTS SPRITE will only SHOW when the SPOTS BUTTON is clicked and sends out the broadcast SPOTS. When any other sticker button is pressed, it will hide.
The CHICK SPRITE will look exactly like this, except that the SHOW block will be under the WHEN I RECEIVE CHICK block! The PAINT BALL SPRITES do the exact same thing. They send out a broadcast, when clicked, that tells what colour the user picked. The SAY block helps let people know what to do.
The EGG must now react to the broadcast. We need to add a new the EGG SPRITE costume that matches the colour of the paint ball and rename the costume to orange. After I added the new costume, I put the WHEN I RECEIVE orange, CHANGE COSTUME TO ORANGE. The same happens for each other coloured PAINT BALL SPRITE.As you add buttons for other decorations on the egg, create or import the decoration and then script them as we have done above for the SPOTS. My final project is on the SCRATCH.MIT.EDU website. Search for projects for the username:cdathenry1516. I will share it so you can play, change the scripts or downlod it to your own computer. Have fun!
Tanks, and all tracked vehicles, have a very particular way of moving. By turning their tracks on both sides in the same direction, they can move forwards or backwards. By turning their tracks in opposite directions, they can turn around. In our game, we don’t model the tracks explicitly, but we do want our tank to behave in this same way.
Input Manager
In our previous two projects, we didn’t concern ourselves too much with how the keys we pressed caused actions to occur in the game. It mostly “just worked”.
In Roll-A-Ball we used the method Input.GetAxis() with axes called “Horizontal” and “Vertical” and these allowed us to control our player object.
The Input Manager allows control axes to be defined. It can be found under the Edit|Project Settings|Input menu. We can add as many control schemes as we need for our game here.
In the case of Tanks, we need controls for two players so we have Horizontal1, Vertical1 and Fire1 and also then Horizontal2, Vertical2, and Fire2.
When we retrieve the axis values in our code, it will have a value between -1 (full negative) and 1 (full positive). A value of zero indicates no input on this axis. When we’re dealing with keys, the only possible values are (-1, 0, 1) but if we had an alternative controller such as a gamepad, we would have values in-between too.
Calculating How Much to Move
The tank’s vertical axis controls how much to move forwards and backwards. To calculate how much the tank should move in one physics frame and in what direction we use the following code:
Vector3 movement = transform.forward * m_MovementInputValue * m_Speed * Time.deltaTime;
It’s a vector, so it it has direction as well as magnitude. The direction comes from transform.forward – this vector always points in the tank’s forward direction, regardless of how the tank has been turned, and is always 1 unit long. It’s worth noting that there are companion vectors called right and up.
The m_MovementInputValue part is how much the user is currently pressing the keys in the vertical axis. As already discussed, it will be either -1 (full speed backwards), 0 (no movement) or 1 (full speed forwards).
The m_Speed property is a value we’ve set which sets the tanks maximum forwards/backwards speed. We have it set to 12 (distance units per second).
If we multiply all of these three things above together, we get a vector that points from the tank’s current position to the location the tank will be at in one second, if nothing else changes.
This is good, but it isn’t taking into account how often we’re doing our physics calculations (i.e several times a second). Time.deltaTime is the time since the last physics calculation. It will be some fraction of a second. Multiplying by this, we get a vector that points from the tank’s current position to the location the tank will be at after one physics calculation. That is what we want.
Calculating How Much to Turn
Calculating how much to turn is easier. This is the code:
We just tell the Rigidbody to move to a new position. That new position is simply the old position with the movement vector we calculated added on.
Applying the Turn
The turn was easy to calculate, but applying it is a little more complex. It’s not important to understand why it work the way it does, just know that if you’re applying an additional rotation to something that you can’t just “add it on” as we did with the positioning. Here is the code:
To turn the rotation into something we can use, we need to construct a Quaternion. A Quaternion is a special way of storing a rotation. The Quaternion.Euler() method allows us to create a Quaternion from X,Y,Z axis rotations. Here our turn was about the Y axis and the values for the X and Z rotations are simply zero.
Once we have our Quaternion, you might imagine that we add it to the Rigidbody’s existing rotation, but that wouldn’t work. We actually have to multiply it to get the correct new rotation for our Rigidbody.
Changing the Engine Sound
Another thing we spent a good bit of time on was checking to see if the tank was moving and changing the engine sound between an idle and driving sound.
We used the Mathf.Abs() function to get the absolute value of m_MovementInputValue and m_TurnInputValue. The absolute value of something is the value with the negative sign ignored. We compared these to a very small value to determine if the tank was currently stationary, or not.
Once we determined if the tank was stationary or not, we checked the engine sound that was playing. If it wasn’t the one it should be, we swapped in the correct one, taking time to randomly alter the pitch a little so that the two tanks won’t sound identical.
Project Download
The up-to-date files for the project are here. Please download these and we will all start from this point next week!
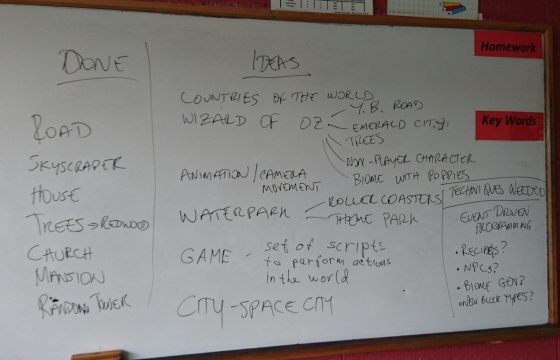
On Saturday, following on from the general information session about Coolest Projects, we started planning a large collaborative mod in the JavaScript/Scriptcraft ModderDojo stream.
We used my favourite planning and design tool – a big whiteboard and a couple of markers.
As the image above shows, we first identified what kinds of things we are already able to make, and we used these as a startpoint for brainstorming some ideas that could build on our capabilities. Finally, we reviewed some of our brainstormed ideas to identify some common threads and in particular some kinds of capabilities we don’t have – things that we will have to learn how to do in future weeks.
For example, we now know that we need to learn about event-driven programming, creating recipes, creating NPCs, creating new block types, and maybe generating biomes. Alex and I will help you to figure out some of these ideas in future weeks.
Since attendance was low, we did not finish the planning and make a final decision about what the theme of our mod is, since we would like more people’s input. But we have made a great start!
Reminder: on Saturday 5 March, there will be no ModderDojo stream as both Alex and I happen to be travelling.
This week we are exploring a new concept of moving across a landscape like some of the treasure hunting type games such as Super Mario Brothers(SMB). Mario moves through a landscape of dangers and treasures looking for Princess Peach. He must avoid turtles and capture coins in order to keep going and not lose lives and start all over! Here are the notes in PDF:CDA-S5-Challenge_12-Scrolling backgrounds.
To understand the concept, you must understand that the STAGE is only 480 pixels wide (x goes from -240 to +240). No one SPRITE can be larger than the STAGE and we won’t be able to see a SPRITE that isn’t on the STAGE (ie. it’s x position is less than -240 or greater than +240). So we have to set up a series of SPRITES that extend past the stage and move them across the stage from left to right and under Mario’s feet to make it look like he is moving over the ground from right to left! Get it? It’s tough, but by the end of next week we will have a cool game!
1. We started by downloading an SMB cartoon character from the internet and saving it as an image file (either .png or .jpg) on our desktop or in our personal folder. We used this file to import a new sprite from FILE from the NEW SPRITE area. We then had to make any white background transparent and shrink Mario down to a reasonable size.
2. Next, we drew our own Ground SPRITE using the PAINT NEW SPRITE button. Important!! The sprite must be the full length of the stage!! See the 1st picture above for an example of what the ground sprite could look like. Mine looked like a brick wall, but yours can look like a stone wall or concrete one or some kind of footpath or road.
3. Now we must code our Ground SPRITE! We need to set it’s inital x position to zero and continuously move it in a direction for as long as we are pushing the right or left arrow buttons. To do this we need a new VARIABLE called XPOS. Go to DATA and create this new VARIABLE. See the image below on the bottom the instructions for setting up the initial position of the first ground SPRITE. After you create and code the first one, we can duplicate Ground SPRITE 1 and create Ground SPRITE 2. Be sure that Ground SPRITE 2 has an xpos set to 480 pixels more than Ground SPRITE 1.
4. Lastly, for this week, we need to get the Ground SPRITES to move!!
!!IMPORTANT! !Click the little i button on your Ground SPRITE and see all the information about the SPRITE. Change the rotational direction of the Ground SPRITE to non-rotational. It is a button that looks like a dot.
We will code the Ground SPRITES to move to the left when we press the left arrow key and to the right when we press the right arrow key on our keyboards. See below: Be careful to program the left arrow key to Point In Direction 90 and the right arrow key to Point In Direction -90. Notice both the Change xpos By commands have different numbers! (-5 and +5) Get these wrong and the SPRITE will not move in the correct direction. Once you have the 1st ground SPRITE working the way you like, duplicate it and all it’s coding. All you have to change in Ground SPRITE 2 is the xpos. It must be set to XPOS +480. If you duplicate that sprite, you must set it’s xpos to XPOS + 960 and so on and so on…
My original project is on theScratch.MIT.edu website. You can log on with your own login name or use our one – CDATHENRY1516 and our password is CDATHENRY and play the game or download it to your computer for next week’s class. Next week will will be coding Mario to jump and to always return to the ground and giving our program a bit of perspective with a mountain in the background. I’ll try adding a coin or two for Mario to jump up and grab! See ye all next week!
Update: This post has been updated with a link to download the project. See the bottom of the post.
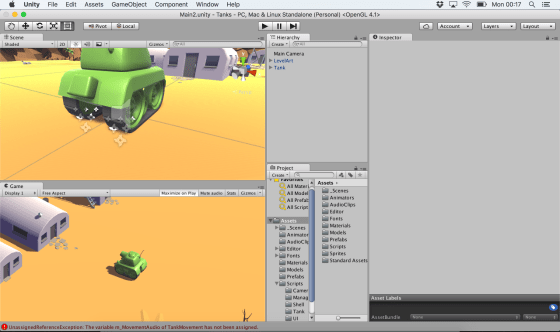
This week we started work on the Unity Tanks tutorial. This is a single-keyboard, two-player, tank game where users can complete in a number rounds against each other.
We began with downloading the tutorial assets from the Unity Assets Store. This tutorial comes with many lovely assets including 3d models and audio clips.
The assets, as downloaded, contained a “Completed” folder. We deleted this first, as it has a second copy of many of the scripts and assets in the project and had the potential to create confusion.
We created a new scene and deleted the default directional light as we wouldn’t be needing it. Then we added the provide “LevelArt” prefab. This prefab contains the entire playing area and also contains a directional light. We discussed the different types of lighting that we can have in a game: ambient, directional, point, and spotlight. The image below shows the same scene lit in each of these four ways, respectively.
We then set our camera to be orthographic. We described the difference between orthographic and perspective cameras. With perspective cameras, the space the camera sees in front of it is shaped like a pyramid and things that are further away look smaller (as in real life). With an orthographic camera, the space the camera sees in front of it is box-shaped and things do not get smaller the further away they get. For some game types, the less realistic orthographic camera is a good stylistic choice. We also removed the standard skybox and just changed the background to a solid colour, again a good stylistic choice for this game.
We then started to build our tank. The 3d model was pre-supplied, so we added it to the hierarchy. We then added a rigidbody, a box collider and two audio sources for the playback of sounds. We were able to add constraints on the rigidbody to prevent the tank from ever moving vertically, or from rolling or pitching. Applying these constraints both prevents unwanted movements and makes the physics engine’s job much easier.
Finally, we added two dust trail particle effects to the tracks of the tank. These were also pre-supplied as assets for the project.
We had just started to look at tank movement and that’s where we’ll pick it up again next week. The project can be downloaded here.
Remember that you should now be starting to plan and work on your own projects for the end of the year. Best of luck and we’re here to help in any way we can!
Hi everyone,
We completed our Mario game this week. We coded Mario so that he always floated down on to the wall. We added a fraction of a second of a wait so that it appears that he floats as he comes down. This also allows time for you to navigate left or right as needed.
We also introduced a more advanced concept, the Parallax effect, whereby objects further away appear to move slower than objects nearer. We coded mountains and a Sun to demonstrate this.


