Code for this weeks session
Creators – Week 3
This week we continued our project from last week, looked at three main topics:
- Frame rate independence
- Creating our own properties on our components
- The Input Manager and getting and using user input
Frame Rate Independence
We covered how to make our actions independent of frame-rate. The code:
transform.Translate(Vector3.forward, 20.0f);
moves the object 20m in every frame. As we know, frame-rate isn’t generally consistent between machines. On my powerful laptop, I was getting up to 1400 frames per second at fastest. Most ninjas were getting a few hundred frames per second on theirs.
On the other hand, the code here:
transform.Translate(Vector3.forward, Time.deltaTime * 20.0f);
moves the object at a consistent 20m per second on everyone’s machine. The magic is that Time.deltaTime variable. It is the time, in seconds, since the last frame was drawn. The faster the frame-rate, the smaller this number gets and the result is a consistent 20m per second movement.
Creating Properties on our Components
We can add properties, variables where we can hold and values that we can then use, to our classes by typing a single line into our class definition:
class MyBehaviour : MonoBehaviour
{
  // The new property
  public float myProperty = 1.0f;

  void Start()
  {
  }
  void Update()
  {
  }
}
Looking at the bits of the line in turn:
- public – The access modifier. Can be private, internal (which we won’t use) or public. If it’s public we can see it in the inspector, and from other classes. If private we can only see and use it within the class itself.
- float – The type of value we are storing. A float is a number with a decimal point. An int (short for integer) is a number without one. We might use an int for counting things, but we use floats for real world measures like speeds and positions, etc.
- myProperty – the name of the variable
- = 1.0f – Assigning a default value to this property. This portion is optional. the ‘f’ after the number is just a hint to the computer that this is a float value.
- ; – The standard semicolon to end the line of code.
The Input Manager and Using User Input
Unity’s Input Manager contains the definition of input “Axes”. These can contain many ways of doing the same thing.

The default definition of the “Horizontal” axis means it can be triggered by the keys A and D, or the Left and Right arrow keys or by the joysticks or d-pad on a game controller.
This means input is “abstracted”; we can write our script to respond to input, without worrying how that input is generated.
To get the value of input on an access we need to use code like this:
forwardInput = Input.GetAxis("Vertical");
Here we’re getting the value of the axis called “Vertical” and storing it in a variables called forwardInput.
The value of the vertical axis goes between -1 and 1. Minus one means fully down, zero means no input and one means fully up. Because of this range, we can use this value like a switch, multiply it with other numbers. When there’s no input, it’s zero which will zero out the expression it’s part of.
Here’s the fully updated code for our PlayerController.cs:
using System.Collections;
using System.Collections.Generic;
using UnityEngine;

public class PlayerController : MonoBehaviour
{
    public float speed = 20.0f;
    public float turnSpeed = 50.0f;
    private float horizontalInput;
    private float forwardInput;

    // Start is called before the first frame update
    void Start()
    {

    }

    // Update is called once per frame
    void Update()
    {
        // Get the player input
        horizontalInput = Input.GetAxis("Horizontal");
        forwardInput = Input.GetAxis("Vertical");

        //  Move our vehicle forward
        transform.Translate(Vector3.forward * Time.deltaTime *
                            speed * forwardInput);

        // Rotate our vehicle
        transform.Rotate(Vector3.up, turnSpeed * Time.deltaTime *
                         horizontalInput);
    }
}
Code for this Week
Updated code is on our GitHub repo: https://github.com/coderdojoathenry/Creators-2022
Explorers Week 3
Code for todays session
Creators – Week 2
Hi folks, this week we started our first project. We have a truck that can drive down a road, avoiding obstacles, or maybe not!
We created a new project in Unity, using the default 3D Core template, and called it Prototype 1.
We then downloaded and imported the assetpack from here: [Creators Teams Channel]
The asset pack already included an existing scene, which had a simple environment already. We them dragged in a vehicle and obstacle from the imported assets. Imported assets aren’t just models; they can contain Unity obstacles, such as colliders, already.

To make the truck move, we made a new C# script called PlayerController. The new C# files Unity creates always look the same (apart from the name of the Class, which matches the new file name):

We added the following code to the Update() method to change the transform of the vehicle:
    // Update is called once per frame
    void Update()
    {
        //  Move our vehicle forward
        transform.Translate(0, 0, 1);
    }
The Unity scripting documentation can be found:
https://docs.unity3d.com/ScriptReference/index.html
and the specific page for the Transform component is:
https://docs.unity3d.com/ScriptReference/Transform.html.
This method on the Transform component that we’re calling, Translate() has several forms. The one we’re using here expects us to provide X, Y, Z values. What we’re saying we want to happen is “Change the transform by moving it 1m in Z every frame.
When we run, the car moves very fast off the end of the road. That’s because we’re running at many frames a second. It’s too fast. Next week, we’ll look at making this frame rate independent and controlling the speed.
Finally, I’ve created a GitHub repo for our projects this year. Up-to-date versions of our projects will always be available here after our sessions: https://github.com/coderdojoathenry/Creators-2022
Creator – Errors Opening a Brand New Project
Hi Folks, there were some people who had a problem even opening a brand new project in Unity today.

Here are instructions for clearing the package cache. Once done, Unity should re-download what it needs automatically.
Instructions on clearing package cache [Reddit]
Hopefully this corrects the issue.
Bodgers – Getting started with Python
Hi Everyone
It was great to get back again with a full year to look forward to and it was also great to see so many people interested in getting involved with CoderDojo Athenry.
In the Bodgers group we got off to a great start, we installed the Mu Python editor, and we wrote our first few programs.

The Mu editor can be downloaded from here: https://codewith.mu/.
You can find our code from last Saturday on the last couple of slides from this week’s notes here: Bodgers Day 1
We also decided we’re going to do a few small projects between now and Halloween and then start on a bigger project after that.
Next week we are going to make a Space Invaders style game, you can find some images for it here: https://www.dropbox.com/home/Bodgers/Space%20invader/Images.
Looking forward to seeing you all next week.
Declan
Creators 2022/2023 – Resources
Here are links to a few resources we’re going to need this year:
You are going to need an email address so you can register for Unity and Microsoft.
Unity:
https://unity3d.com/get-unity/download
Install Unity Hub. Create a Personal account. Install the latest standard version of Unity version 2021.3. Include Visual Studio.
Click on the link. Log-in to your Microsoft account, or create one if necessary.
CoderDojo Athenry Returns on 01 October 2022!

CoderDojo Athenry is returning with our weekly sessions in Clarin College starting Saturday 01 October 2022.
Our sessions will take place between 2:00pm and 4:00pm.
We will run five groups this year Explorers, Advancers, Bodgers, Creators and Hackers.
There is more information about the groups, our location and everything else on our About page.
New members are always welcome. If you are aged between 7 and 17, just come along on the first day and fill out a registration form. Young people aged 12 and under have to be accompanied by a parent/guardian for the whole session.
And don’t forget, CoderDojo Athenry is run by volunteers and is completely free for participants — no membership fees, no weekly contributions.
You should bring a laptop if you have one, but we have some loaner laptops if you don’t.
Explorers

No code for this weeks session, as we will be having a party!!
We will supply food, but please BRING YOUR OWN DRINKS.
As each family has there own policy on fizzy drinks, sugar, caffeine etc it is best if everyone brings their own.
See you all Saturday.
Modellers – Weeks 5 & 6
We completed our dioramas with materials and lights and rendered the final images. Some people chose their own colours and some used a palette generator (see: https://coolors.co/bf4e30-c6ccb2-093824-e5eafa-78fecf) to choose a complimentary set of colours to provide a harmonious look for our scene.
We used the Cycles rendered and turned on the denoising options, which automatically remove any graininess from the resulting render, to give us a high-quality output in a reasonable timeframe.

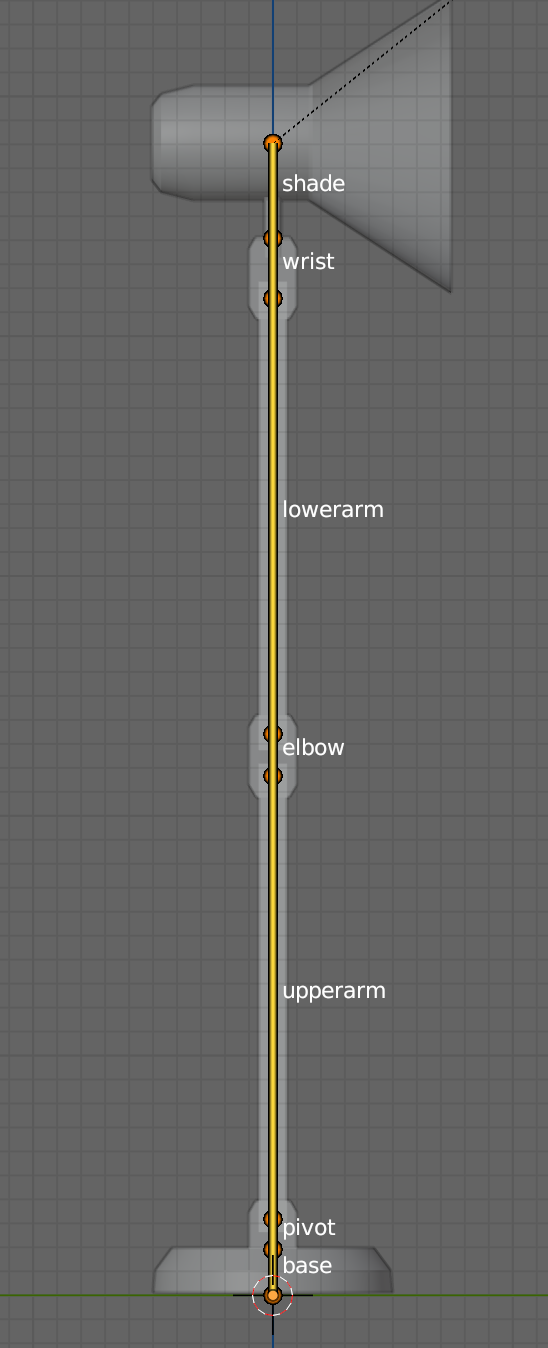
We then built a simple model of an articulated desk lamp. Built as a single mesh and composed of simple primitive objects, all starting as cylinders or cubes, we developed it initially in a completely linear vertical configuration.

We then created vertex groups for each distinct portion of the lamp and assigned those parts of the lamp to those vertex groups. From the bottom up, these groups were:
- base
- pivot
- upperarm
- elbow
- lowerarm
- wrist
- shade
We then added a spot light to represent the lamp’s bulb.
Next we generated a new armature. In edit mode, we scaled the initial bone until it was just the size of the base vertically and called it base, the name matching that of the vertex group in the lamp model. We then extruded the tip of this bone vertically to the centre of the first hinge pin in the model. This bone was named pivot again matching the name of the corresponding vertex group. We repeated this until there was a bone, named for the corresponding vertex group, across each section of the model.
We then returned to edit mode and, selecting first the armature and then shift-selecting the model, we used Parent | Armature Deform from the object menu to associated them together. The mesh became a child of the armature. Selecting the armature and changing to Pose mode, we were able to see how rotating the bones allowed us to move the model in a simple and non-destructive way.
We then wanted to move the light with the armature as well, as it currently remained in space where we’d located it originally. To do this we selected the spotlight object and added an object constraint tying it to the the shade bone in the armature, as shown below. This moved the light, so we needed to reposition and rotate it again to get it in the correct location.

The final step was adding an inverse kinematic control bone into the rig. Moving an inverse kinematic (IK) bone automatically moves all connected bones to try to follow the movement of the control bone. In the armature, in edit mode, we added a single bone and located it near the rim of the lamp shade. We called it “control” and, selecting it and then the shade bone, used Armature | Parent | Make | Keep Offset to join them.
We then switched to pose mode. Once in pose mode, we could add an IK constraint to the control bone as shown below. All defaults here are fine in this case.

Then we saw that moving this bone in Pose mode caused the rest of the lamp to follow, however some parts of the lamp were moving in ways we didn’t want. The final step was to place some IK limits on certain bones in the Bone Properties Panel. For the base we locked x, y and z because we didn’t want it to rotate at all:

For pivot and shade, we locked then in x and z, this will allow them to turn around their own axis but not bend over. For all the others we locked them in y and z allowing them to bend over corresponding to the way they were pinned in the model.
Files for these final models can be found on our Sharepoint site.

