This week, in a fun and pretty free-form session, we looked at the Unity standard assets packs to get an appreciations of the wealth of valuable content they contain.
We looked first at the Characters asset pack and tried the first-person, third-person and car controllers.
We also used the Prototyping pack to place some basic house shapes and other basic level layout in our scene.
Finally we played around with some of the effects in the Particles pack to see what was available there.
Next week we will continue with another a session in a similar vein and explore the Environment assets pack and the creation of terrains to model exterior spaces.
All ninjas are encouraged this week to play around with the standard assets, time permitting, and we may look next week at anything you’ve managed to create.
This week, despite a small group, we finished off the Pin Bowling game. After Christmas we’ll move onto a different game – most likely something 1st person in design.
UI Elements – Text and Buttons
We added two UI Text elements to our game and aligned them to the top left and top right hand corners respectively. One is used for showing the current score and one is used for showing the number of shots remaining. Note that when we add UI elements, Unity automatically adds a Canvas and an EventSystem for us.
UI elements don’t have a standard Transform component, instead they have a RectTransform component which is used to describe their position within their Canvas. To align to a particular location we click on the square below the words “Rect Transform” and select how we’d like to align within the Canvas by clicking one of the options while holding the Shift and Alt keys to set both the pivot and position.
This week we finished off texturing our bowling pin model in Blender and then imported it into Unity to use in our game.
UV Unwrap
We started by loading our existing bowling pin model with seams already marked.
The process of unwrapping a 3D model is similar to peeling an orange and pressing the skin flat. The seams we marked are like cuts in the orange’s skin. When we peel it, the pieces between the seams come out separated.
To unpeel the model we entered Edit Mode (TAB key), selected the entire model (A key) and chose UV Unwrap | Unwrap from the Mesh menu. Notice that we don’t see impact of this until we switch to the UV/Image Editor
Switching to UV/Image Editor
Our main panel is normally in 3D View mode. To start working with our texture we click on the icon to the left of the menu options and choose “UV/Image Editor”.
When we change mode we see a flat image with our model split apart and spread out into flat sections. Each of these sections represents a part of our model between a set of seams.
This week we worked on random pin placement for our game. We updated the existing PinManager component to randomly (as opposed to regularly) place a number of pins into the scene.
Arrays
An array is a way for a variable to hold more than one value. It’s a a very useful concept in programming; complex programs would be practically impossible without them. In C# arrays are declared as follows:
The first line creates a one-dimensional array called nums which has four entries: nums[0], nums[1], nums[2] and nums[3].
The second line creates a two-dimensional array called grid. Note the size in this case depends on the values of the variables rows and cols. The first entry is grid[0,0] and the last is grid[rows – 1, cols – 1]. The total number of locations in this array is rows * cols.
This week we worked on getting input from the user and making the game react to it.
InputManager
Unity has a build in system for handling user input. The InputManager can be found under the Edit|Project Settings|Input menu:
The Unity input system is based on the concept of “axes”. The game request if there is input on a specific axis, giving the axis name. What that means in terms of button presses, mouse or controller input depends on the settings in the InputManager. Axes have a value that ranges from -1.0f (full negative, if negative values are allowed) through 0.0f (no input) to 1.0f (full positive).
Pre-defined Input Axes
While the game programmer can define as many input axes themselves as they like, Unity come with many common ones built-in. The first two shown above, called “Horizontal” and “Vertical” are commonly used for movement. The third “Fire1” is usually used for shooting.
We redefined “Fire1” from it’s default key (Left Ctrl) to bind it to the space key instead.
Updating the Code to Detect “Fire1”
We originally had a force applied to our ball in the “PushSphere” script as soon as the game started. We modified the code so that in the Start() method all we did was to retrieve and store the Rigidbody component. In the Update() method (called every time the game draws) we ask if there’s been any input on “Fire1” and only if there has, do we apply a force to the ball:
using UnityEngine;using System.Collections;publicclassPushSphere:MonoBehaviour{publicfloatPushStrength=1.0f;privateRigidbodyrb;//Usethisfor initializationvoidStart(){rb=GetComponent<Rigidbody>();}//Updateiscalledonceper framevoidUpdate(){floatfire=Input.GetAxis("Fire1");if(fire>0.0f){rb.AddForce(Vector3.back*PushStrength);}}}
Before proceeding, we ran our game and tested to ensure it was working correctly.
Moving Our Aimer
The aimer was rotated using input from the horizontal axis. We added a script called AimerController to our Aimer game object. A public property called RotateSpeed gives us a way to tune the speed our our aimer. We don’t need anything in the Start() method, and it’s been removed here for clarity. The Update() method looks for input on the “Horizontal” axis (which maps to the left and right keys) and applies a rotation to the Aimer’s transform using the following logic:
amount to rotate = speed of rotation * user input * time
User input here will either be -1.0f, 0.0f or 0.0f. This equates to rotate in a negative direction (anti-clockwise), don’t rotate or rotate in a positive direction (clockwise).
using UnityEngine;using System.Collections;publicclassAimerController:MonoBehaviour{publicfloatRotateSpeed=1.0f;//UpdateiscalledonceperframevoidUpdate(){floathoriz=Input.GetAxis("Horizontal");transform.RotateAround(transform.position,Vector3.up,RotateSpeed*horiz*Time.deltaTime);}}
Note that we’re rotating about the vertical axis and the rotation is centred around the aimer’s position.
Linking the Aimer and the Sphere’s Direction of Fire
To link the aimer’s with the sphere’s direction of fire, we needed to provide the sphere with a new public property which could store a reference to the Aimer’s game object:
publicGameObjectAimer;
We then simply had to update the AddForce call, in the Update() method, to take the aimer’s direction into account:
Note that we had to also multiply by -1.0f as the ball was initially going opposite to the direction we wanted.
Prefabs
Prefabs are objects, or collections of objects that we want to re-use multiple times. To create a prefab, all we need to do is to drag an object from the Hierarchy to a project folder. We made a prefab of our pin by doing this. Note that prefabs show up blue in the hierarchy to mark them out. When the prefab is changed, all copies of it in the hierarchy are updated as well.
Automatic Creation of Game Objects at Run-Time
Once we created our pin prefab, we worked on adding pins automatically into the game a run-time.
We added a new empty game object and named it PinManager, we then added a component to it of the same name. This script was given a public property, of type GameObject, to store a reference to the prefab. In the Start() method, we use two loops to place nine pins automatically into the scene, using the Instantiate() method:
using UnityEngine;using System.Collections;publicclassPinManager:MonoBehaviour{publicGameObjectPinPrefab;//Usethisfor initializationvoidStart(){for(intx=-1;x<=1;x++){for(intz=-2;z<=0;z++){Vector3pos=newVector3(x*2,0.5f,z*2);Instantiate(PinPrefab,pos,Quaternion.identity);}}}}
Note that there are several versions of the Instantiate() method. The version we’re using allows us to specify the position and rotation of the newly created object. A Quaternion is variable type that can store a rotation. Quaternion.identity simply means “no rotation”.
Testing
Project File
The latest project files can be downloaded from here.
This week we started our first game in earnest. Let’s talk about the design and the steps we took to begin implementing it.
Game Design
The game involves a simple play area with pins. The players tries to knock down the pins by controlling the direction and force at which the ball is projected. The number of pins knocked constitutes the score. The game shares element of classic games such as pinball, bowling and skittles, to name a few.
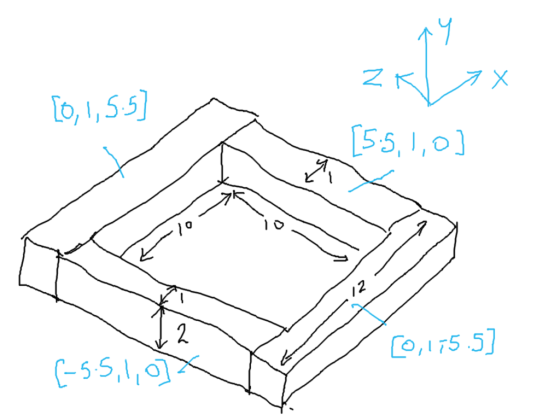
Setting up the play area
To establish the play area, we used a plane (for the ground) and four cubes stretched to size to provide the walls:
Because we don’t want gaps in our walls, we’ve been careful to be precise with the positions of everything.
Applying a Force to our Sphere
We added a sphere to our scene and made sure that it had a RigidBody body component. The RigidBody component makes it so that the physic engine takes care of the movement of the sphere.
To test adding a force to the sphere we added a temporary script to the sphere and had it add a force to the RigidBody as soon as the game starts.
Immediately it was clear that the force was too weak, so we added a property to the script which allowed us to scale the force. In testing 1000 proved to be a good value. Here is the script:
using UnityEngine;using System.Collections;publicclassPushSphere:MonoBehaviour{publicfloatPushStrength=1.0f;//Usethisfor initializationvoidStart(){Rigidbodyrb;rb=GetComponent<Rigidbody>();rb.AddForce(Vector3.back*PushStrength);}//Updateiscalledonceper framevoidUpdate(){}}
We also experimented with creating a physic material and assigning it to the sphere. Different levels of friction and bounciness give different behaviours.
Testing With a Single Pin
To test the sphere colliding with a pin we added a single cylinder to the scene. Like the sphere, we made sure it had a RigidBody component attached to it. When the game started the ball shot forward and knocked the pin, as we’d hoped.
Aimer
To aim our sphere and control the strength of our shot, we created an aimer. The aimer is composed of an empty object containing two cylinders, one pointing forwards and one pointing crossways.
We didn’t want the aimer cylinders interacting with anything so we made sure to remove the colliders from the cylinders.
We also wanted the aimer to be partially transparent so we created a new material, setting the Rendering Mode to “Transparent”, choosing a colour from the Albedo colour picker and setting the Alpha value to a value less than 255.
Project
Updated project files for this week’s project can be found here. This requires Unity Version 5.4.1f1 or later.
We’ve been busy the last two weeks covering the basics of Unity. Among the topics we’ve touched on are:
Customising the Unity layout
Explaining what the main Unity windows (Scene, Game, Hierarchy, Project and Inspector) are each for
Talked about 3D space and vectors and talked about the difference between local and global axes (child objects)
Shown how to place objects in the scene and how to position, rotate and scale them
Shown how to “fly” around the scene view
Explained how the physics engine works (Physics clock monitoring and moving rigidbodies and tracking collisions and other interactions)
Built a simple physics-based scene which had a ball fall, hit a ramp and roll into a bunch of stacked block
Wrote a script to have the camera follow the ball as it moves
Additionally Mike kindly filled in and talked about the basics of object oriented programming, classes and class diagrams. There is a post from last year that covers this well for those who’d like to read it.
Additionally, the basics of the C# language that we discussed are covered in both that post which we have already linked to above and another which can be found here. The topics we touched on were:
Curly braces as “containers” and the requirement that they occur in pairs.
How semicolons (;) mark the end of statements
Using directives and namespaces.
A basic class declaration
Properties, both public and private
Methods, both public and private
How Unity automatically calls certain methods at certain times, and some specific examples of this:
Start() called when we start the game
Update() called every time the scene is drawn
The up-to-date project file can be found here. Please note it will require Unity 4.5.1 or later.
This week we had a short session because of the fantastic demonstration that Colmac Robotics were kind enough to give us.
Following feedback from a few ninjas and ninja parents, I decided to do an impromptu session on the C# language. I had hoped that we’d perhaps just try to pick this up as we went along, learning through practical examples, but it was clear that the transition from visual languages to code-based languages was tough for some.
We used MonoDevelop to create a simple test application. Originally I had intended to use Visual Studio, but some people have had installation problems with it. I encourage everyone to re-install Unity at home when they have time, so that we can all standardise on Visual Studio in the near future.
Concept of Classes and Basic Structure of A C# File
I ran over these topics quickly again, but they were covered in last week’s post. Please do review it if you didn’t get a chance to read it before. It can be found here.
Simple Test Application
In our test application, apart from reinforcing the basic concepts mentioned above, we also touched on number of other concepts:
We looked how the class definitions in our files are blueprints for how the class is structured and operates. We never actually have a copy, more commonly known as an instance, of that class until we actually create one ourselves with the new keyword.
We discussed class constructors, the special method, with the same name as the class itself, that is called when we make an instance of that class.
We saw how Console.WriteLine() can output text to the Windows console.
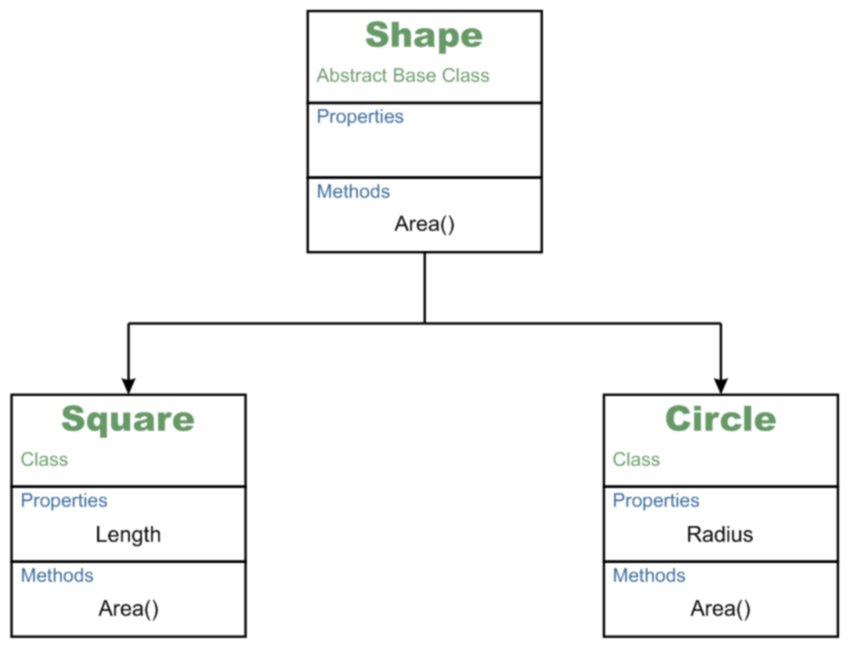
We created a class called Shape. We said it was abstract; which meant that we would never be making an instance of the Shape class itself. We would purely be using it as a base for other classes.
We said that Shape had a public method called Area(). We made its return type double, but we also marked it as abstract and provided no body for the method. This meant that we were saying all classes based on Shape would have to provide their own version of Area(), but that Shape itself had no definition for it.
We defined a class called Circle. We made it so that it was derived from Shape.
We gave it a property called Radius of type double and marked it public.
We used the override keyword to make our own Circle specific version of Area(); “override” meaning that we were over-riding or replacing the method definition from the base class (Shape).
We provided a means to set the Radius property through an optional argument to the constructor method Circle().
We defined a class called Square. We made it so that it was derived from Shape.
We gave it a property called Length of type double and marked it public.
We used the override keyword to make our own Square specific version of Area(); “override” meaning that we were over-riding or replacing the method definition from the base class (Shape).
We provided a means to set the Length property through an optional argument to the constructor method Length().
When writing our Circle.Area() and Square.Area() methods, we saw how the built-in Math object has lots of useful mathematical properties and methods. We used the property Math.PI and the method Math.Pow() (to raise a number to a given power) to perform our area calculations.
In the end we had a small sample program that could defined instances of circles and squares, calculate their areas and output the results to the console window (command prompt window).
On-line Resources for Learning C#
If you want to brush up on your C# skills, outside of our CoderDojo sessions, there are a number of useful on-line resources:
LearnCS.org: An on-line tutorial for C# which lets you build and test code right in a browser window
tutorialspoint.com: Another on-line tutorial for C# which also lets you build and test code right in a browser window
msdn.microsoft.com: Microsoft’s vast library of C# related resources including tutorials
Next Week
Next week, we’ll be taking a few minutes to close off this sample application, so that we can quickly illustrate a few outstanding points, and then return to roll-a-ball to, hopefully, close it out. See you next week!