This week we worked on our gem detector. We want a signal that behaves like this:
- The signal strength should increase dramatically as we’re closer to a gem
- The signal should be strongest when we’re pointing directly at a gem
- The signal should be zero when the gem is behind us
Setting Up a Test Scene
To develop the sensor, we created a new test scene. It consists of a flat plane, a tall and narrow cube to represent our target (signal source) and the prefab containing the first person character controller.

We also added a new script ProximitySensor.cs to our Scripts folder and attached it to an empty object in our new scene as “Proximity Sensor”.
Adding UI Elements to the Scene
We added a few Text – TextMeshPro objects to our scene. Adding the first one automatically added a Canvas object as well. In the scene view. the UI elements look enormous, but in the game view, they just overlay the game image.
Calculating Distance
All of our positions in Unity are stored as Vector3 objects. If you subtract one Vector3 from another the result is also a Vector3 that contains the differences between the two positions. Unity can give us the length of this (or any) Vector3 through it’s magnitude property. The code below shows this calculation and us setting the value of the UI Text element so we can see it:
float distance = (Player.position - Target.position).magnitude;
DistanceTxt.text = "Distance: " + distance.ToString();
Calculating Base Signal Strength
We want a scheme were by the signal falls off quickly with distance. We start with a nominal strongest signal value of 100. If we divide this by distance it falls off, but not that strongly, as shown in the blue line below. If instead we divide it by distance squared (meaning the distance multiplied by itself) the impact of distance is much more dramatic and the value falls off to a small value much more quickly. This is the red line.
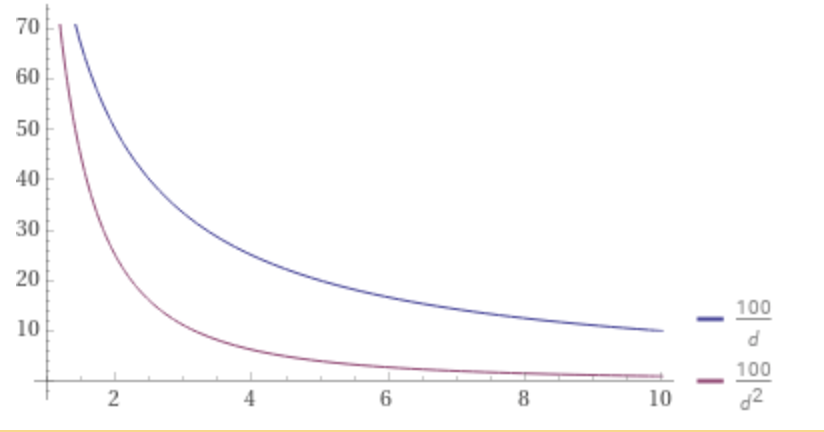
The problem with this scheme is that once distance goes less than 1, the resulting value is greater than 100 and when we get to zero, the value hits infinity (anything divided by zero is infinity).
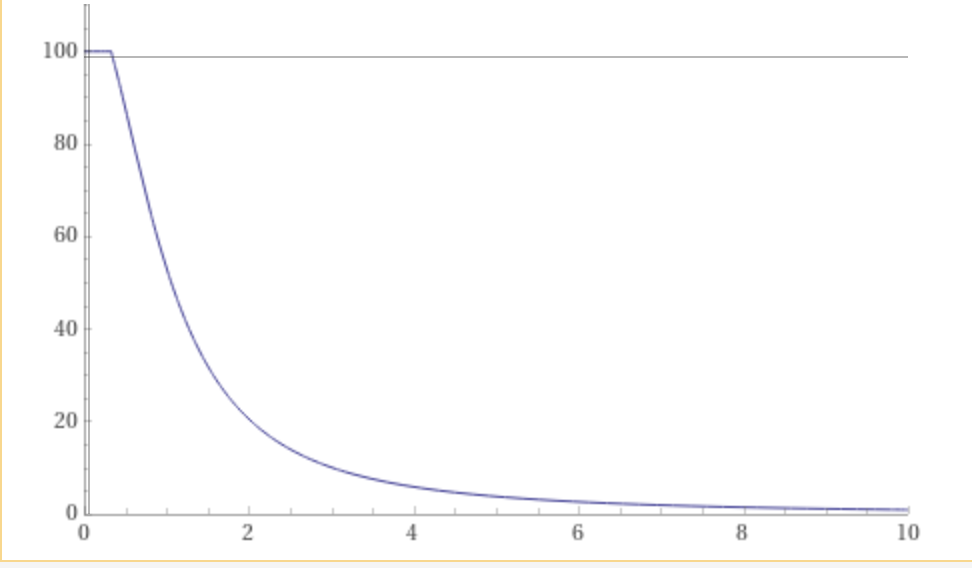
We can simply solve this infinity problem by adding one to d2. This means that the smallest value it can have is 1, not zero and the highest value the signal strength can get to is 100.

This seems perfect, but actually in testing its clear we can never practically get to zero distance, so we never get to full signal strength. The final modification is not to add one to d2 but to add something a bit smaller. We’re going to use 0.9. Now the signal strength will go as high as 100/0.9 = 111.11 so we just use logic that says if it’s greater than 100, then make it 100. Here’s what that looks like (noting the flat section at the start):
Here’s what the code matching this looks like:
float signalStrength = MaxSignalStrength / ((distance * distance) + 0.9f);
signalStrength = Mathf.Min(signalStrength, MaxSignalStrength);
SignalStrengthTxt.text = "Signal Strength: " + signalStrength.ToString();
Unit Vectors/Normalised
A Vector3 that has a length of one is called a “unit vector”. Vector3.normalised gives us back a version of that Vector3 that points in the same direction as the original by always has a length of one.
Pointing In The Same Direction
If we have two Vector3s that have a length of one, we can use the Vector3.Dot() function to determine to what degree they’re pointing in the same direction. Vector3.Dot() also called a Dot Product. When we pass Vector3.Dot() two unit vectors it will return a value between -1 and 1. If the two vectors are pointing in the exact same direction, it will be 1 and if they’re pointing in opposite directions it will be -1. If it’s zero it means that they are perpendicular to each other and don’t point in the same direction at all. Any positive value in-between means they’re pointing in the same direction somewhat.
We can work out the Vector3 from the Player to the Target and the Player’s Forward vector and compare them using Vector3.Dot(). We will make it so that all negative values go to zero. The resulting value is one that gets close to 1 when the player is pointing directly at the target. Here’s the code:
Vector3 playerToTarget = (Target.position - Player.position).normalized;
float pointingTowards = Vector3.Dot(playerToTarget, Player.forward);
pointingTowards = Mathf.Max(pointingTowards, 0.0f);
Combining Distance and Direction
To combine these calculations, we just multiply them. Now we have a measure that reacts to both distance and direction. Here’s that code:
float adjustedSignalStrength = signalStrength * pointingTowards;
Code Download
The code for this week’s project is on our GitHub, as always.