Last week, two of our members from the Hackers group were at the BT Young Scientist & Technology Exhibition, where they presented their projects. Luke, who goes to Clarin College in Athenry, presented a project called “Relax and Reward”, … Continue reading →
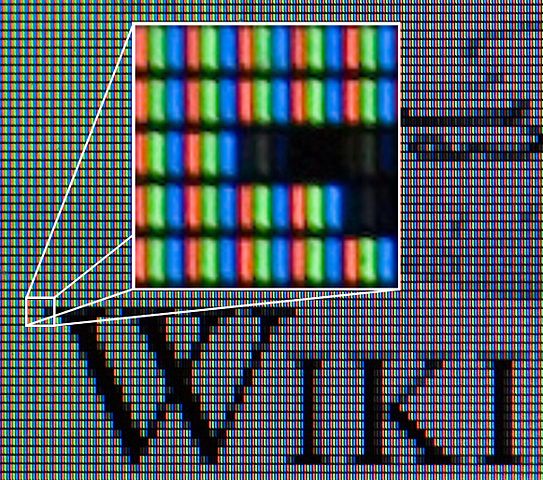
This week we looked at pixels. Your screen is made up of thousands of them; the picture on it is created by setting each one to the correct colour. We may ask P5 for an ellipse(), but ultimately some piece of code is deciding which pixels to change to the currently selected fill() colour (for the centre) and which to set to the currently selected stroke() colour (for the edges).
Working with Pixels in P5
P5 contains two main functions for working with pixels. The first is loadPixels(). By default it reads all the pixels from the canvas and copies the information into a huge array (or list) called pixels[].
If we then make a change to pixels[], all we have to do is call updatePixels() to copy this information back to the canvas again.
Sound easy? It almost is, but the content of pixels[] isn’t immediately obvious.
Structure of the pixels[] Array
The pixel[] array is one long list of numbers. It is arranged such all the information for the first row on the canvas is first, followed by the information for the second and so on until the bottom of the canvas.
For each pixel there are four numbers representing the red (R), green (G), blue (B) and alpha/transparency (A) value of the pixel. By the time the pixel has reached the screen, alpha has no more meaning, so we will ignore it and concentrate on the RGB values.
This diagram represents what we’ve been talking about:
Getting and Setting a Pixel
To make it easy to get and change the value of a specific pixel we can write two functions:
getPixel(x, y) which returns an array containing [r, g, b] values
setPixel(x, y, colour) where colour is an array containing [r, g, b] values
Both these functions rely on knowing where in pixels[] the data for the pixel at (x, y) is.
We wrote three filters, all very similar. Each used loops to go over each pixel in turn, retrieve the current colour, change it in some way and set it back.
The first was fade(amount) which took a number between 0 -> 1 for amount. It multiplied each of the original RGB values from the pixel with this value. The closer to zero amount was, the more it faded the image to black.
The second was invert(). It subtracted each RGB value from 255. This has the effect of inverting all colours in the image.
The final one was vignette(). This is like fade() but fades pixels depending on how close to the edge of the picture they are.
Animating Fade
Finally, we also animated fade() so that the picture started black and got brighter over a number of frames.
Putting all the filters together:
Download
The files for this week can be found on our GitHub repository.
For our first day back in 2019 we decided to do a simple Paper folding program.
It doesn’t really fold paper though, it just shows you how thick the paper gets when you keep folding it in half! It will get very thick quite quickly!
So we Googled, how thick is a sheet of Paper and we got the number 0.1mm, so quite thin really!
We then Googled a list of items and their heights, so we could write out a message when we reached that height, this was the list we came up with [and a guess of how many folds it would take]:
Paper: 0.1mm
Baby: 530mm
Human: 2 Meters [50]
Dublin Spire: 121m
Croagh Patrick: 764m
Burj Khaleefa: 828m [10,000]
Carauntoohill: 1038m [1 billion]
Mount Everest: 8848m
Galway to America: 6603km [25]
Space: 100km
Moon:300,000km
Mars: 56,000,000 km
Sun: 150,000,000 km
Pluto: 7,500,000,000 KM
The Program
In order to keep track of how many folds we have done and what height the paper has reached we needed a few variables:
We store the number of folds, and the height in mm, meters and kilometers.
folds – to store how many times we have folded the paper
mm – to store the height in milimetres
metre – to store the height in metres
km – to store the height in kilometres
We then made sure that they were all set to the correct value when the Green Flag was clicked.
The only one that is not zero is the height in mm which we set the thickness of paper 0.1
Now we can get coding.
We used the Up and Down arrows to fold/unfold the Paper, this would increase/decrease the number of folds and the mm height and then Broadcast to the code that checked everything else.
The code that does the checking needs a few IF’s to work out what to do. First of all though it needs to calculate the height in Metres and Kilometres as well.
We used the number of folds to work out if we should be checking the mm, metre or km variable. All we did when we got to a particular height was to Say something on the Screen, but you could do anything you want at these points in the code, maybe show a different sprite or make a sound or something.
This is the code that checked the mm and metre variables
and this is the code that checked the metre and km variables
And if anyone wants the full project, it is availabe on the scratch.mit.edu web site: