Previously in Hackers we have studied how transistors work, and made a transistor-based circuit to control a motor from an Arduino: Hackers – a Joule Thief and Controlling Motors.
When you write to a pin on the Arduino, it outputs a voltage. However, you can’t use this directly to drive an electric motor, because they require too much current, and it would damage the Arduino. The solution is to use a 6V battery as an external power supply, and connect it to the motor via a transistor circuit. When you apply a signal with small current to the middle leg of the transistor, a much larger current can flow from the battery to the motor.
While this works, a more elaborate circuit is needed if you want to be able to control two motors, and make them go backwards and forwards. This circuit is called a Dual H-Bridge. The Wikipedia page has technical details: https://en.wikipedia.org/wiki/H_bridge
We are using a pre-built integrated circuit for our H-Bridge, as they are low-cost, small, and work well. Here is the one we are using:
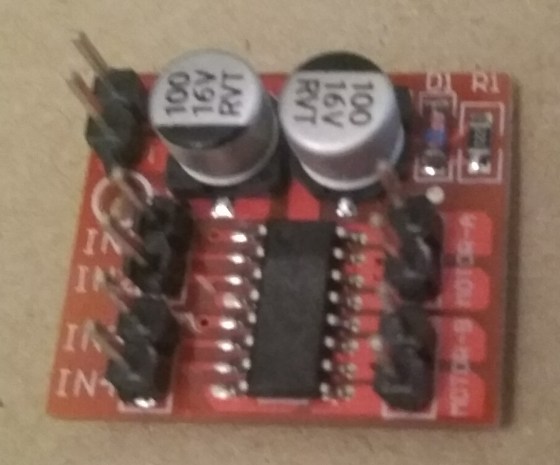
It has several connectors:
- [+] and [-] are where the external battery is connected
- [IN1] and [IN2] control Motor A (details below)
- [IN3] and [IN4] control Motor B
- [Motor A] and [Motor B] each have two pins that are connected directly to motors
To control Motor A, connect [IN1] and [IN2] to two pins of the Arduino, such as 6 and 7:
- [IN1] HIGH and [IN2] LOW: Motor A goes forward full speed
- [IN1] LOW and [IN2] HIGH: Motor A goes backward full speed
- Both LOW: Motor A does not turn (no power, it coasts)
- Both HIGH: Motor A does not turn (is braked)
- To control speed, use a value for the pins connected to [IN1] or [IN2] in the range 0-255 (0=LOW, 255=HIGH)
Here is Arduino code to control a motor with a H-Bridge, written by Luke, one of our Hackers:
// Luke Madden, CoderDojo Athenry
// Control motors using a H Bridge

// The H bridge has 4 input pins: in1-in4
#define in1 6
#define in2 7

int fast = 100;// range 1-255
int slow = 50;// slower speed
int hyperspeed = 255;// hits the hyperdrive

void setup() {
  pinMode(in1, OUTPUT);
  pinMode(in2, OUTPUT);
  Serial.begin(9600);
}

void loop() {
  drive();
}

 void drive() {
  // Test the functions
  Serial.println("move forward");
  forward();
  delay(2000);

  Serial.println("hit the hyperdrive");
  hyperdrive();
  delay(2000);

  Serial.println("go backwards");
  backwards();
  delay(2000);
}

void forward() {
  //makes motor go forwards
  analogWrite(in1, fast);
  analogWrite(in2, 0);
}

void hyperdrive() {
  //hits the hyperdrive
  analogWrite(in1, hyperspeed);
  analogWrite(in2, 0);
}

void backwards() {
  //makes motor go backwards
  analogWrite(in1, 0);
  analogWrite(in2, slow);
}

void stopping(){
  //makes it stop
  analogWrite(in1, 0);
  analogWrite(in2, 0);
}
