Hi folks,
Below are links to some resources we’re going to use today:
Hi folks,
Below are links to some resources we’re going to use today:
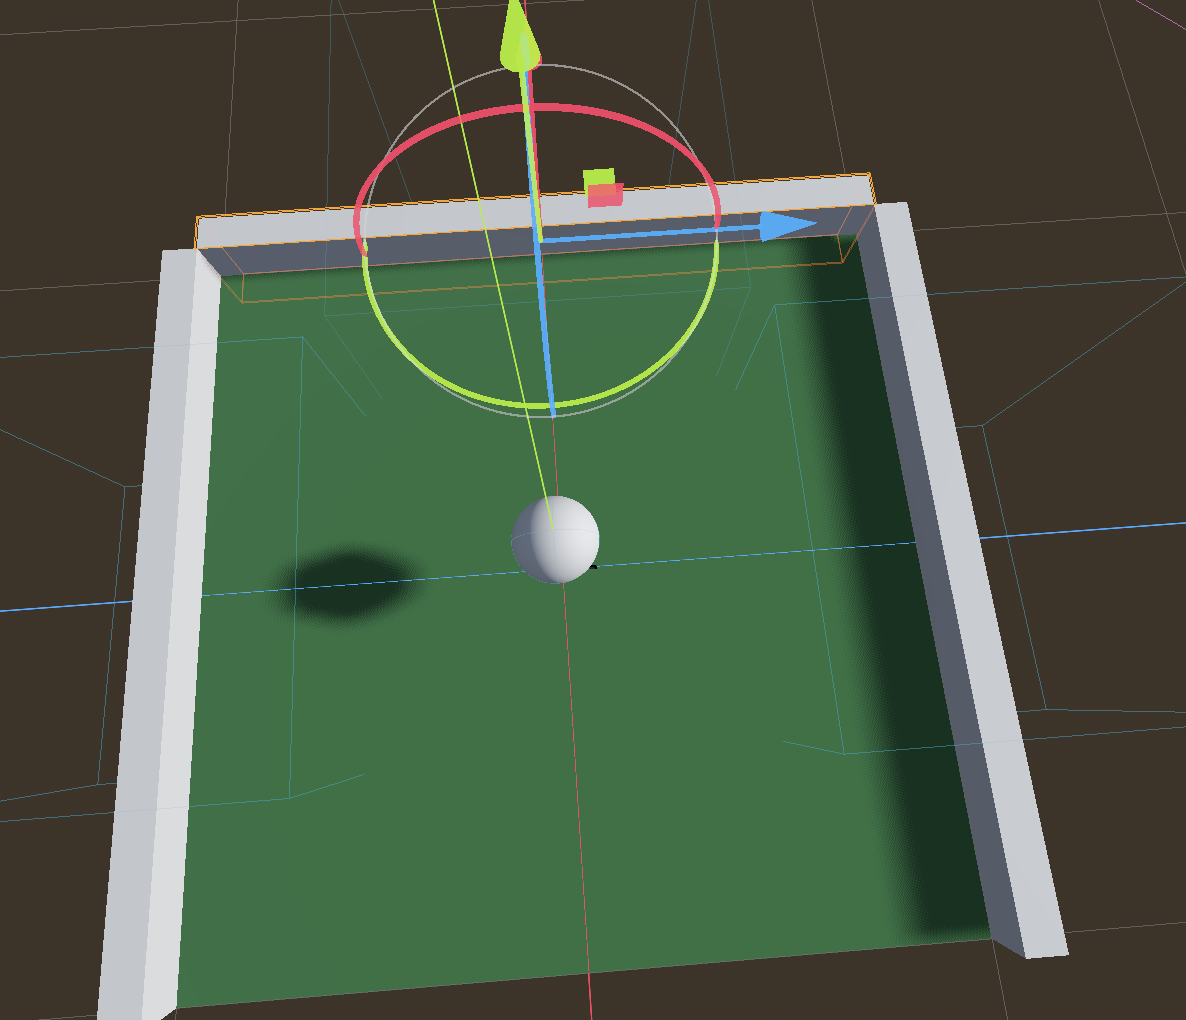
This week we continued working on Roll-A-Ball.
More Walls and Resource Copies
We left off last week with two walls. This week we copied one of those to create a third. It’s new transform position is (1.05, 0, 0) and it’s transform rotation is (0, 90, 0). That rotation represents 90 degrees around the vertical axis (y-axis).
It was immediately clear that we ideally needed to close the gaps at the corners where the walls meet.
To adjust the size of the third node, we select its MeshInstance3d child node. To adjust the mesh size, we click on the picture of the mesh in the inspector to see it’s properties and then adjust the size to 2.1m:
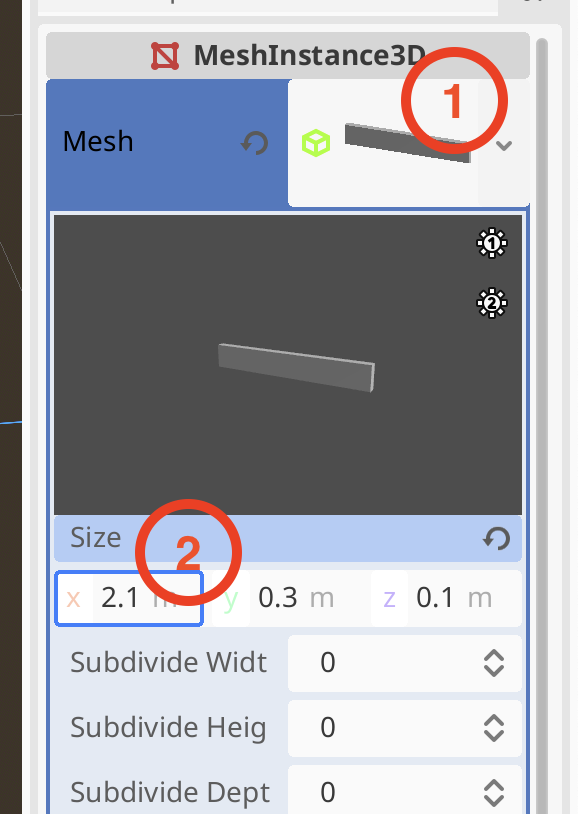
We can see all the walls change size. This is because they are all using the same mesh resource. We set the size back to (2.0, 0.3, 0.1) first. Now, we can make this mesh resource separate to the one used by the other two walls. Click on the drop-down arrow next to the mesh picture and then select “Make Unique”
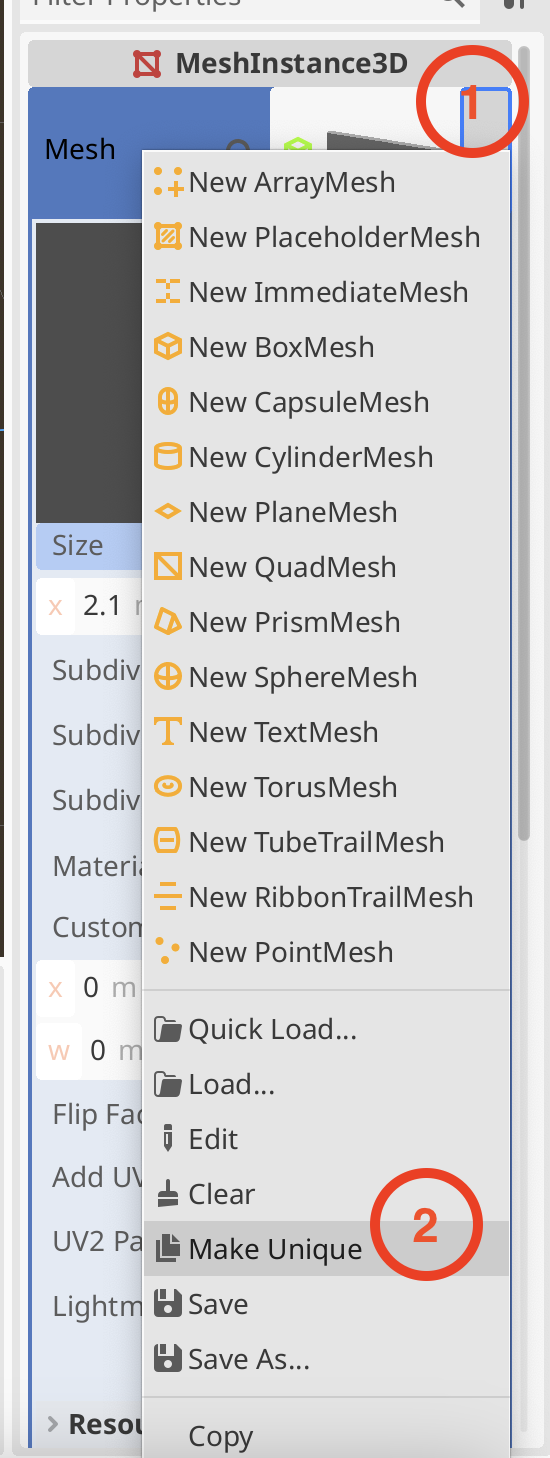
Now when we change the size to (2.2, 0.3, 0.1) it doesn’t change the other two walls.
Finally we copy this third wall and move it to (-1.05, 0, 0). Now we have four walls.
Materials
We created a wall material in a very similar fashion to how we created the original ground material and assigned it to all four walls.
We also created a new material and assigned it to the ball. We gave it a strong red colour in ‘Albedo’. Because the ball was going to be impossible to tell if it was rolling, being all one uniform colour, we decided to apply a checker board texture to it. Here’s a texture we used today:

We placed this in a textures folder in the FileSystem and then assigned it to the Texture slot under ‘Albedo’ in the ball material. That gave the ball a checkered look.
We also looked at some of the other most commonly used material settings, including roughness, metallic and transparency.
Turning the Ball into the Player
We wanted to create a Player object and make it it’s own scene. We renamed “ball” in the Main scene to Player and right-clicked on and chose “Save branch as scene”. This created a new scene called “Player” which opened a new tab in the centre of the editor.
The Player node still had the transformation from the main scene (lifted up along the y-axis). We removed this and saved the Player scene. Switching back to Main we could see the Player node was now cutting through the ground so we moved it upwards again. Note that changes in the child scene were reflected in the parent scene, but not the other way around.
Creating an Input Map
To capture user input, we set up some Input Actions. Under the Project menu, we selected Project Settings and then selected the Input Map tab:
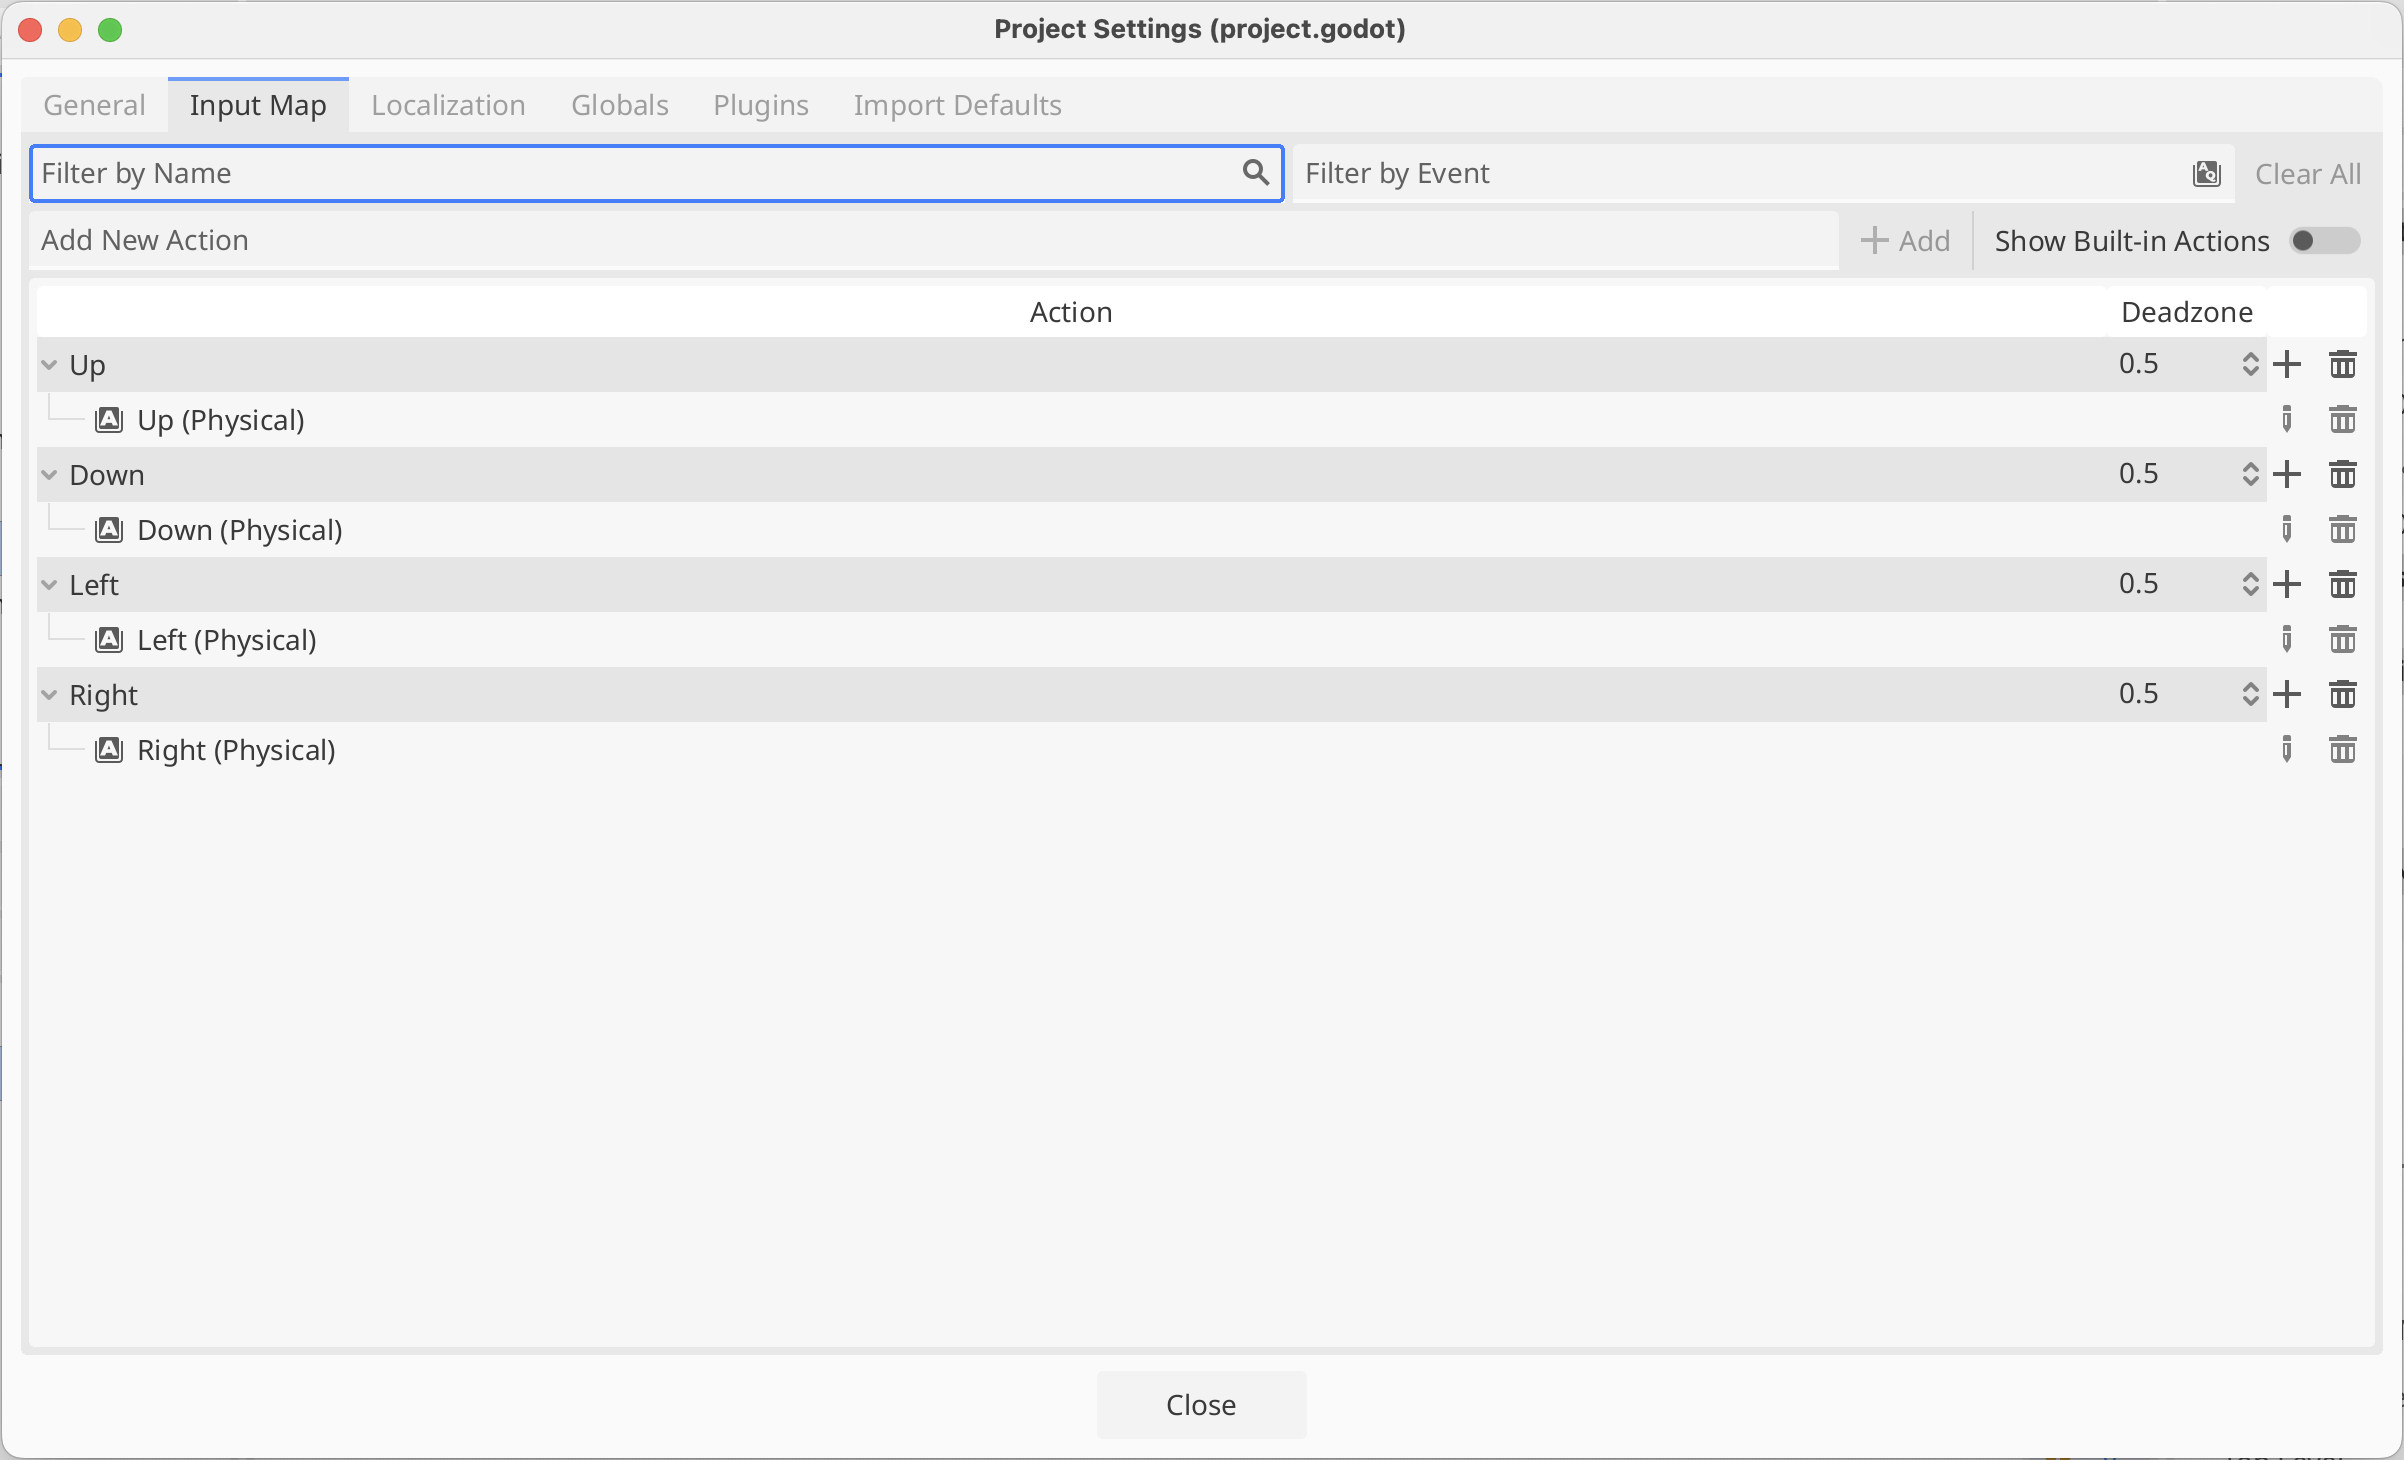
Where it says “Add New Action” we typed the name of each action in turn (Up, Down, Left and Right) and pressed the Enter key or the “+ Add” button to create it.
We then selected each action in turn and pressed the + at the right hand side of it’s row. We then just pressed the key we wanted for that action and closed the dialog to confirm the selection. Above I’ve chosen the arrow keys, but others chose WASD. Either is fine.
Making the Player Move
We next want to make our player move in response to input.
First we created a scripts folder in our file system
In the Player scene, we selected the Player node and pressed the Attach Scripts button. We then change the path on the dialog that appeared to make sure to place our new script in the scripts folder (instead of the scenes folder).

Our script automatically opens in the editor. It extends RigidBody3D, which is the type of the existing Player node. It has two empty functions, _ready() and _process(), by default. _ready() is called when the object is first created and _process() is called every time the scene is drawn.
We’d like to apply physical forces to our object, specifically torque, which is a turning force. There is another function where we should put code that interacts with the physics system: _physics_process(). Here’s what that empty function should like:
func _physics_process(delta : float) -> void:
      pass
This is a function that takes one parameter called “delta” which is a float. A float is a number with a decimal point. The “-> void” means that this functions doesn’t send back a value to the code that calls it. You must have at least one line inside a function in GDScript; “pass” doesn’t do anything, it’s just there to prevent the function from having no lines in it.
We can get our input values like this:
func _physics_process(delta : float) -> void:
	var input = Input.get_vector("Up", "Down", "Left", "Right")
These are the names of the input actions we’ve already defined. This is going to return a Vector2 value which we’re storing in the variable called “input”. As a Vector2, this has an x and a y value. The x value will vary between 1, -1 and 0 depending on whether “Up” or “Down” or neither are being pressed. Similarly the y value will vary between 1, -1 and 0 depending on whether “Left” or “Right” or neither are being pressed.
We can now actually apply torque (turning force) to our ball:
func _physics_process(delta : float) -> void:
	var input = Input.get_vector("Up", "Down", "Left", "Right")
	apply_torque(Vector3(input.x, 0, -input.y))
The function apply_torque() is part of RigidBody3D and expects a Vector3 which indicates how much to apply around the x, y and z axes respectively. We don’t want any applied around the y-axis as this would just spin the ball around the vertical axis and not roll it along he ground. So we make a Vector3 where the “Up”/”Down” actions add torque around the X-axis and the “Left”/”Right” actions add torque around the z-axis. When testing, because of our camera angles, we find the “Left”/”Right” is backwards to what we want, so we use – to flip the direction.
The ball now rolls! Too fast and there’s a problem with colliders, which we need to fix – the wall colliers are the wrong size, but once that’s corrected we have something not too bad.
Getting the Code
All our code for this year is be available on our GitHub. Please see Creators – Week 4 for more details.
This week we saw where we were going with the dungeon:
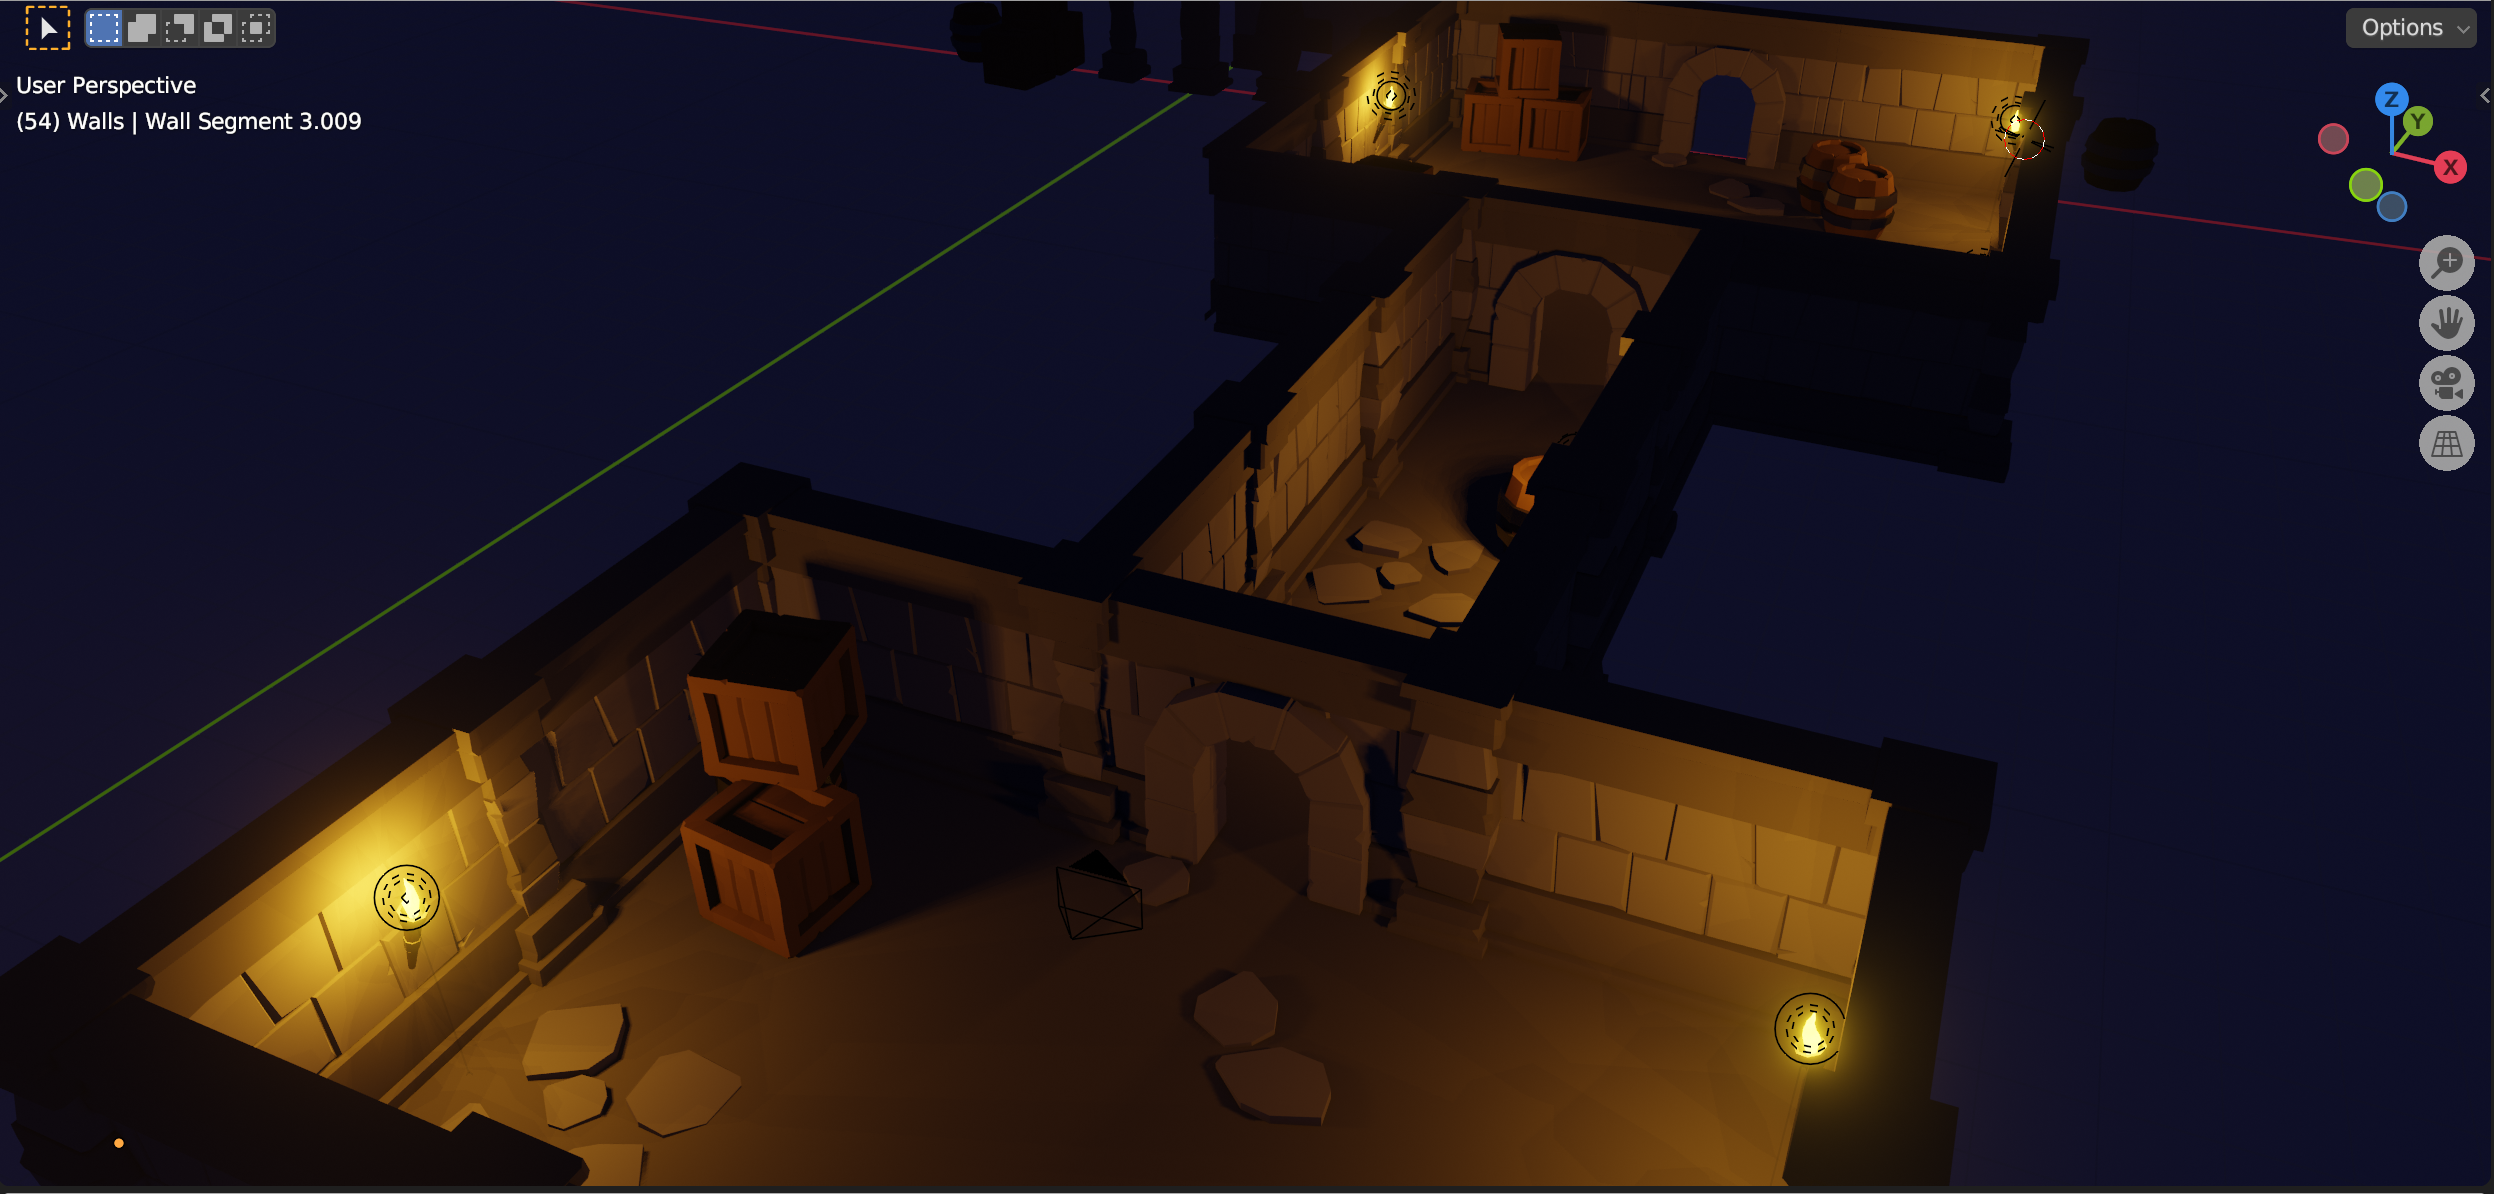
The screenshot shows a completed dungeon, made from the modular parts that we are currently building.
We finished off the two pillar designs, shaping one straight-sided and the other rounded and we worked on a wall section. For the wall section, we used a mirror modifier to make it two sided while only having to work on a single side.
Our file from today can be found here.
This week we turned our original scene, a truck driving down a straight road. into a two-player racing game around a curved track.
We deleted the road and crates from the old scene, imported a track asset from our Sharepoint site and moved our truck to be on it.

The truck still drives, just as before, as it has the PlayerController component attached, but the camera, while it follows the truck, doesn’t behave as we’d like. It’s always looking in the same direction. We’d like it to point in the same direction as the truck itself.
The easiest way to achieve this is to remove the FollowPlayer script from the camera, and make it a child of the truck directly. We do this by dragging it onto the truck in the hierarchy:

We then select the camera, reset it’s transform component and tweak the Y (height), Z (distance back-and-forward along the truck) and X-rotation (tilt of the camera up and down) while keeping an eye on the camera preview (bottom right-hand corner of the game view) until we’re happy with the alignment.
The controls on PlayerController are set to always use the input axes called “Horizontal” and “Vertical”. If we put two trucks in our scene now, they’d move together, even if one player was using the WASD keys and the other was using the arrow keys.
To fix this, we first update PlayerController.cs. We add two new public variables at the top:
    public string HorizontalAxis = "Horizontal";
    public string VerticalAxis = "Vertical";
And then down in the code where the “Horizontal” and “Vertical” were used explicitly, we replace them with the names of these two variables:
        // Get the player input
        horizontalInput = Input.GetAxis(HorizontalAxis);
        forwardInput = Input.GetAxis(VerticalAxis);
Everything behaves the same as before, but now, looking at the inspector, we can see that we can easily tell PlayerController to use other axes instead of these ones.
The Input Manager can be found under the Edit | Project Settings menu. In there are all the axes currently defined. Note that it’s not usual to see a few duplicates in this list; Unity will always pick up the first one matching the name it’s looking for and ignore the others. The number of axes defined is at the top. We increase the number by four (4) to allow us to make four new axes. In my case this meant changing the number from 18 to 22. Note that the four new axes created start out as copies of the last one in the list.
Open each of these last four axes in turn and name them “Horizontal P1”, “Horizontal P2”, “Vertical P1” and “Vertical P2”. We then need to set the negative button and positive button values on each of them like this:
| Axis Name | Negative Button | Positive Button |
| Horizontal P1 | a | d |
| Horizontal P2 | left | right |
| Vertical P1 | s | w |
| Vertical P2 | down | up |
Close the Project Settings and select the truck. In the Inspector for PlayerController, change Horizontal Axis to “Horizontal P1” and change Vertical Axis to “Vertical P1”. Test the game, note that the truck now only moves in response to the WASD keys.
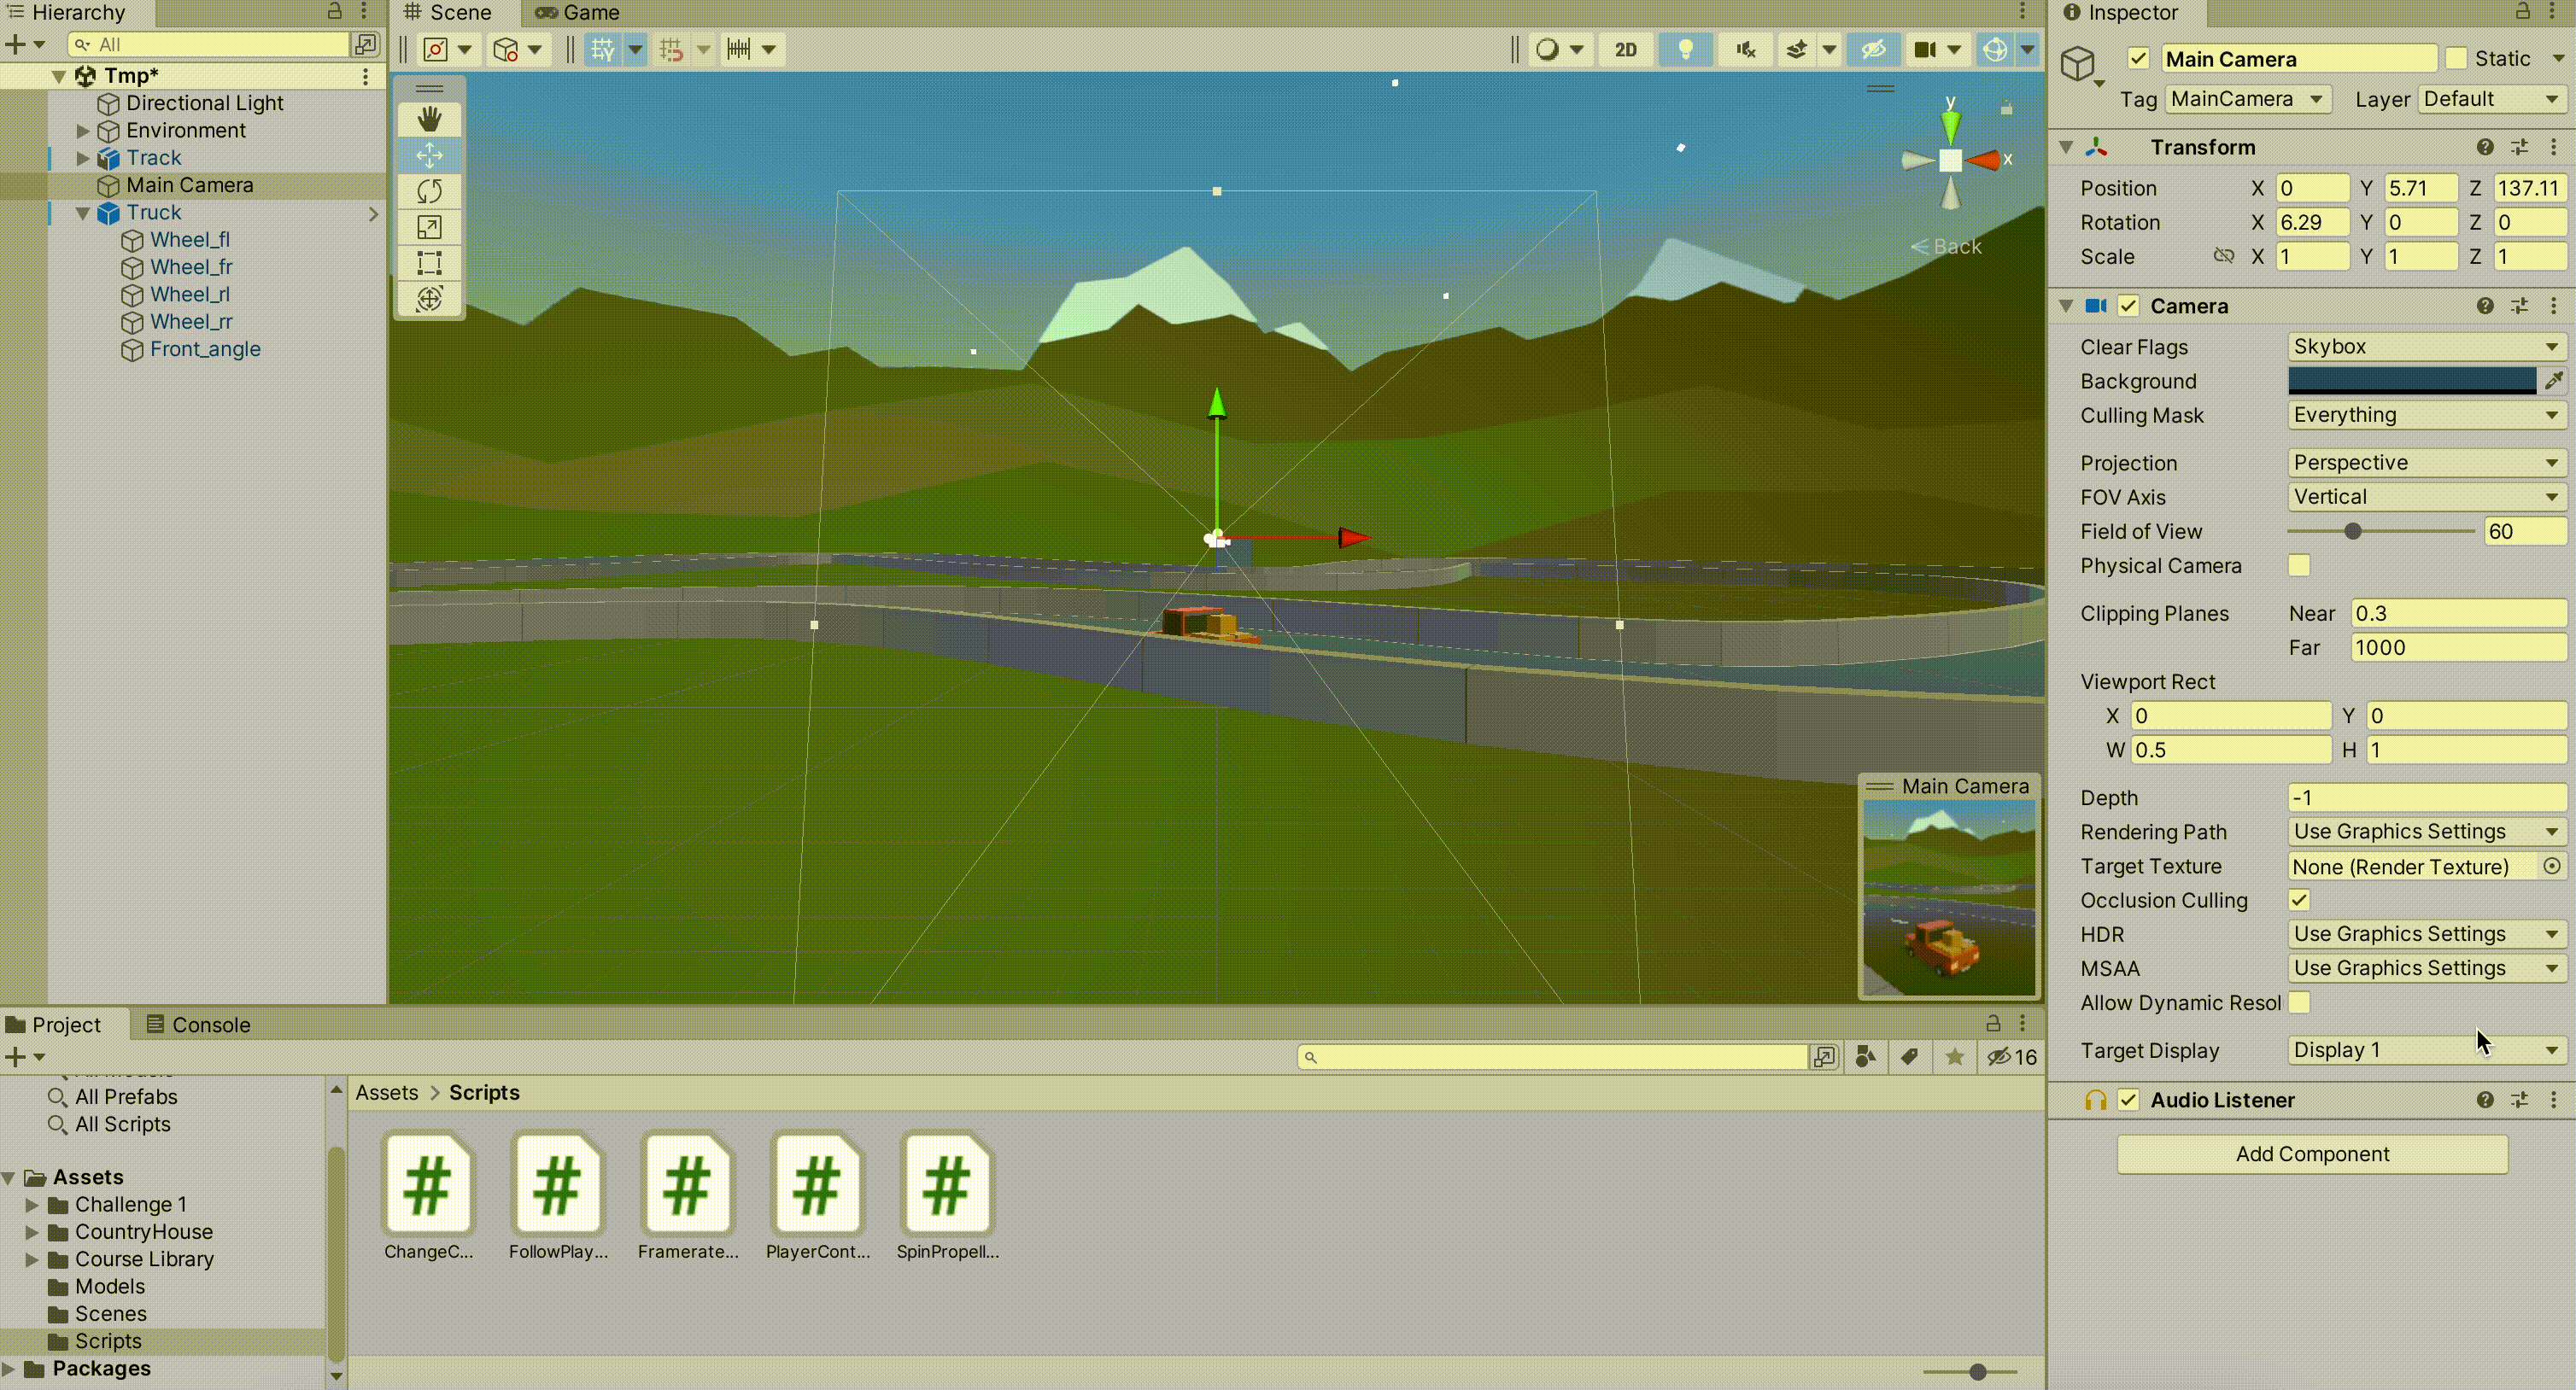
The camera on the truck fills the screen when it draws, we want it to only draw to the left-hand side of the screen. To to this, select the camera and in the inspector change the Viewport Rect settings like this:
Look at the Game view, the camera’s only drawing to the left hand side of the screen, this is because we’ve set W (meaning width) to a half.
Select the truck in the hierarchy, right-click and chose “Duplicate”. This makes a copy of the truck, including all its components and children. It doesn’t look like that though because they’re right on top of each other. Separate them by moving the copy a bit. I suggest using the overhead view for this.
Rename the trucks “Player 1” and “Player 2”.
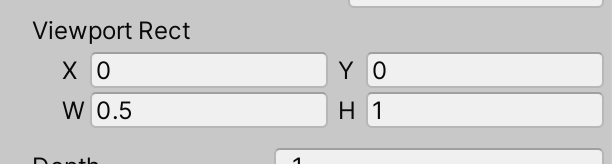
We just need to tweak “Player 2” a little bit. Select it and change the PlayerController to use the axes “Horizontal P1” and “Horizontal P2”. Then select it’s camera and change the Viewport Rect making X = 0.5. This means that not only is it half width, but it also starts drawing at half way across the screen,
Play the game. Player 1 should draw on the left side of the screen and be controlled by the WASD keys. Player 2 draws on the right and is controlled by the arrow keys.
Updated code is on our GitHub repo: https://github.com/coderdojoathenry/Creators-2022. It also includes some camera switching code that I briefly demonstrated, but was too complex to finish in time.
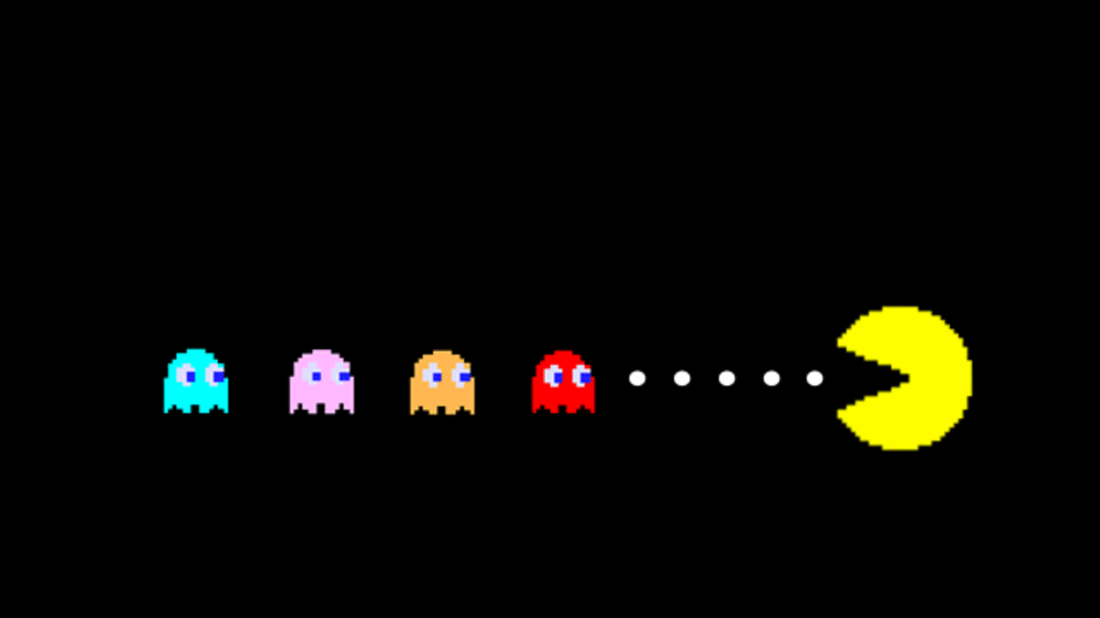 For the last two weeks (with a break for a Red Weather Warning!) we worked on a Pacman type game. We tried to put in all the code we have learned over this year and all the games were brilliant and all so different.

We designed our own sprites rather than take them from the library.


Here are the notes in PDF CDA-S9-Week_05_Pacman.pdf
Here is a link to the game if you want to check it out. https://scratch.mit.edu/projects/375094277
See you two weeks time, keep yourselves safe and healthy.
Martha
Julie, Ruaidhrí, Iseult and Eoin
Hi folks, thanks again for another fun session.
This week we continued our sword model. We finished the blade and started work on the guard.
We didn’t introduce any new concepts this week, but we did make our first practical use of the mirror modifier to allow us to create one side of the sword guard and have the other side created automatically.
Here are the video instructions from this week:
The matching model file can be downloaded from here.
Hello Everyone,
A special welcome to all our new members that came to us this week, I hope you enjoyed yourself and hope to see you back again soon.
Thank you all for coming again this week. This week we looked at pen commands, we have not done this before in the Explorers group so it was new for everyone.

We also created some variables which we set as sliders which again is something we had not done before with this group.

Here are the full Pdf version of my notes from this weeks session. CDA-S8 Week 5-Pen Command.pdf
Martha

This week we looked at two important concepts, loops and lists.
Loops
Start by imagining we wanted to draw four circles next to each other. We could write four calls the ellipse function, like this:
let size = 50;

ellipse(25, 25, size, size);
ellipse(75, 25, size, size);
ellipse(125, 25, size, size);
ellipse(175, 25, size, size);
Pretty easy. What if we had variables for the positions? We’d get this:
let size = 50;
let x = size / 2;
ley y = size / 2;

ellipse(x, y, size, size);
x = x + size;
ellipse(x, y, size, size);
x = x + size;
ellipse(x, y, size, size);
x = x + size;
ellipse(x, y, size, size);
x = x + size;
It’s longer than before, but notice how the same two lines now keep repeating. If we had a way to say “do these two lines four times” then this would get much shorter, and we do. We use the for statement:
let size = 50;
let x = size / 2;
ley y = size / 2;

for (let i = 0; i < 4; i++){
  ellipse(x, y, size, size);
  x = x + size;
}
The for statement is a bit complicated, so let’s break it down:
for (do first; check to see if we keep going; do every time 2) {
  do every time 1
}
Note the curly brackets (braces) containing the stuff we want repeated.
So in our case we:
This means that i will have the values 0, 1, 2 and 3 and our two lines will be run four times in total. Result! Our code can draw a row of circles. If we increase the value in the check, we can have as many as we like. We choose to have 8.
Nested Loops
Nesting a loop means putting one loop inside another. What’s the point of that? Well in our case we have a loop that can draw a single row of circles. If we put all of that inside another loop we could draw several rows. The row outside has a different variable j and also runs eight times. After we draw our row we do two things:
The code now looks like this:
let size = 50;
let x = size / 2;
let y = size / 2;

for (let j = 0; j < 8; j++){
  for (let i = 0; i < 8; i++){
    ellipse(x, y, size, size);
    x = x + size;
  }
  y = y + size; // Move down and
  x = size / 2; // Back to the left
}
We now have 8 x 8 = 64 circles in a grid.
Changing the Colour of Some Circles Based on a Check
We then added code just before our call to ellipse() to change the colour based on some check:
if( /* some check here */ ){
  fill("red");
}
else {
  fill("white");
}
We experimented with some different checks to see what might happen. This check turns the upper-left of the grid red:
if (i + j < 8 ){
  :  :  :
This check, using the modulus operator, turns every third circle of the grid red:
if ((i + j) % 3 == 0){
  :  :  :
This check paints a red cross through the centre of the grid:
if (i == 3 || i == 4 || j == 3 || j == 4){
  :  :  :
Lists
We then jumped quickly into lists. Also called arrays, lists are like a variable that can store several values. We create them simply like this:
let a = []; // An empty list
let b = [1, 2, 4, 7]; // A list created with four entries
To get at the entries in a list you just use the list variable’s name and square brackets containing the number of the entry in the list you want to get out, noting that the first one is zero:
b[0] = 10; // Set the first entry in the list to ten
b[4] = 301; // Set the fifth entry in the list to three hundred and one
A list isn’t just for holding numbers though, it can hold anything. It can hold strings for example, or even other lists!
It’s this idea of holding lists that we use to define our pattern.
Defining our Pattern
We make a list with eight entries, each of which is a list also containing eight entries, all zero. We write it so it forms a neat block like this:
let pattern = [
  [0, 0, 0, 0, 0, 0, 0, 0],
  [0, 0, 0, 0, 0, 0, 0, 0],
  [0, 0, 0, 0, 0, 0, 0, 0],
  [0, 0, 0, 0, 0, 0, 0, 0],
  [0, 0, 0, 0, 0, 0, 0, 0],
  [0, 0, 0, 0, 0, 0, 0, 0],
  [0, 0, 0, 0, 0, 0, 0, 0],
  [0, 0, 0, 0, 0, 0, 0, 0]
];
Then down in our code, where we’re deciding what colour to make our circles, we change the check to read:
if (pattern[j][i] == 1){
  : : :
What does this mean? Well, j is a counter that goes from 0 -> 7 as we go down our eight rows. Given that, pattern[j] means get entry from our list for that row. Since pattern[j] is a list too, we need to say which entry we want in. The variable i goes from 0 -> 7 as we go across each row. So, pattern[j][i] gets the list for the row and then picks out the number for that column.
Once it’s set up, we can then change zeros to one in our pattern and have our circles turn red to match (red in the text below to make them stand out):
let pattern = [
  [0, 0, 0, 0, 0, 0, 0, 0],
  [0, 0, 1, 0, 0, 1, 0, 0],
  [0, 0, 1, 0, 1, 0, 0, 0],
  [0, 0, 1, 1, 0, 0, 0, 0],
  [0, 0, 1, 1, 0, 0, 0, 0],
  [0, 0, 1, 0, 1, 0, 0, 0],
  [0, 0, 1, 0, 0, 1, 0, 0],
  [0, 0, 0, 0, 0, 0, 0, 0]
];

We have essentially built something that works like an image file! Our pattern is the image data and our program is the code that draws it.
As several smart people already noticed, you’re not limited to one and zero. By using more numbers, and expanding the if statement, you can have as many colours as you like.
Download
The files for this week are on our GitHub, as always.
Hi everyone,
Thanks for coming Saturday even though the weather was dreadful.
This week, I helped Bo Peep found her sheep! Some of you did the same and some used ideas like Minecraft Steve finding Iron Ore and Diamonds, Knights finding dragons or a Princess finding flowers.
Before we even started our game this week we talked a little bit about File Management and about the importance of keeping your files somewhere you can access them quickly and giving them a meaningful name.
So to this end, we all created a folder where we will be keeping our files in the future and within that we had a sub folder for this weeks files.
We started our game by drawing our background on our stage:

Unfortunately, due to internet problems we could not search the internet for images for our Sprites, but we could still use the sprites from the Scratch Library.
This week, we decided to move our main sprite using the arrow keys. For this we had to learn a small bit about the X and Y axis and I gave you a little tip on how to remember which is which!
 Hope you all enjoyed this week, aee you next week when we will be starting a new game!
Here are the notes for this weeks session in PDF CDA-S7-Week_05-BoBeep.pdf
Martha
Julie, Ruaidhrí and Eoin
Hi everyone,
Thank you all for coming on Saturday. I hope you liked the short video of the SpaceX Falcon Heavy Test Launch and the Intel Light Drones from the opening Ceremony of the Winter Olympics.
This week we did a new game, How fast can you Type? Last week we used Sprites as backgrounds and this week we used Backgrounds as Sprites. Just to mix it up!

We used a variable as our Timer, our first time doing this, don’t forget if you want the time to start when you press the first letter rather than when the green flag is clicked then you are going to have to add another broadcast.


We are off for the next two weeks, to cover the school mid term break and also as Confirmation for all the Athenry Schools takes place on the 24th of February and there will be many families attending this from Coderdojo Athenry. Best wishes to any of our Ninjas and families who are being confirmed.
Hope you all have a great break and hope to see you all back on the 3rd of March
