This function we then connected to the body_entered signal by updating the _ready() function as follows:
# Called when the node enters the scene tree for the first time.
func _ready() -> void:
	body_entered.connect(_on_body_entered)
Now when a body is detected entering the Area2D that defines the missile, that body is removed from the game.
The last part of the process was to set the collision layer and layer mask correctly. Missiles are player projectiles and belong in layer 5 and only interact with enemies, which are layer 4. This is how the correctly set-up layer and layer mask look for the missile:
One quirk at the moment is that the missiles don’t get destroyed when they hit something. We may update this later.
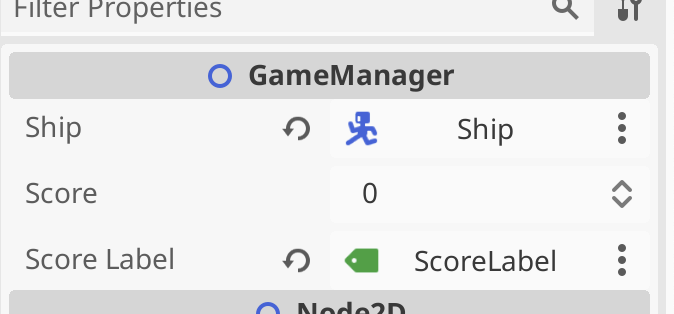
Adding a Score to the GameManager
We first set a class name first in game_manager.gd by editing the first line to read:
class_name GameManager extends Node2D
This will be convenient to us later.
We then added a new exported variable, of type int, called score:
@export var score : int = 0
Finally we also added a function to increase the score by an amount:
Now we have a score we can increase. To allow us to see the score, we added a Label called ScoreLabel to the main scene. We then added a variable in game_manager.gd to allow us to reference it from that code:
@export var score_label : Label
We then assigned this value in the inspector to hold a reference to ScoreLabel:
Finally, to update the label with the value of score, we added a _process() function to keep them in sync every frame:
func _process(delta: float) -> void:
	if (score_label):
		score_label.text = str(score)
Because it’s possible that score_label hasn’t been assigned, we check that it’s not null before we set it’s text property. Note the use of the str() function that takes a number and turns it into text.
Increase Score when Enemies Die
One of the signals all nodes have access to is one that is triggered just before the node is about to exit the tree. As an enemy, we can use this as a good time to inform the GameManager that we have died and that the score should be increased.
We first added a new exported score variable to ememy.gd:
@export var score : int = 100
We then also created a variable to store a reference to the GameManager:
@onready var game_manager: GameManager = %GameManager
Godot automatically writes this line of code for us if we drag and drop the GameManager from the tree into our code, holding down the CTRL (or CMD on Mac) key just before releasing the left mouse button. The @onready means that this variable assignment happens once this node is added to the tree. Is is a variable of type GameManager and it looks for a node in the tree with the unique name “GameManager”.
We then created a new function _on_tree_exiting():
And in _ready() we connected it to the tree_exiting signal:
# Called when the node enters the scene tree for the first time.
func _ready() -> void:
	vp_rect = get_viewport_rect()
	set_wander_change_dir_time()
	tree_exiting.connect(_on_tree_exiting)
Now when ever an enemy is removed from the tree, regardless of why, the score in the game manager is increased accordingly.
Adding New Enemy Type
We wanted to introduce a new enemy behaviour: pursuing the player instead of just wandering aimlessly. We also decided to have a percentage that could be dialed up or down so that the enemy could spend part of the time pursuing and part of the time wandering. We added a new exported variable to control this:
@export var persuit_percent : float = 0
We also drag-and-dropped the GameManager into the code (holding down CTRL just before releasing the mouse button) to get this:
@onready var game_manager: GameManager = %GameManager
Then we wrote a new function pick_direction():
func pick_direction() -> void:
	if (randf() < persuit_percent && game_manager.ship != null):
		direction = game_manager.ship.position - position
		direction = direction.normalized()
	else:
		pick_random_direction()
This function checks a random number between 0 -> 1 against the pursuit percentage to see if it should be pursuing the player. It also checks the the reference to the player in the GameManager is set, as it needs this to know where the player is. If these checks both pass, it calculates the direction from the enemy to the player and normalises it (makes it length 1). Otherwise, it picks a random direction instead.
Finally we just replaced the call to pick_random_direction() in _process() to call pick_direction() instead:
# Called every frame. 'delta' is the elapsed time since the previous frame.
func _process(delta: float) -> void:
	wander_change_dir_time -= delta

	if (wander_change_dir_time < 0):
		pick_direction()
		set_wander_change_dir_time()
We then duplicated the existing enemy_0.tscn in the scenes folder as enemy_1.tscn. With a new sprite and updated settings to make it faster, change direction quickly and pursue the player all the time, we got a brand new enemy type.
Getting the Code
All our code for this year is available on our GitHub.
Moved our enemy’s root node from Area2D to AnimatableBody2D
Wrote a new enemy script, enemy.gd, for the enemy, based on mover.gd
Improved the code in enemy.gd so that it now works as a physics object
Created a set of collision layers for the game
Wrote new code for the body-on-body contact
Added sound for when we shoot
Moving Enemy from Area2D to AnimatableBody2D
It was necessary to move the enemy from an Area2D based node to a physics body of some sort. AnimatableBody2D is intended for physics bodies that are moved with animation or code.
To change the type of the Enemy node, we right-clicked on it and choose “Change Type”. We then searched for AnimatableBody2D.
Moving code from Mover.gd to Enemy.gd
We added new script directly to the Enemy’s root node, called Enemy.gd. We copied all the code from Mover.gd with the exception of the line “extends Area2D” at the very top and pasted it into Enemy,gd overwriting everything except the very first line, “extends AnimatableBody2D”.
We copied the variables from Mover in the inspector, and assigned the same values to the variables in Enemy.
Testing we found that this worked a bit, bit there was weird effects. It was moving the player too, for example. We recalled that Mover.gd was designed to move the parent of the node it was attached to. For Enemy, that is the scene root, and not what we want. We removed the variable storing the parent and all reference to it, setting our own position instead,
Additionally, we noted that the node called Mover, with a Mover.gd script attached, was still part of the Enemy node tree. It would also be moving our enemy, which we didn’t want. We deleted this node from the tree.
Now when we tested, we found that the the enemy was more-or-less behaving as before, excepting that it was wiggling about. Disabling “Sync to Physics” in the inspector resolved that.
Improving the Code so that Enemy Behaves as a Physics Object
Since AnimatableBody2D is a physics object, we could improve how we were moving it.
With physics objects, we don’t normally set the position explicitly, we set a suggested position, or a suggested velocity and let the physics engine then influence the actual outcome.
To move towards that change, we added a new function _physics_process() and moved the last line of _process() into it, changing position (explicit) to global_position (suggested). We also changed position to global_position in the bounds checking code. The last line in _physics_process() is a call to move_and_collide() which is passing control to the physics engine, once we’ve made our suggestion on position:
What we then noted, was that the AnimatableBody2D respects collisions with other physics bodies, so the bounds checking that we had previously in Mover.gd was no longer necessary to prevent the enemy moving out of bounds, so we removed exported variable bounds and the function check_pos_for_bounds().
Even though the Enemy was constrained to stay within the play area by the walls around the edge, there was no way yet for it to automatically reverse direction on hitting a wall (or other physics body). We added the following code to _process_physics() to achieve this:
func _physics_process(delta: float) -> void:
	global_position += direction.normalized() * speed * delta
	var collision = move_and_collide(direction)
	if (collision):
		var collision_pos = collision.get_position()

		if (direction.x < 0 && collision_pos.x < global_position.x):
			direction.x = 1
		if (direction.x > 0 && collision_pos.x > global_position.x):
			direction.x = -1

		if (direction.y < 0 && collision_pos.y < global_position.y):
			direction.y = 1
		if (direction.y > 0 && collision_pos.y > global_position.y):
			direction.y = -1
Creating Collision Layers
Objects that can collide with other objects have layers and layer masks:
Layers: These are the layers that an object itself is in
Mask: These are the layers that containing other objects that this object will collide with
Imagine these scenarios:
Player is in layer 1. Wall is in layer 1. The player’s layer mask is set to 1. The player cannot pass through the wall.
Player is in layer 1. Wall is in layer 2. The player’s layer mask is set to 1. The player pass through the wall.
Player is in layer 1. Wall is in layer 2. The player’s layer mask is set to 2. The player cannot pass through the wall.
We established these layer:
Player
Boundaries
Things that can destroy the player (obstacles, bombs, etc.)
Enemies
Player projectiles
Pickups
We moved our player, enemy and boundary walls into their appropriate layers and set their layer masks. The player (ship) is in layer 1 and it’s mask is set to 2, 3, 4.
New Code for Body-on-Body Contact
In ship.gd we could now add code to detect body-on-body contact:
func _physics_process(delta: float) -> void:
	var mouse_pos : Vector2 = get_viewport().get_mouse_position()
	var ship_to_mouse : Vector2 = mouse_pos - position
	var distance : float = ship_to_mouse.length()

	if (distance > DEADZONE):
		velocity = ship_to_mouse * speed_by_distance
	else:
		velocity = Vector2.ZERO

	move_and_slide()

	for i in get_slide_collision_count():
		var collision = get_slide_collision(i)
		var collision_obj = collision.get_collider() as CollisionObject2D
		if (collision_obj && \
			collision_obj.get_collision_layer_value(2) == false):
			%GameManager.inform_body_entered(self)
After move_and_slide() above, we can check for collisions. We need to take any collisions that are not with objects in layer 2 (the boundary layer) and inform the name manager that we’ve hit something we shouldn’t.
Adding Sound when we Shoot
We went to freesound.org to look for suitable sound effects for our Ship when it shoots. Note that the site requires an account before it allows downloading.
We then added a new AudioStreamPlayer2D under Ship and called it ShootSound. Dragging it into the top of the Ship.gd script and pressing CTRL before releasing the mouse button provided this reference:
@onready var shoot_sound: AudioStreamPlayer2D = $ShootSound
In _process() after we’ve created the missile, we just have to insert this line to get the sound to play:
shoot_sound.play()
Getting the Code
All our code for this year is available on our GitHub.
Creating a custom resource to define a border and using it in mover.gd
Allowing our player ship to shoot missiles
Border Resource
To define a new border resource, we created a new script in the scripts folder that inherits Resource. Here’s the code:
class_name Border extends Resource

@export var Top : int
@export var Bottom : int
@export var Left : int
@export var Right : int
It’s a very simple resource that just stores four values.
Note that we used “class_name Border” to ensure this new class had a name. This means, among other things, that we can create variables of this type in code.
In our mover.gd script, we added an additional exported variable of type Border to the class:
@export var direction : Vector2
@export var speed : float
@export var wander_time_min : float
@export var wander_time_max : float
@export var border : Border
Once we saved the file and looked at the inspector, we could see that this new exporter variable is there and by clicking on the drop down arrow, we could create a new Border resource and assign values to it. We entered the values 80, 20, 20 and 20 for the border.
In the mover.gd code we could then update our correct_dir_for_bounds() function to take this border into account. Note that they way we’ve structured the code, a border is optional:
func correct_dir_for_bounds() -> void:
	var top = 0
	var bottom = 0
	var left = 0
	var right = 0

	if (border):
		top = border.Top
		bottom = border.Bottom
		left = border.Left
		right = border.Right

	if (direction.x < 0 && parent.position.x < left):
		direction.x = 1
	if (direction.x > 0 && parent.position.x > vp_rect.size.x - right):
		direction.x = -1
	if (direction.y < 0 && parent.position.y < top):
		direction.y = 1
	if (direction.y > 0 && parent.position.y > vp_rect.size.y - bottom):
		direction.y = -1
This now keeps the enemy from going too close to the edge of the screen, especially at the top.
Creating a Missile
We went to Piskel and created a new 16×16 sprite to represent a missile, exported it and imported it into our Textures folder in Godot.
We then added a new Area2D to the scene and called it “Missile”. Under this we added a CollisionShape2D with a RectangleShape of size 16×16 and a Sprite2D containing the missile image.
We added a new script to MIssile:
class_name Missile extends Area2D

@export var direction : Vector2
@export var speed : float

# Called every frame. 'delta' is the elapsed time since the previous frame.
func _process(delta: float) -> void:
	position += direction * speed * delta
	rotation = Vector2.UP.angle_to(direction)
This code moves the missile in the given direction at the given speed, pointing it towards the direction of travel. Because we’ve specified a class name, we can access the variables here easily in other code.
We also wanted a way to ensure that missiles we create don’t go on for ever. A cheap and easy way to do this is with a timer. We added timer under the Missile node and set its time out to 3s and enabled both One Shot (fire the timer once and don’t repeat) and Autostart (start counting down as soon as the node appears in the tree).
We then needed to connect this timer to the missile code, we selected the Timer and opened the Node panel in the UI. Right-clicking on Timer – timeout and connected it to the missile.gd script with a function _on_timer_timeout(). All we need in _on_time_timeout() is to call queue_free(). Now the missile self destructs after three seconds.
Finally we dragged Missile from the tree into the scenes folder in the file system view, making it a separate scene. With that done. we could remove it from the scene.
Shooting
We went to the Project | Project Settings | Input Map and added a new Action called “Shoot”. We bound this to the spacebar and the left mouse button.
In ship.gd we added the following export variable to store the missile scene:
@export var missile_scene : PackedScene
We then added a _process() function to check for the shoot action being triggered and to spawn a missile a little ahead of the player and moving in the same direction the player is moving in:
const MISSILE_OFFSET : int = 32

func _process(delta: float) -> void:
	if (Input.is_action_just_pressed("Shoot")):
		var new_missile = missile_scene.instantiate() as Missile

		new_missile.direction = velocity.normalized()
		if (new_missile.direction == Vector2.ZERO):
			new_missile.direction = Vector2.UP

		new_missile.position = position + new_missile.direction * MISSILE_OFFSET

		get_parent().add_child(new_missile)
This code:
Creates a new instance of the missile scene
Sets the direction, based on the player’s velocity
Ensures the direction isn’t zero, because this would mean the missile doesn’t move
Sets the missile’s position a little ahead of the player
Adds the new missile to the scene at the same level as player’s ship (we don’t want the missile to be a child of the ship or to move with it)
Rate Limiting Shots
Finally, we added a little code to implement a minimum time between shots. We added two new variables, one an export and the other internal:
@export var min_time_between_missiles : float = 0.1

var missile_countdown : float = 0
We updated _process() as follows:
func _process(delta: float) -> void:
	missile_countdown -= delta

	if (Input.is_action_just_pressed("Shoot") && missile_countdown < 0):
		var new_missile = missile_scene.instantiate() as Missile

		new_missile.direction = velocity.normalized()
		if (new_missile.direction == Vector2.ZERO):
			new_missile.direction = Vector2.UP

		new_missile.position = position + \
							   new_missile.direction * MISSILE_OFFSET

		get_parent().add_child(new_missile)
		missile_countdown = min_time_between_missiles
Every time we run _process() (i.e. every frame) we count down missile_countdown. Since it starts at zero, it will keep getting negative until we first shoot,. We only shoot when it is less than zero. If we shoot, we set it to min_time_between_missiles this means there can’t be another shot until this time has elapsed.
Getting the Code
All our code for this year is available on our GitHub.
Made a ShipKiller class that interfaces with GameManager
Added an enemy that wanders around the screen
ShipKiller and GameManager
Godot nodes can emit a bunch of signals that indicate when things happen. For something like Area2D we’re usually most interested in signals like body_entered, which emits when something crossed into that area.
We can connect to these signals from our code. This works well when we have a small number of things to connect, but it’s not so useful when we have a lot of things to connect or for allowing us to connect to things dynamically created at run-time.
For our ShipKiller, we wanted a script that we could attach to any Area2D node and not require any further set-up for it to work. This will allow us to really easily use it for static obstacles, enemies and even enemy projectiles.
To make this work so simply, we made the GameManager class and attached it to a node of the same name. We gave this node a unique name. This means two things:
There can only ever be one node in the tree called GameManager
We can always just address the GameManager object in code as %GameManager and we don’t need to know the relative path. This makes it easy to use from anywhere.
Here’s out basic game_manager.gd script:
extends Node2D

@export var ship : Node2D

func inform_body_entered(body) -> void:
	if (body == ship):
		ship.queue_free()
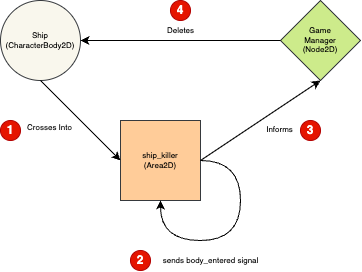
The Ship (a CharacterBody2D) crosses into the area of the ShipKiller (an Area2D)
This causes the Area2D to emit the body_entered signal which ship_killer.gd is connected to with it’s function _on_body_entered()
ShipKiller tells the GameManager that something has just crossed its area
GameManager checks to make sure it was the Ship, and if it was, deletes it
Enemy and Wandering Behaviour
We designed a multi-frame animated sprite at https://www.piskelapp.com/ and imported it into Godot as a spritesheet.
We created an Area2D node and called it Enemy0. Under that we placed a CollisionShape2D node, with a 32×32 RectangleShape2D defining it’s shape. We also placed an AnimatedSprite2D and used our enemy sprite sheet to define the animation.
We also added a Node2D under Ememy0, called it Mover and added a new script to it. This script is intended to be attached to the child of an existing node and so we’ll always be moving the parent, not the node the script is attached to. Again, this is to help us reuse this general purpose script.
Here is the version of mover.gd that we wrote:
extends Node2D

@export var direction : Vector2
@export var speed : float
@export var wander_time_min : float
@export var wander_time_max : float

var parent : Node2D
var vp_rect : Rect2
var wander_change_dir_time : float

# Called when the node enters the scene tree for the first time.
func _ready() -> void:
	parent = get_parent() as Node2D
	vp_rect = get_viewport_rect()
	set_wander_change_dir_time()

func set_wander_change_dir_time() -> void:
	wander_change_dir_time = randf_range(wander_time_min, wander_time_max)

# Called every frame. 'delta' is the elapsed time since the previous frame.
func _process(delta: float) -> void:
	if (parent == null):
		return

	wander_change_dir_time -= delta

	if (wander_change_dir_time < 0):
		pick_random_direction()
		set_wander_change_dir_time()

	correct_dir_for_bounds()
	parent.position += direction.normalized() * speed * delta

func correct_dir_for_bounds() -> void:
	if (direction.x < 0 && parent.position.x < 0):
		direction.x = 1
	if (direction.x > 0 && parent.position.x > vp_rect.size.x):
		direction.x = -1
	if (direction.y < 0 && parent.position.y < 0):
		direction.y = 1
	if (direction.y > 0 && parent.position.y > vp_rect.size.y):
		direction.y = -1

func pick_random_direction() -> void:
	direction = Vector2.ZERO
	while (direction == Vector2.ZERO):
		direction.x = randi_range(-1, 1)
		direction.y = randi_range(-1, 1)
The exported variables in the script define a direction of travel, a speed and a minimum and maximum time before the item changes direction.
Private variables are used to store the parent node and the viewport rectangle (the bounds of the screen) and the time until we are going to change direction next.
In the _ready() function we set the parent and viewport rect variables and we call a function set_wander_change_dir_time() which randomly picks a time until the next direction change between the minimum and maximum values we’ve supplied.
In _process() we first make sure that the parent variable has been set; if it hasn’t we leave immediately. We then take delta (the time since the last frame) away from the time until the next direction change. This has the effect of counting it town to zero.
Once the time until the next direction change has dropped to zero or below, we call pick_random_direction() to pick a new direction and we also call set_wander_change_dir_time() to set the time to the next direction change.
The function pick_random_direction() is pretty simple, but it is setup to keep picking random directions until the direction isn’t (0, 0), which would cause the item to stop dead. The function will return one of eight directions: up, up right, right, down right, down, down left, left or up left.
Finally the code compares the direction we’re travelling in and how close we are to the edge of the screen in that direction and reverse the direction we’re travelling if we’re going to cross the edge and go off the screen.
Once all that’s done, we actually move the parent’s position.
Getting the Code
All our code for this year is available on our GitHub.
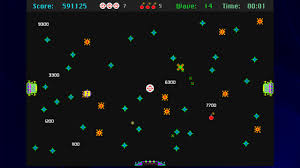
We started a new game this week, inspired by the classic Crystal Quest written first for the Macintosh in 1987. Below is a screenshot of a later colourised version:
In Crystal Quest, the mouse controls the velocity of a little round ship, you must avoid obstacles and enemies, while collecting all crystals in a level, before making your way safely to the exit to complete a level. As the levels increase, the action gets increasingly intense.
We started a new project called Crystal Quest and chose a new 2D Scene as out starting point. We looked at the layout of the 2D scene and examined the default resolution in the Project Settings.
We renamed the Node2D at the top of our new scene “Main” and saved it to a project folder called “scenes”.
Adding our Ship
We added a CharacterBody2D to the scene and renamed it to “Ship”. It required a CollisionShape2D, we provided one with a CircleShape of 16px radius. This defines the shape of our object, for collision purposes.
We still had nothing we could see. While 3D games require 3D models, 2D games require 2D sprites (images). While Godot has a bunch of simple 3D shapes built-in, there’s nothing equivalent for 2D sprites.
We took a look at a free, online, pixel editing tool called Piskel:
There we were able to generate a 32x32px sprite to represent the ship.
The ship sprite below can be downloaded, if desired:
We exported the file from Piskel as a PNG and saved it to a “textures” folder in Godot. Now that we have this image resource, we were able to add a Sprite2D under Ship. The ship was then visible.
The ship was still at the top of the screen, so we relocated it to the centre. We then added a script to Ship, saving it in a “scripts” folder.
The default script file for a CharacterBody2D is to provide platform character-like movement (left, right and jump, with gravity). We explored this, adding a StaticBody2D and CollisionShape2D the bottom of the screen to catch the Ship before it fell past the bottom of the screen. Once we understood what the old code was doing, we removed all the code from the _process_physics() function except the last line; move_and_slide().
Moving Something Controlled by Physics
When we move something in Godot controlled by physics, we effectively state what we’d like to happen by adding forces to the body, or setting its velocity, but once we call move_and_slide() Godot will take everything that’s happening from a physics viewpoint and take that into account, alongside what we asked for. For example, if we propel our body into a wall, it can’t move through the wall, regardless of how we set the velocity to be into the wall.
Following the Mouse
In the Ship’s script, in the _process_physics() function, we added a couple, of lines. The first finds the location of the mouse pointer and the second sets the ships location to the mouse’s location:
func _physics_process(delta: float) -> void:
	var mouse_pos : Vector2 = get_viewport().get_mouse_position()
	position = mouse_pos
	move_and_slide()
While this seems initially to work, it also allows us to pass beyond the StaticBody2D representing the bottom wall of our game area. Setting the position isn’t what we really want to do. Instead, we set the velocity of the ship to point towards the mouse. This looks like the following:
@export var speed_by_distance : float = 1.0

func _physics_process(delta: float) -> void:
	var mouse_pos : Vector2 = get_viewport().get_mouse_position()
	var ship_to_mouse : Vector2 = mouse_pos - position

	velocity = ship_to_mouse * speed_by_distance
	move_and_slide()
Note also that we’ve added an export variable to control the ratio of speed to distance. This gives the effect that we want, the ship always moves towards the mouse pointer, the speed of movement is proportional to how far away the mouse is.
Sometimes, depending on the mouse or trackpad used, the ship might oscillate wildly once it’s at the mouse pointer’s location (if the mouse pointer is changing very slightly all the time). We can prevent this with a deadzone, as follows:
@export var speed_by_distance : float = 10.0

const DEADZONE : float = 10.0

func _physics_process(delta: float) -> void:
	var mouse_pos : Vector2 = get_viewport().get_mouse_position()
	var ship_to_mouse : Vector2 = mouse_pos - position
	var distance : float = ship_to_mouse.length()

	if (distance > DEADZONE):
		velocity = ship_to_mouse * speed_by_distance
	else:
		velocity = Vector2.ZERO

	move_and_slide()
Now the ship won’t move unless the mouse pointer is more than 10px from the ship’s centre. Note too, that we’ve upped the ship’s speed_by_distance to 10.0.
Hiding the Mouse Pointer
The Operating System mouse pointer is distracting in our game. To hide it, we created a new Node2D as a child of Main and called it “MouseHider”. We added a new script as follows:
extends Node2D

# Called every frame. 'delta' is the elapsed time since the previous frame.
func _process(delta: float) -> void:
	var vp_rect : Rect2 = get_viewport().get_visible_rect()
	var mouse_pos : Vector2 = get_viewport().get_mouse_position()

	if (vp_rect.has_point(mouse_pos)):
		Input.set_mouse_mode(Input.MOUSE_MODE_HIDDEN)
	else:
		Input.set_mouse_mode(Input.MOUSE_MODE_VISIBLE)
This hides the mouse pointer if it’s inside the viewport (screen) and enables it again outside of that.
Getting the Code
All our code for this year is available on our GitHub.
It was time this week to finish up Roll-A-Ball. After the session, I did some additional tweaking. There are changes to the materials and camera position. I also added a splash screen, background sound, a font resource and a sound effect when a pickup is collected. Each level has an associated target time and you advance to the next level depending on whether you beat that time. There are four levels in total. At the end, depending on how you did, you get “You won” or “Game over” message and the option to restart. Here it is in action:
Collision
Although the pickups were technically just over the ground, and not intersecting it, we found previously that for many of us, when we ran, several of the pickups detected contact with the ground and deleted it. We “fixed” that by temporarily lifting the CollisionShape3D in the pickup up by 0.01m, but we returned to this to correct it.
Every node that collides with another, in our specific case Area3D and RigidBody3D, derives from the CollisionObject3D node and has a Layer and Mask property:
Layer is the collision layer that this node is in. Note that something can be in more than one layer.
Mask is the collision layer that we watch for collisions with. Anything not in these nominated layers will be ignored.
All we had to do to fix this, was to set the Mask for the Pickup to 2, and the Layer for the Player to 2. Now the pickup ignores all collisions except with the player (everything else, including the ground, being in Layer 1 by default).
Dynamic Level Loading
We wanted the GameManager to be able to load levels automatically. First we created our level, by adding a Node3D called “Level 1” to our Main scene and dragging all pickups into it. We then right-clicked and chose “Save Branch as Scene…” to make it a scene of its own. We then deleted the instance of the level from the scene, since we were going to have the Game Manager create it.
We added a new variable to Game Manager:
@export var level : PackedScene
PackedScene is the type used for a scene saved to disk. We were then able to assign our level scene to this variable in the inspector.
Next we had to add some code to get this level created. We added these lines at the bottom of the GameManager’s _ready() function:
var current_level = level.instantiate()
add_child(current_level)
This takes the level from the disk and actually creates nodes from it (instantiate()). We save that to a variable current_level and the use add_child() to actually add this to the current scene. When we ran, all was as normal, but looking at the remote tree, we could see that Level 1 was now a child of Game Manager.
We then created a few extra levels and tried loading them instead, by selecting them in the inspector.
Handing Multiple Levels Automatically
We then went back and decided to add support for multiple levels, having the game change to the next level automatically. We added these variables to the game_manager.gd script:
@export var levels : Array[PackedScene]

var current_level : Node3D
var current_level_index : int = -1
An Array, as you might remember from the first few weeks, is a variable that can store multiple values like a list. We then removed the last two lines from _ready() and created this function instead:
func load_next_level() -> void:
	if (current_level != null):
		current_level.queue_free()

	current_level_index += 1
	current_level = level[current_level_index].instantiate() as Level
	add_child(current_level)
This function:
Removes the current level, if there’s one loaded
Increments the level counter
Loads the next level and adds it to the scene
Note that it doesn’t know when to stop yet and will keep trying to load even when there’s no levels left.
Finally we had to call this function from somewhere. All that was needed was to edit _process() as follows:
If we’re at the start of the game, when the pickup_count is also zero, or we’ve just collected all the pickups i a level, the game will call load_next_level() and load a level.
We tested this and it worked.
Reseting the Player
We wanted to reset the player. This means returning it to its starting position and clearing any linear and angular velocity from the RigidBody3D. For a RigidBody3D, all changes to physics variables should happen in _physics_process().
To make this work, we first added three variables to player.gd:
var initial_pos : Vector3
var initial_rot : Vector3

var reset_requested : bool = false
The first two are to remember the initial position and rotation of the player and the third is a switch we can toggle to true when we want to trigger a reset.
To remember the initial position and rotation, we just needed to add these two lines to _ready():
	initial_pos = position
	initial_rot = rotation
Then in _physics_process() we change it to read as follows:
If reset_required is true, then we put the ball position and rotation back to their original values and set both linear_velocity and angular_velocity to zero. Finally we set reset_requested back to false so that we won’t run this code again until it’s needed.
To actually trigger this, in game_manager.gd, we added a variable for the player:
@onready var player: RigidBody3D = $"../Player"
And we updated _process() to also reset the player:
To handle running out of levels, we updated our load_next_level() function in game_manager.gd to check that there actually was another level to load and to return false if there wasn’t. We changed the return type to -> bool first:
func load_next_level() -> bool:
	if (current_level != null):
		current_level.queue_free()

	current_level_index += 1
	if (current_level_index >= len(level)):
		return false

	current_level = level[current_level_index].instantiate() as Level
	time_remaining = current_level.target_seconds
	add_child(current_level)

	return true
This uses the len() function to check the size of the level array and if there isn’t another level to load return false.
Now the game doesn’t crash when it runs out of levels. Finally we added this logic to game_manager.gd’s _process() to hide the player once we run out of levels:
This week we added some pickups to our game, some signals (Godot’s term for messages or events) to indicate their creation or collection, and a game manager to keep track of everything.
Pickups
To create our pickups we created a new scene with an Area3D as the root node. An Area3D, in conjunction with a CollisionShape3D, allows us to define an area where bodies entering and exiting this area can be detected.
We paired this Area3D with a cylinder CollisionShape3D and a cylinder MeshInstance3D, both about the same height as our player ball.
We created a new StandardMaterial3D resource for our pickup and used the checker texture again, this time scaled to appear multiple times on the object, to give it some visual interest.
Signals
Signals are Godot’s way for nodes to tell other nodes when something’s happened. There are many built-in signals in the existing nodes and you can easily define others yourself.
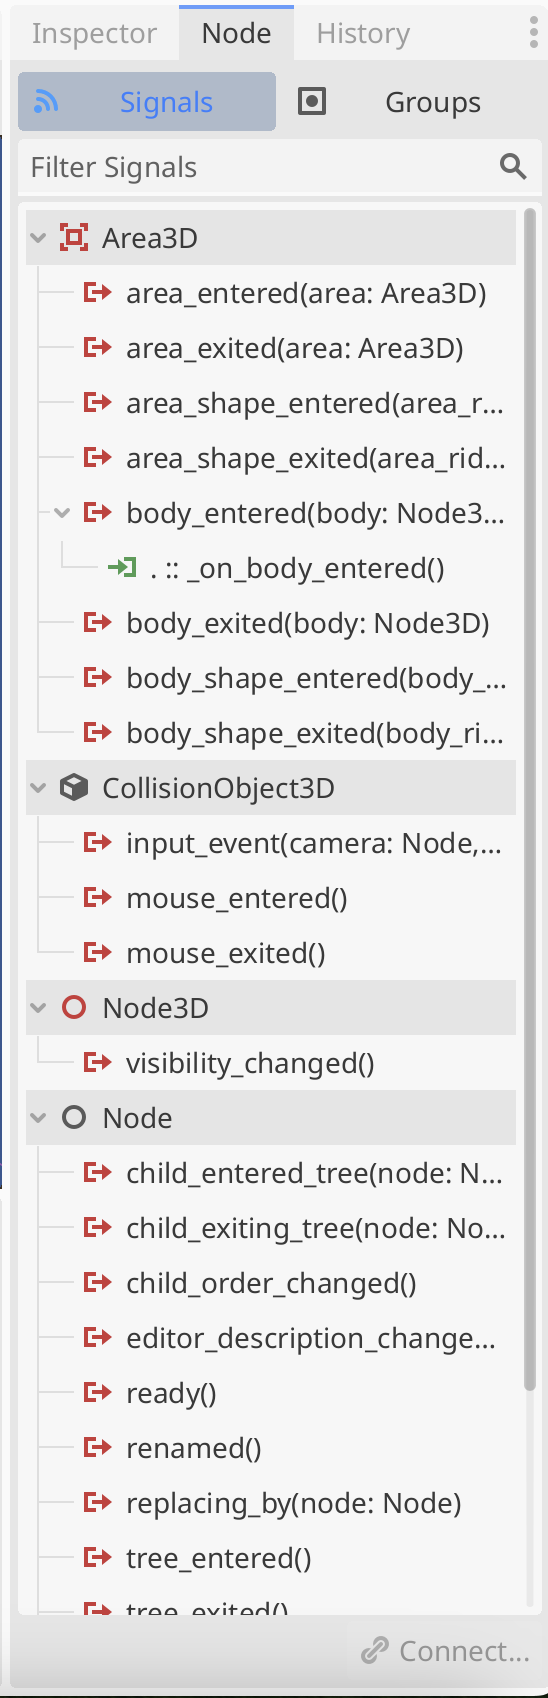
To demonstrate, we created a new script attached to the root node of the pickup scene, and with this same node selected, we then went to the tab underneath the Inspector tab, a tab called Node.
This shows the list of signals on this node available to connect to. We right clicked on body_entered() and connected it to the pickup script, creating a new function called _on_body_entered() in that script.
We just set the following code there to show that we’d detected something entering the area (as defined by the collider):
We created an instance of the pickup in our Main scene by using the “Instantiate Child Scene” button at the top of the scene view, and selecting the pickup scene:
We moved this pickup off centre and tested our code by playing it and rolling the player into the pickup. The message “Player entered the area” was printed to the Output window.
We updated this code by adding queue_free() at the end of the function:
This function means “please queue this node (and all it’s child nodes) for deletion at the end of this frame”. When we test again, we see that rolling the player into the pickup now makes the pickup disappear.
A Handy Way To Handle Events
In Godot connecting a node to another’s signal normally means that the first node has to have a reference to the second.
There’s a nice pattern that simplifies things. We make a central place that holds the signals, nodes that want to “emit” (or cause the signal to fire) and nodes that want to know when the signal was emitted just need to know about this central place, they don’t need to know about each other.
Godot has a system whereby a script can be set to autoload when the game starts, it doesn’t have to be connected to a node in a scene. Even more convenient, it will declare a global (visible everywhere) variable for this class instance that everyone can easily access.
This might sound complex, but it’s super easy in practice. We created a new script called events.gd. The contents were as follows:
extends Node

signal pickup_created
signal pickup_collected
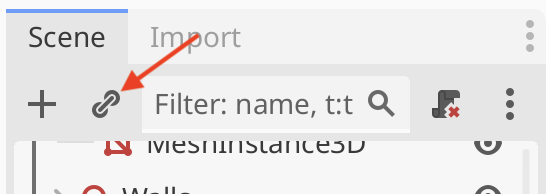
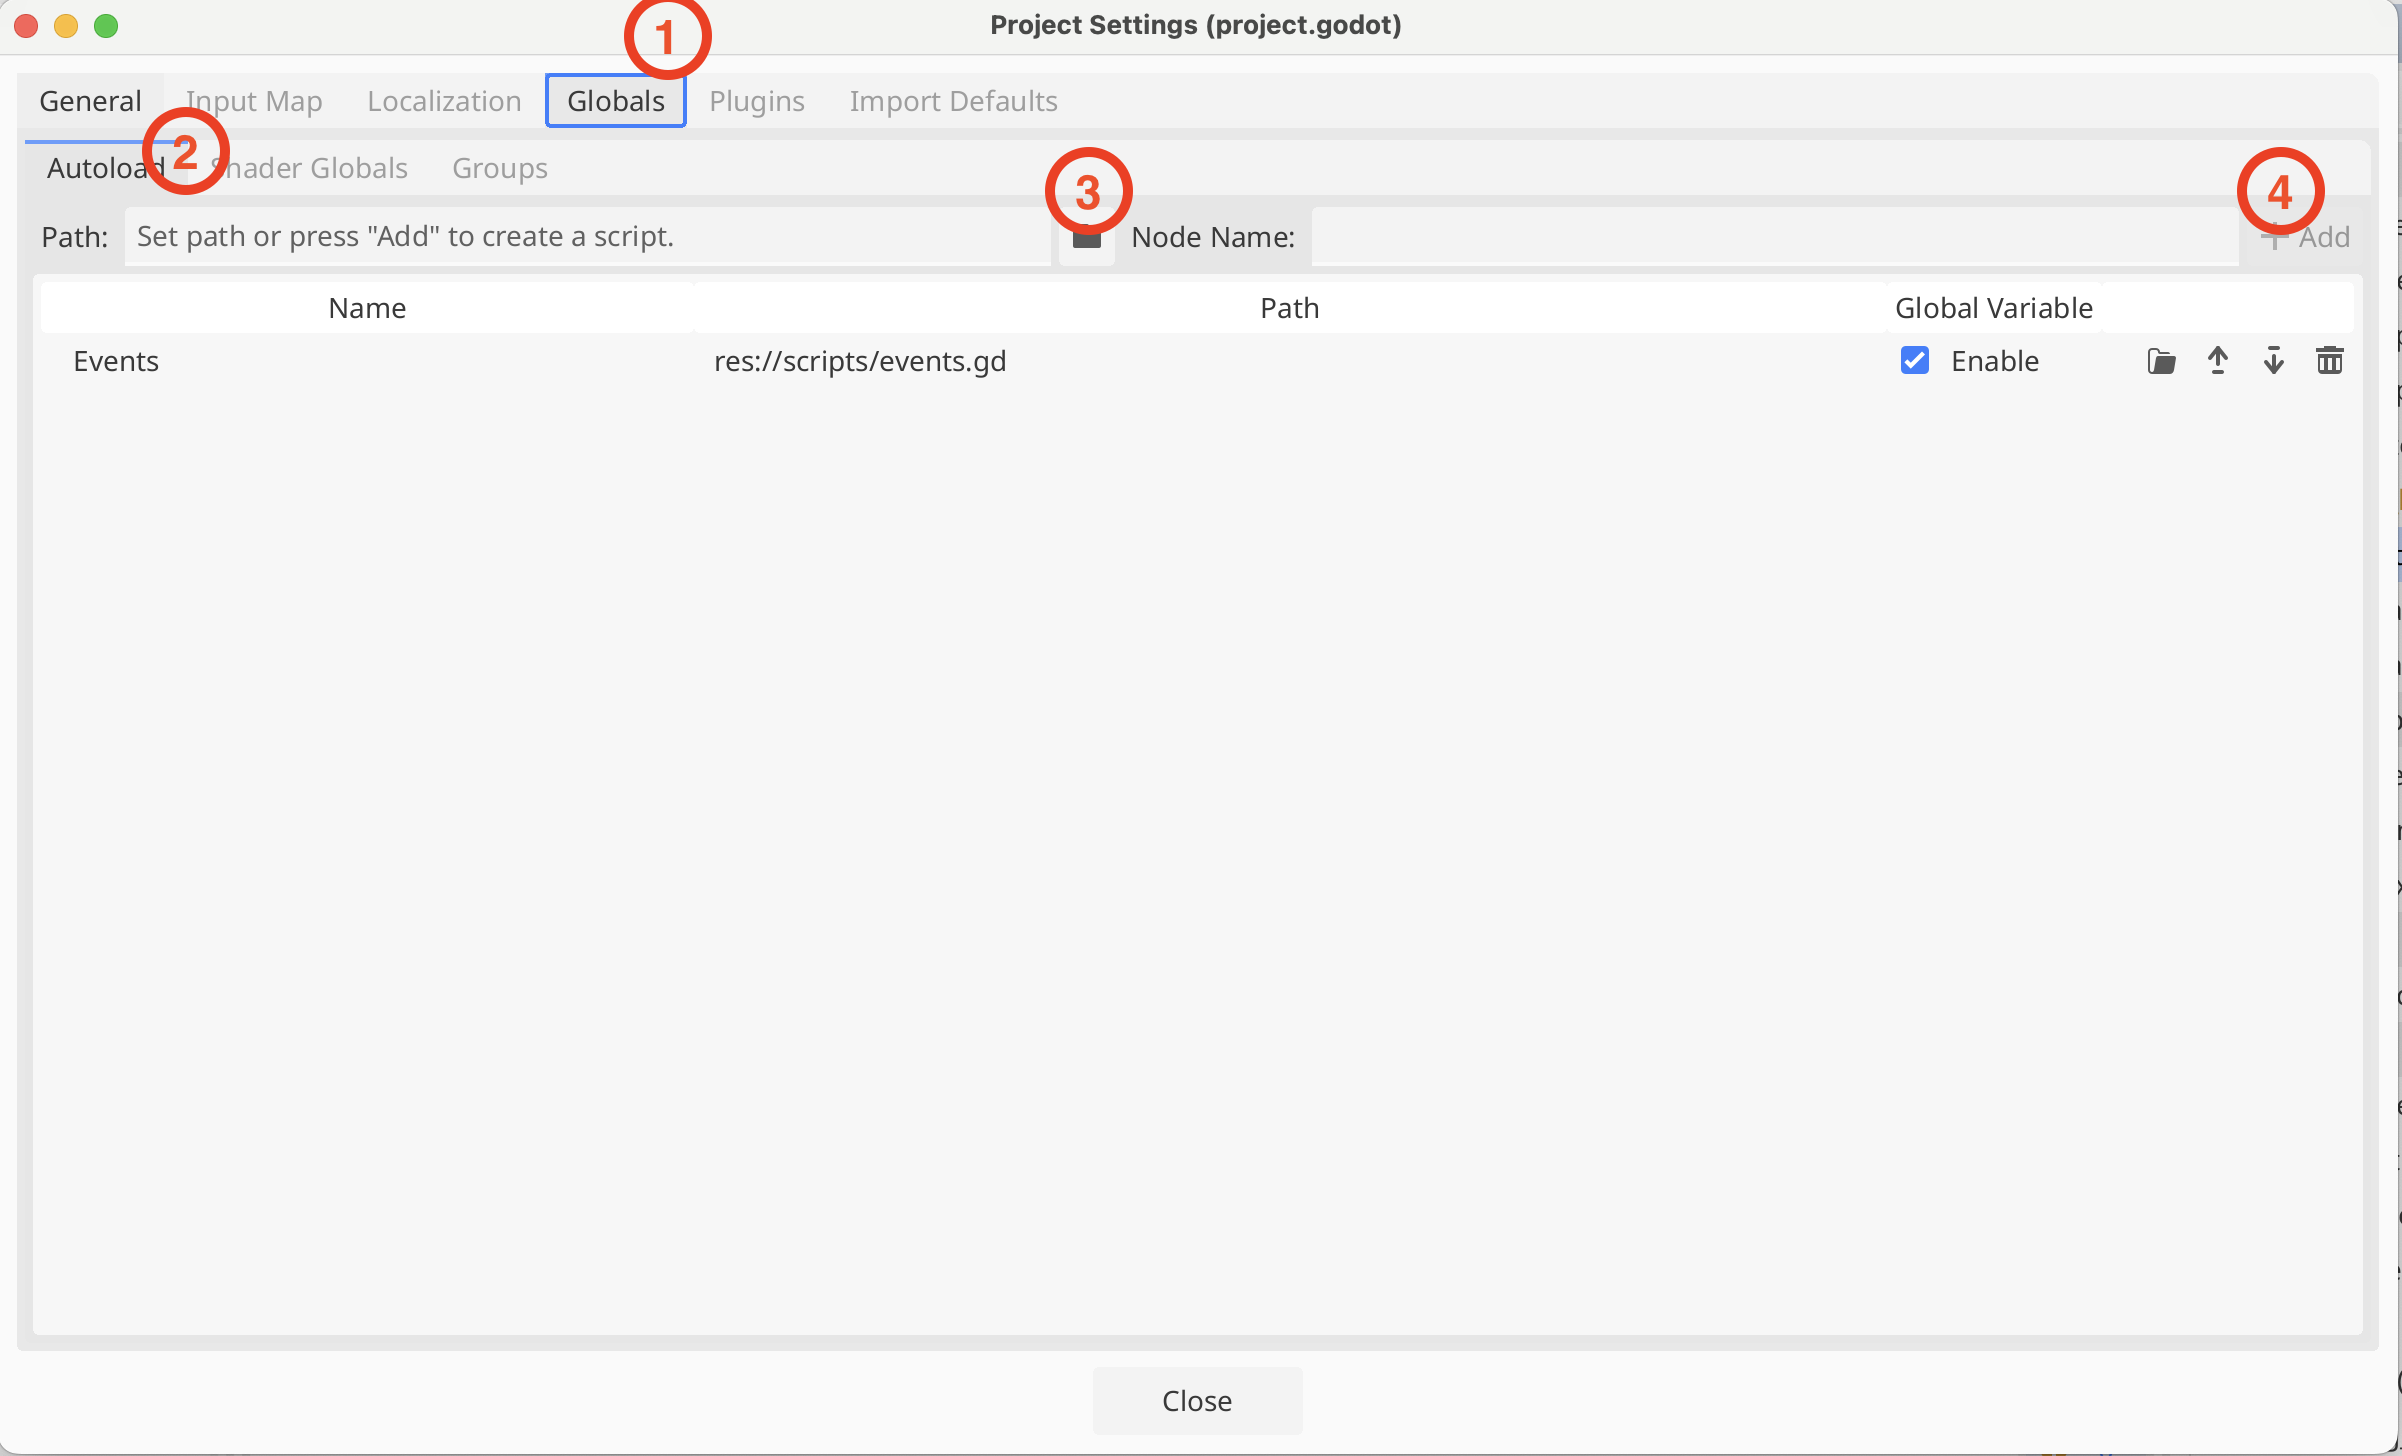
We then went to Project Settings | Globals and under Autoload, selected the events.gd script and pressed “+ Add”
Firing the Events from Pickup
In pickup.gd we added two lines to our _ready() and _on_body_entered() functions to cause the appropriate signals to be emitted when the pickup was created and collected respectively:
See that we’re using the global variable “Events” here to access the signals.
We tested that we could read these signals by putting code into Player, but as this was just for quick testing, we won’t replicate it here.
Game Manager
We created a new Node3D in the Main scene, called it Game Manager, and created a new script attached to it.
In this script we added two variables to the top of the class:
extends Node3D

@export var pickup_count : int = 0
@export var game_time : float = 0
One is an integer variable to keep track of the number of pickups. The second is a float variable that tracks how long the game has been running for. Both have “@export” at the start, this means that they both appear as variables in the Inspector, which is handy.
For the pickup count, we first added two new functions, to respond to the creation and collection signals respectively:
All these to is increase or decrease the pickup_count variable. We need then to connect them to the signals, so that they get called if the signal is emitted. We do that in _ready():
For game_time, all we have to do is keep adding the delta values available in _process(), which represent the time in seconds since the last frame was drawn, together:
To see these running we ran our game and in the Scene view, switched to the “Remote” tree. The remote tree is the tree of the game that’s running. Looking at the Game Manager node in the inspector, we could verify the variables were working as expected.
Getting the Code
All our code for this year is be available on our GitHub.
We left off last week with two walls. This week we copied one of those to create a third. It’s new transform position is (1.05, 0, 0) and it’s transform rotation is (0, 90, 0). That rotation represents 90 degrees around the vertical axis (y-axis).
It was immediately clear that we ideally needed to close the gaps at the corners where the walls meet.
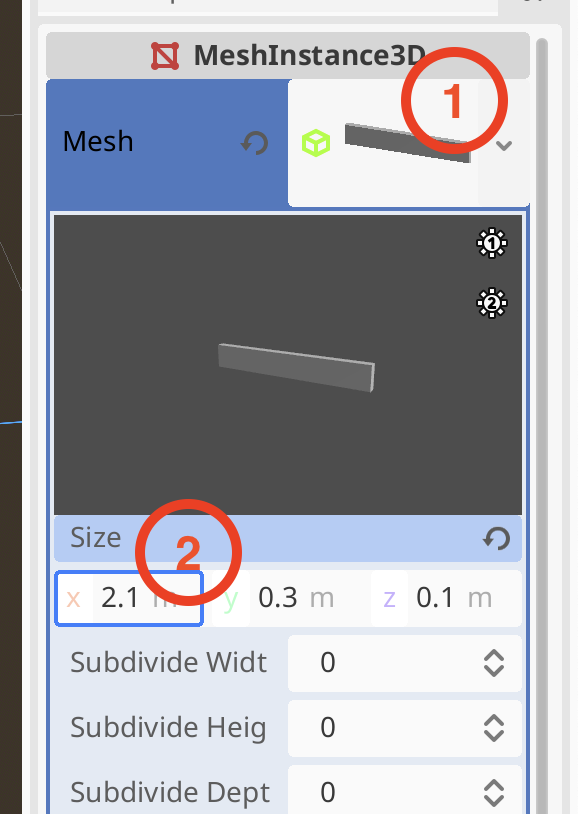
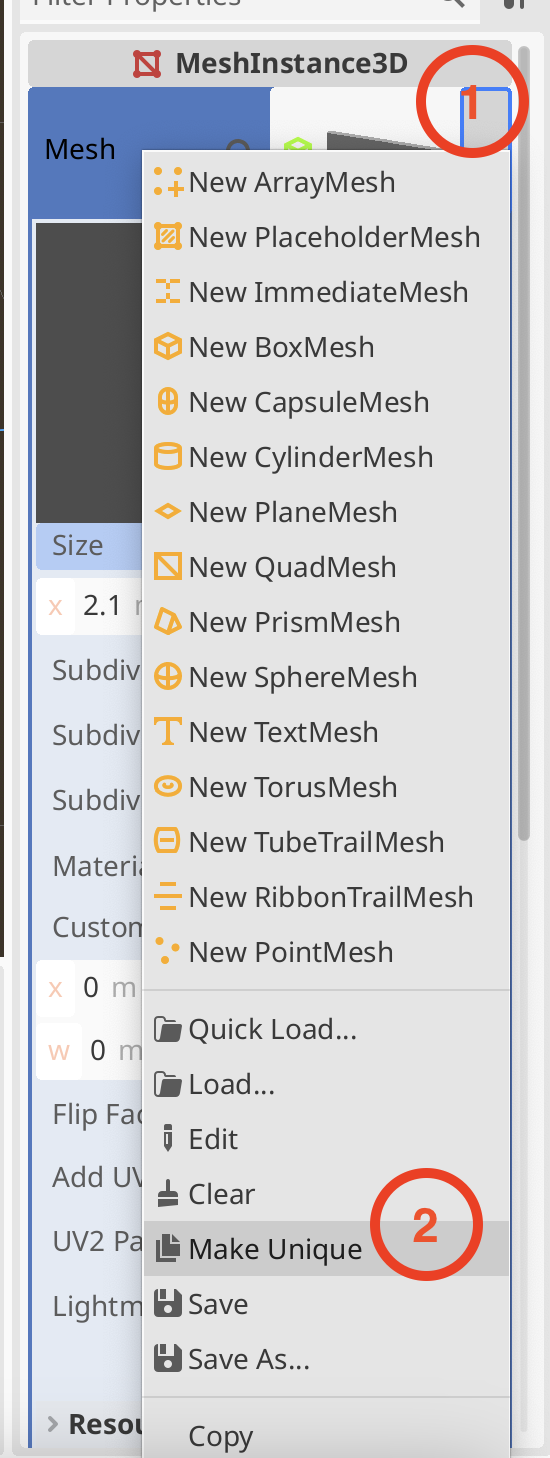
To adjust the size of the third node, we select its MeshInstance3d child node. To adjust the mesh size, we click on the picture of the mesh in the inspector to see it’s properties and then adjust the size to 2.1m:
We can see all the walls change size. This is because they are all using the same mesh resource. We set the size back to (2.0, 0.3, 0.1) first. Now, we can make this mesh resource separate to the one used by the other two walls. Click on the drop-down arrow next to the mesh picture and then select “Make Unique”
Now when we change the size to (2.2, 0.3, 0.1) it doesn’t change the other two walls.
Finally we copy this third wall and move it to (-1.05, 0, 0). Now we have four walls.
Materials
We created a wall material in a very similar fashion to how we created the original ground material and assigned it to all four walls.
We also created a new material and assigned it to the ball. We gave it a strong red colour in ‘Albedo’. Because the ball was going to be impossible to tell if it was rolling, being all one uniform colour, we decided to apply a checker board texture to it. Here’s a texture we used today:
We placed this in a textures folder in the FileSystem and then assigned it to the Texture slot under ‘Albedo’ in the ball material. That gave the ball a checkered look.
We also looked at some of the other most commonly used material settings, including roughness, metallic and transparency.
Turning the Ball into the Player
We wanted to create a Player object and make it it’s own scene. We renamed “ball” in the Main scene to Player and right-clicked on and chose “Save branch as scene”. This created a new scene called “Player” which opened a new tab in the centre of the editor.
The Player node still had the transformation from the main scene (lifted up along the y-axis). We removed this and saved the Player scene. Switching back to Main we could see the Player node was now cutting through the ground so we moved it upwards again. Note that changes in the child scene were reflected in the parent scene, but not the other way around.
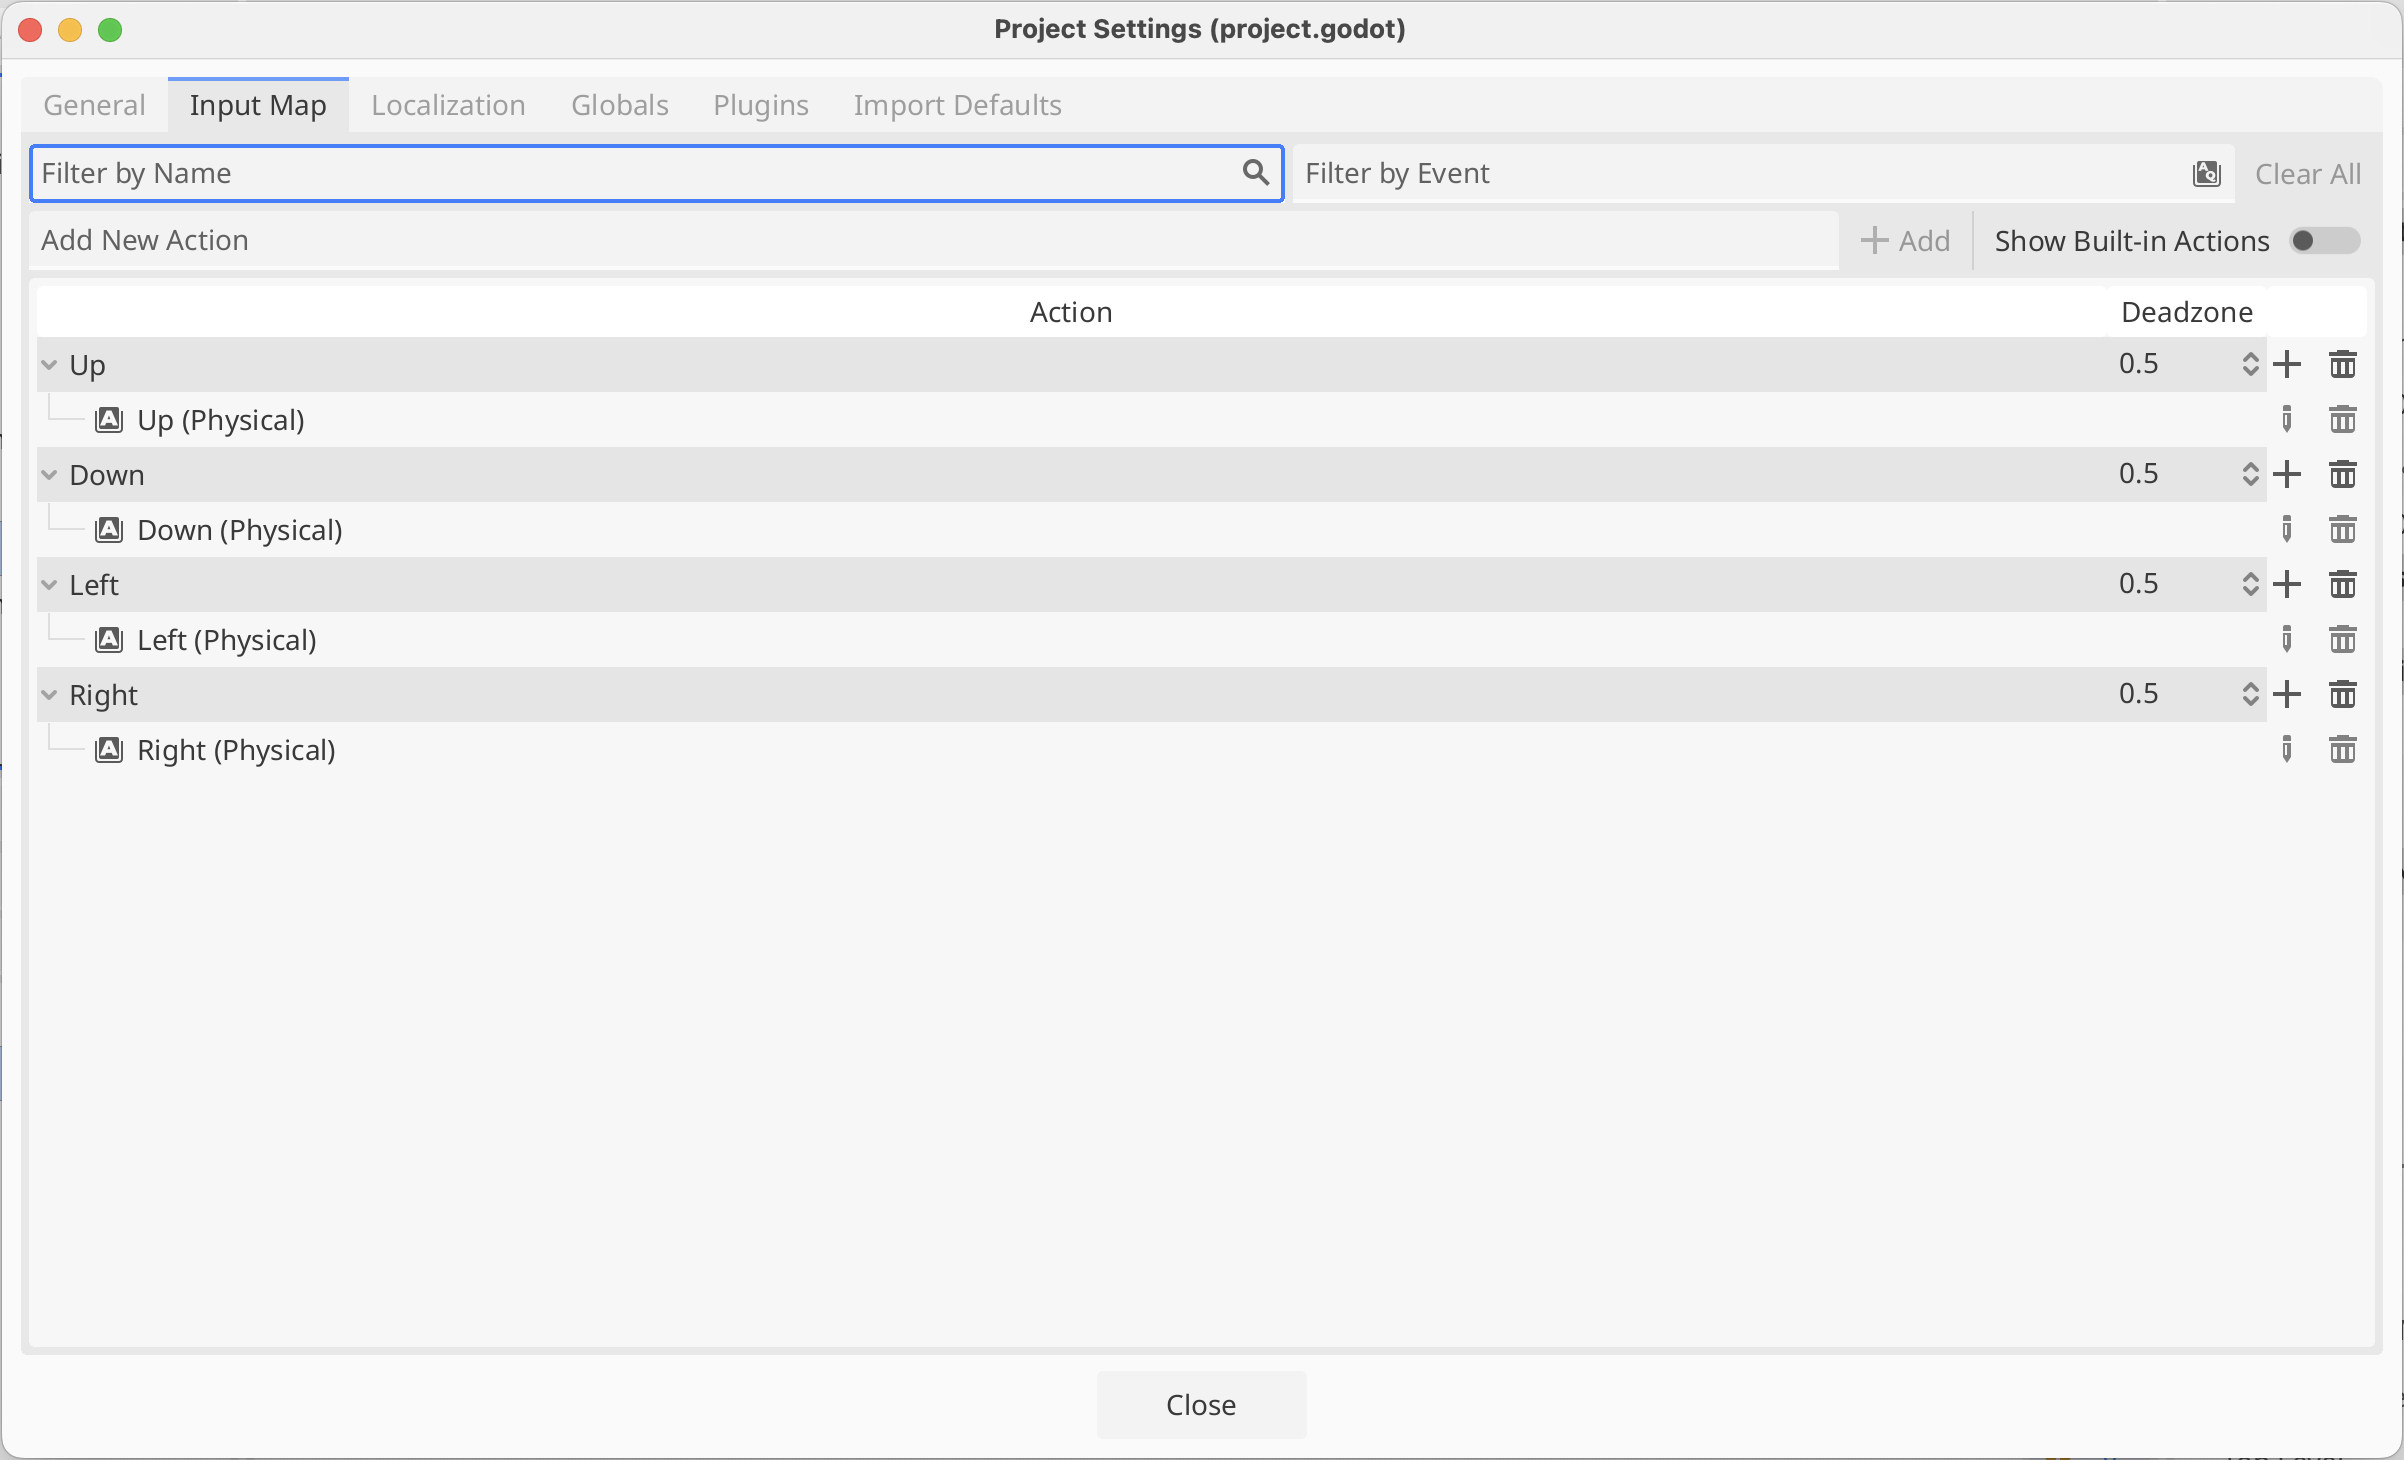
Creating an Input Map
To capture user input, we set up some Input Actions. Under the Project menu, we selected Project Settings and then selected the Input Map tab:
Where it says “Add New Action” we typed the name of each action in turn (Up, Down, Left and Right) and pressed the Enter key or the “+ Add” button to create it.
We then selected each action in turn and pressed the + at the right hand side of it’s row. We then just pressed the key we wanted for that action and closed the dialog to confirm the selection. Above I’ve chosen the arrow keys, but others chose WASD. Either is fine.
Making the Player Move
We next want to make our player move in response to input.
First we created a scripts folder in our file system
In the Player scene, we selected the Player node and pressed the Attach Scripts button. We then change the path on the dialog that appeared to make sure to place our new script in the scripts folder (instead of the scenes folder).
Our script automatically opens in the editor. It extends RigidBody3D, which is the type of the existing Player node. It has two empty functions, _ready() and _process(), by default. _ready() is called when the object is first created and _process() is called every time the scene is drawn.
We’d like to apply physical forces to our object, specifically torque, which is a turning force. There is another function where we should put code that interacts with the physics system: _physics_process(). Here’s what that empty function should like:
This is a function that takes one parameter called “delta” which is a float. A float is a number with a decimal point. The “-> void” means that this functions doesn’t send back a value to the code that calls it. You must have at least one line inside a function in GDScript; “pass” doesn’t do anything, it’s just there to prevent the function from having no lines in it.
These are the names of the input actions we’ve already defined. This is going to return a Vector2 value which we’re storing in the variable called “input”. As a Vector2, this has an x and a y value. The x value will vary between 1, -1 and 0 depending on whether “Up” or “Down” or neither are being pressed. Similarly the y value will vary between 1, -1 and 0 depending on whether “Left” or “Right” or neither are being pressed.
We can now actually apply torque (turning force) to our ball:
The function apply_torque() is part of RigidBody3D and expects a Vector3 which indicates how much to apply around the x, y and z axes respectively. We don’t want any applied around the y-axis as this would just spin the ball around the vertical axis and not roll it along he ground. So we make a Vector3 where the “Up”/”Down” actions add torque around the X-axis and the “Left”/”Right” actions add torque around the z-axis. When testing, because of our camera angles, we find the “Left”/”Right” is backwards to what we want, so we use – to flip the direction.
The ball now rolls! Too fast and there’s a problem with colliders, which we need to fix – the wall colliers are the wrong size, but once that’s corrected we have something not too bad.
Getting the Code
All our code for this year is be available on our GitHub. Please see Creators – Week 4 for more details.
We continued with Learn GDScript from Zero, completing lessons 18-23. There are four remaining lessons, which I encourage you to explore in your own time, we won’t be covering them in Creators.
When we return after the Halloween break, we will install Godot and start our first game.


