
This week the creator crew learned some of the most important things for coding and we managed to build quite a useful app while we were at it! For those that missed this week, we handed out two sheets which … Continue reading
This week the creator crew learned some of the most important things for coding and we managed to build quite a useful app while we were at it! For those that missed this week, we handed out two sheets which … Continue reading
Today in Creators, we built on our HTML example of last week and added in some Javascript so we could start coding. We then learnt how to separate our javascript into different files and folders. At the end of all … Continue reading
Understanding the internet! There was great excitement in CoderDojo Athenry as we got started in the creators group. This week we started off by chatting about the internet and talked about how it actually works – we learned: That “Servers” … Continue reading
Today the Bodgers and Creators were on a hiatus so Mark took a few folks and covered some web development – with a particular focus on Javascript.
We reviewed:
We then spent the rest of the time playing with Javascript, using the p5.js framework to do some graphical stuff. We learned about:
We built quite a few cool things to draw interesting patterns and shapes and some of you came up with some mad patterns. The one we ended up with is shown below. Have fun playing with javascript and I’ll be really interested to see what you come up with! Also try to think of ideas and if you come up with something interesting we can have some fun trying to build it!
This week we did a little code to finish our engine and spent the rest of the time working on our own platformer games using it. The code changes we made to last week’s game engine were:
Hit Boxes:
Fixed the platformer so that our character doesn’t get snagged on edges by its whiskers. This we did by learning about hitboxes. The hitbox is just a costume which is rectangular in shape. Before we do our animation, we switch to the hitbox costume and after we switch back to the costume we want.

Head Bumping:
Fixed the platformer so that we can bump our heads against the platforms without popping up. This was by adding a couple of lines to the “stay above ground block” sprite to move down if we are touching the ground while moving upwards.
The entire code for the platformer is below:
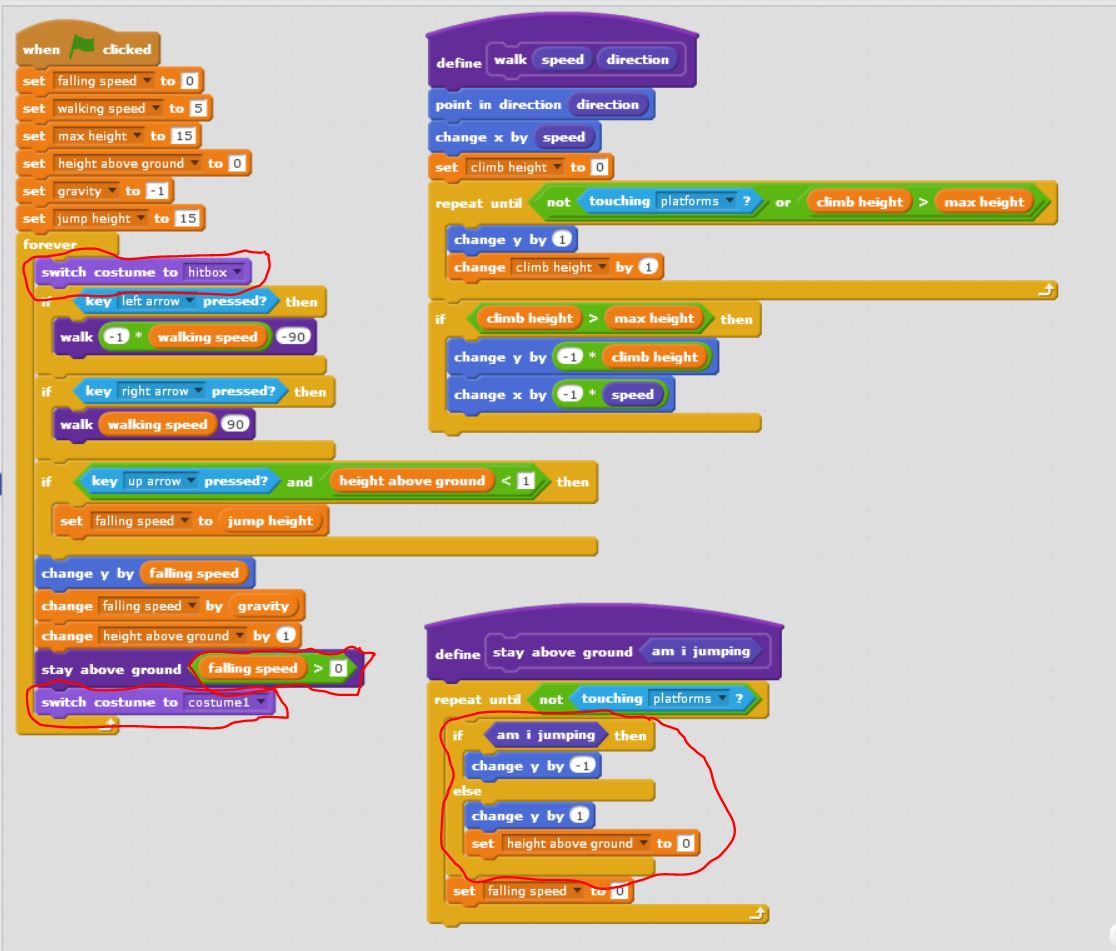
DOWNLOAD THE FULL PLATFORM ENGINE CODE HERE!!!
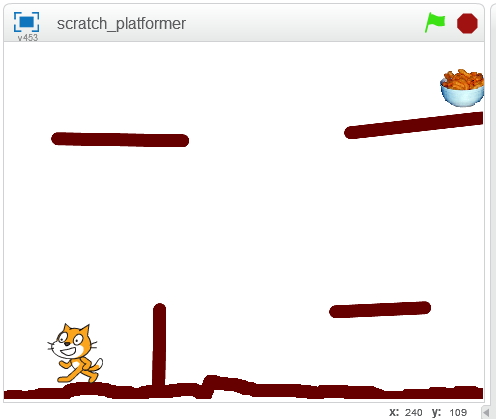
Example Game: Mentor Dash
Finally Mark showed an example game pulling all the elements in together – “Mentor Dash”. It has the same code as we covered, but adds a bit of animation, level changes, sound and some sillyness.

There were lots of brilliant ideas from the ninjas on their own games .. looking forward to seeing what you can do!
This week was quite busy in the Advancers group.
Talk on Coolest Projects
Platform Engine
We started a platform Engine and got most of the code done – next week we’ll finish up the engine (not much code, honest!) and see what it would take to make it into games. A Platform Engine is something that’s useful in lots of types of games or interactive adventures – be they mario-style or escape-room style, etc. Once we have this platform engine done, we can easily apply it to other cases. Think about ideas for platformers for your coolest project!
Things we got working:
Things we didn’t get working (yet):
Next week we can look at the above to see how we might do it, and also what it might take to make it look pretty, add a loading screen, etc.
The full code for today is below (click to view large):

Code from Week 1
We will finish this next week and make a game out of it! You can download the project from here
Click “Run Pen” followed by “Edit on Codepen” to view the game and play with the code. At this stage, codepen has been working well for us so I think it’s a really good idea for you all to register for an account on codepen. This will allow you to “copy” my sketches so you can save your versions of them online. As we get more advanced (or if the network is down), we will start working locally with Atom again but this is good for us.
Today we started writing our first javascript game. We thought for a bit about which game might be good to start and decided on a version of the hit game Flappy Bird. We got quite far before people started to tire!
It will take another session to finish the game – we might do this next week, or take a break from javascript and come back to it in the new year.
Writing the Game
The first step was to plan how we would do the game. Like all projects, we build it up in steps. These steps would work to build a basic flappy bird:
Step 1: Draw the sky
Step 2: Draw the ground
Step 3: Draw the bird
Step 4: Make the bird fall
Step 5: Make the bird stop falling when it hits the ground
Step 6: Make the bird jump/flap when the mouse pressed / screen touched
Step 7: Add pipes as obstacles with a random gap
Step 8: Move the pipes towards the bird
Step 9: When the pipes go offscreen on the left, make them appear on the right again
Step 10: Check if the pipe is hitting the bird and restart of it does
Step 11: Add a distance label (how many pipes have we passed)
Step 12: Add sound, improve the graphics and keep a “high” score
We got as far as Step 6. The next 6 steps would need another week to cover. I’ve added comments to the code so you can see which parts of the code relate to which steps. If you have your own codepen account, it might be a good idea to attempt to do the rest of the game – you might get stuck but that’s part of the fun!
New Concepts we covered today:
Today we continued our look at P5 and javascript. We mostly practiced what we learned last week.
This time we did our work online using the awesome website “codepen” rather than a local text editor. This website is a place for web developers to play with web code and share it with others. Using it allowed us to work without getting bogged down with install problems on people’s PCs. It is great for smaller sketches, but if you want to develop something really big like a complex game it will be much easier to use a local text editor like we did last week. If you get a chance and have an email address (or your parent has one), sign up for a codepen account. This will allow you to create and share your own sketches – I’ll link any and all of them on the coderdojo athenry website!
Today we basically just fooled around with it and tried to draw our own picture just with code. We mostly drew robots as they are fairly easy to draw with rectangles and ellipses!
What we covered:
We played about with the all the above to draw a (pretty poor) robot with flashing eyes that fires lasers – the sketch we did is below. Play around with this and build on it to do something cooler!!
This week we tried something different with some text based coding. We learned that for text bas ed coding, we need a good text editor. The text editor we picked was called “Atom” as it’s a free, powerful text editor that works on Mac, Linux and Windows.
Unfortunately.. with some network and pc problems.. it took longer than I hoped to get things installed on people’s PCs, but even then we managed to make a great start on some code and actually built some quite cool stuff.
For anyone that missed last week.. it would be great if you could run through the steps below and we will be ready for the next stage!
 This week at Advancers, we took some time out from programming to review image editing, and play around using the highest quality free image editor in the world, the GNU Image Manipulation Program, also known as “The Gimp“.
Mastering Gimp, or a tool like it, is essential to be able to produce the images you will need for high quality games. It’s also very useful for touching up photographs, chopping people’s heads off and sticking them on others, etc!
After taking some time to get it installed on most people’s laptops, we reviewed the most important parts of this incredibly powerful program:
Installing Gimp
On windows or Mac, GIMP can be installed by browsing to https://www.gimp.org/ and selecting “Download”. On linux it can be installed from the app store/package manager on your distribution. Note: some people last week had Chromebooks and I mistakenly told them that gimp wasn’t available on those devices – I since checked and it is available, though as it’s a web-app it is not as good as a locally installed version – check out this video for instructions on installation: https://www.youtube.com/watch?v=NtdcukXILJg . It is also not quite free too since you need to pay to save your files. Click read more for more details!
